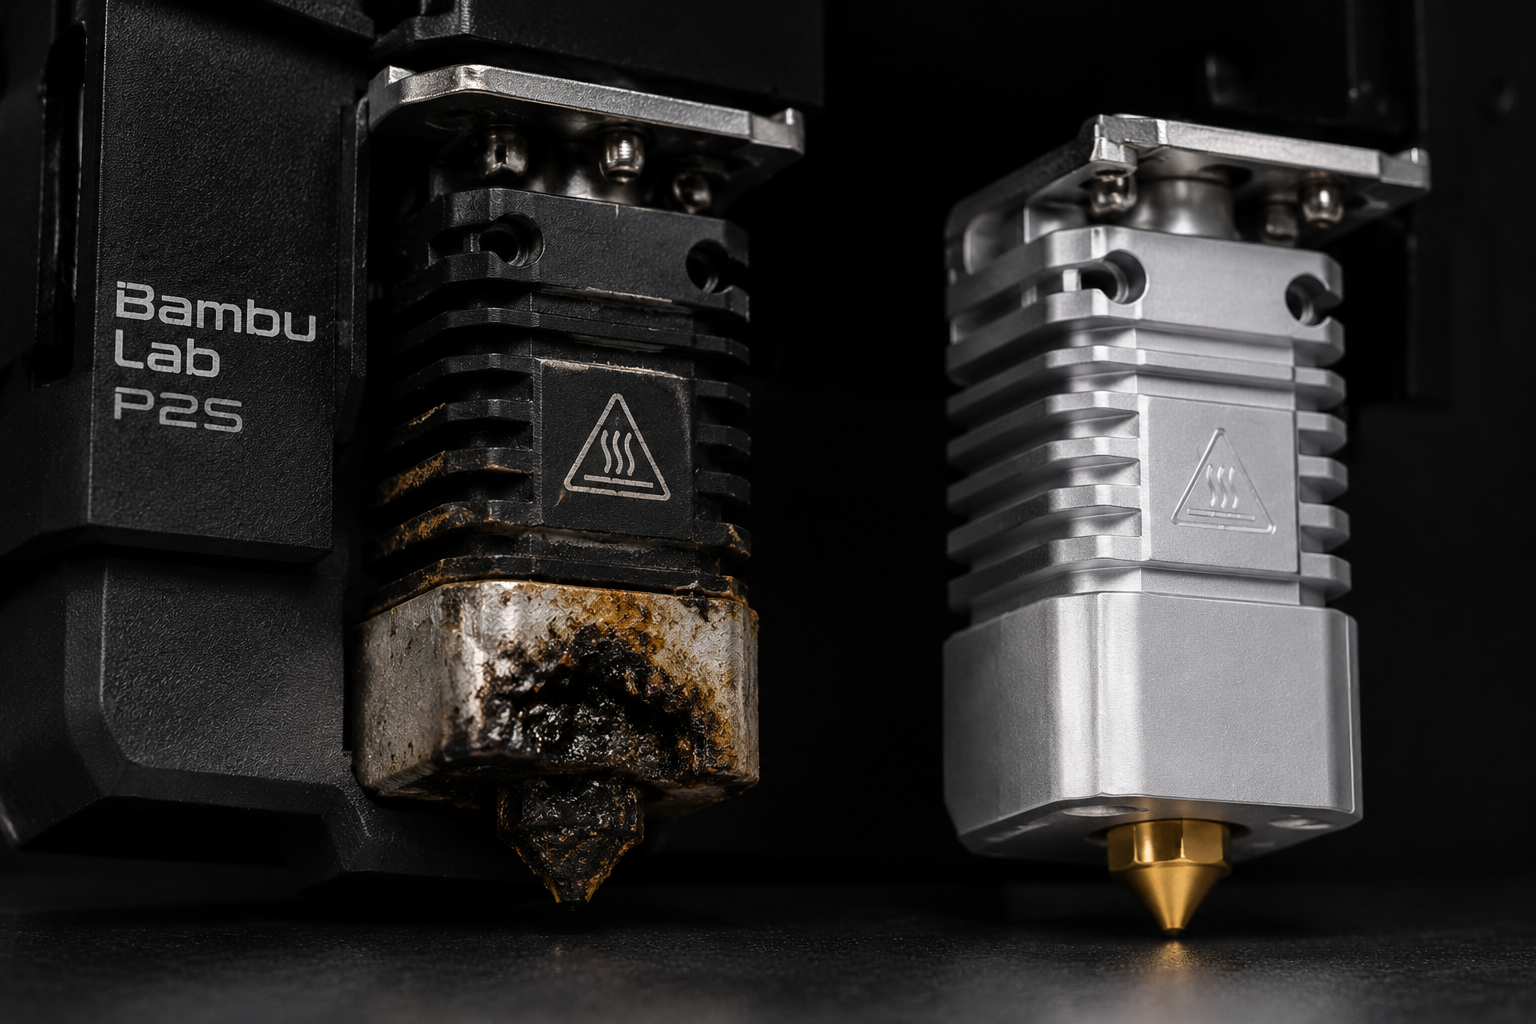
Is your Bambu Lab P2S clicking, under-extruding, or showing a ‘Nozzle Jam’ error? This guide walks you through diagnosing a clogged or dead printhead, explains why it happens, and shows you exactly how to replace the hotend—saving you the cost and wait of professional repair.
What’s Happening — Symptoms in Detail
Your printer was working fine, then suddenly it stopped printing correctly. You hear a rhythmic clicking sound from the extruder as the filament skips. The printer displays error code ‘Nozzle Jam’ on the LCD, or you see ‘Extruder temperature abnormal’ when you try a preheat cycle.
Some users report a grinding noise when the filament is loaded, or the print surface starts fine but after a few layers the filament stops coming out altogether. Others see a burned, brown residue around the nozzle tip, or the nozzle appears dented or bent.
The problem often appears suddenly—right after a failed print, a filament tangle, or after printing with abrasive materials like glow-in-the-dark or carbon-fiber filament. It can also develop gradually, with prints getting weaker and more stringy over several weeks.
Progression varies: In some cases the jam is temporary and can be cleared; but if the printhead is physically damaged, the problem will only worsen until the hotend is replaced.
How to Diagnose the Problem Step by Step
Visual Inspection – Nozzle & Heater Block: Remove the silicone sock and look at the nozzle. Normal: Nozzle tip is smooth, no gunk, and the heater block wires are intact. Abnormal: Nozzle is dented, clogged with charred filament, or wires are frayed/melted.
Cold Pull Test: Heat the nozzle to 200°C (for PLA), then let it cool to 100°C. Pull out the filament sharply. Normal: You see a perfect negative impression of the nozzle bore. Abnormal: The filament comes out with a rough shape, or there’s a dark spot indicating a clog deeper in the hotend.
Extruder Gear Check: Remove the filament and look at the extruder gears. Normal: Gears are clean and turn freely. Abnormal: Gears have filament shavings, worn teeth, or you can’t turn them by hand without resistance.
Heater Resistance Measurement (advanced): Use a multimeter set to ohms. Probe the two wires of the heater cartridge while disconnected from the mainboard. Normal: Reads approx. 4.7 ohms (for a 40W heater). Abnormal: Reads infinite (open circuit) or 0 (short circuit).
Thermistor Check: Set multimeter to ohms, probe the two thermistor wires. Normal: Reads ~100k ohms at room temperature. Abnormal: Reads any other value or infinite. This indicates a dead thermistor, causing temperature errors.
Why This Happens — Root Cause
Your Bambu Lab P2S uses a direct-drive extruder with a brass nozzle and PTFE-lined hotend. The most common failure is heat creep, where heat travels up the heater block and softens filament above the melt zone. This swells the filament and jams the cold end.
Heat creep is accelerated by:
- Printing too hot (above 230°C for PLA) for long periods.
- Inadequate cooling fan (the hotend fan must spin at 100% during printing).
- Dust or debris blocking the fan intake.
- A bad thermal paste application between the heatsink and heatbreak.
Physical damage can also occur: a crash into the print bed (e.g., after a hotend leveling failure) bends the heatbreak, crushes the nozzle, or breaks the wires to the heater cartridge. Part numbers for replacement: The heater cartridge is a standard 24V 40W cartridge; the thermistor is an NTC 100k; the heatbreak (the stainless steel tube) is part number BP-HEATBREAK-001.
Age and wear: After roughly 500 hours of printing, the PTFE tube inside the hotend degrades and creates friction, leading to clogs. The nozzle itself wears down, especially with abrasive filaments, changing the hole diameter and flow rate.
Can You Fix It Yourself?
- Difficulty Level: 3 out of 5 (moderate) – requires handling small screws and delicate wires.
- Time Required: 45 to 75 minutes for first-time replacement.
- Skill Level Needed: Basic mechanical skills – no soldering required if you replace the entire hotend assembly. You will need a hex key set (1.5 mm, 2.0 mm) and a small Phillips screwdriver.
- Risks:
- Breaking the thermistor wires if you overtighten the mounting screw.
- Stripping the heatblock screws.
- Installing the heater cartridge backwards (polarity doesn’t matter, but physically it must seat fully).
- Tools Required:
- Hex key: 1.5 mm and 2.0 mm (for fan screws and hotend mounting).
- Small Phillips screwdriver: #0 size.
- Tweezers or needle-nose pliers for plugging connectors.
- Multimeter (for heater/thermistor testing).
- Cleaning alcohol and a brush for old thermal paste.
Cost Breakdown — DIY vs Professional
- DIY Part Cost: The Upgraded Hotend Kit Bambu Lab P2S 0.2… (Part #1) is available for $2.38 and includes a complete replacement heater block, nozzle, heatbreak, and thermistor. Note: The ‘Wax Stamp Seal Wax Print Thick Copper…’ (Part #2) is not for this repair. The 3D Printing Pen Nozzle Printer Head 1… (Part #3) at $3.28 could be used as a spare brass nozzle, but it’s designed for pens, not the P2S hotend – do not use it unless you verify thread compatibility (M6? M7?).
- Professional Repair Cost: A typical 3D printer repair shop charges $50 to $100 for parts and labor. Some shops charge a flat $35 diagnostic fee even if you don’t proceed.
- When to Skip DIY: If you are uncomfortable working with mains-voltage heaters (24V is low, but still carries current), or if your printer’s mainboard or wiring harness is also damaged (e.g., a melted connector), professional help is wiser. If you break the thermistor wire, you may need to resolder – that’s a higher skill level.
Repair Process Overview
Power off the printer and unplug the power cord. Allow the hotend to cool completely.
Remove the front fan shroud by unscrewing the two 2.0 mm screws on the fan housing. Gently unplug the fan connector from the mainboard.
Remove the old hotend assembly: Unscrew the two 1.5 mm screws that hold the heatblock to the heatsink. Lift the entire hotend (heater block, heatbreak, thermistor, and heater cartridge) out of the carriage.
Transfer the wiring harness: Unplug the two-pin heater cartridge connector and the two-pin thermistor connector from the old hotend. Note the orientation of the wires for reassembly.
Install the new hotend: Place the replacement hotend (Part #1) into the carriage. Secure it with the two 1.5 mm screws – do not overtighten (just snug).
Reconnect the wiring: Plug the heater cartridge and thermistor connectors into the mainboard. Use tweezers to ensure they seat fully.
Reattach the fan shroud: Screw the fan housing back in place and reconnect the fan connector.
Load filament and test heat: Set the nozzle temperature to 200°C. Watch the LCD – it should reach target within 60 seconds. If it doesn’t heat or shows a temperature error, recheck the thermistor connections.
Perform a cold pull (as described in diagnosis) to clear any initial manufacturing debris in the new nozzle.
After the Repair — Testing & Verification
- First test print: Use a small calibration cube (20 mm). Watch the first layer: the filament should extrude smoothly, no clicking.
- Check temperature stability: After 10 minutes of printing, the nozzle temperature should not fluctuate more than ±2°C around the set value. If it swings wildly, the thermistor may be loose or the heater cartridge not fully inserted.
- Inspect the nozzle for leaks: After a few minutes, look at the top of the heatblock – no molten filament should ooze out. If it does, the heatbreak was not fully tightened.
- Listen for fan noise: The hotend fan should spin continuously and quietly. A grinding fan means it wasn’t reinstalled correctly.
- Monitor first 2 hours: Re-run a longer print (e.g., a vase). If you see under-extrusion or skipped steps again, the new hotend may have a defect (rare) or the extruder gears are worn out.
Parts You’ll Need
Here are the parts that match this repair. Click the link to check the current price on AliExpress.
| Product | Price |
|---|---|
| Upgraded Hotend Kit Bambu Lab P2S 0.2… | $2.38 |
| Wax Stamp Seal Wax Print Thick Copper… | $2.44 |
| 3D Printing Pen Nozzle Printer Head 1… | $3.28 |
Prices and availability are subject to change on AliExpress.