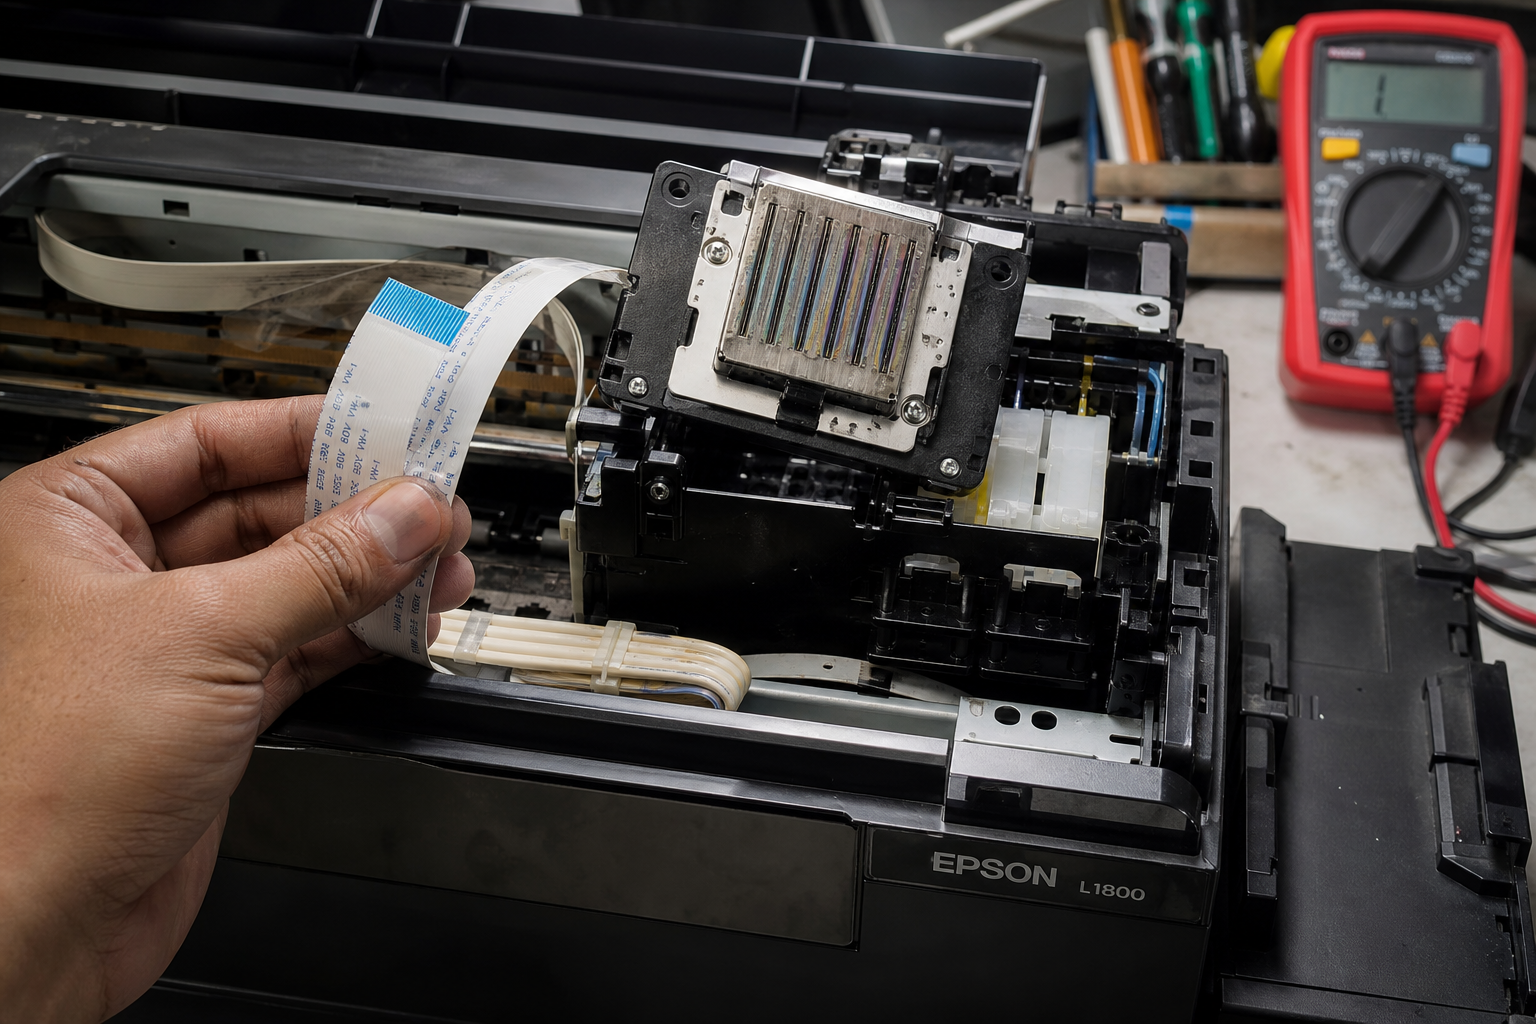
Your Epson L1800 shows missing colors, streaks, or an error code. This guide pinpoints the exact symptoms of printhead failure, walks you through step-by-step diagnosis, explains why it happens, compares DIY vs professional costs, and outlines the repair process to get your printer working again.
What’s Happening — Symptoms in Detail
What You Experience When the Printhead Fails
The Epson L1800 printhead failure manifests in several distinct ways:
Missing Colors or Entirely Blank Output: One or more colors disappear completely. A nozzle check pattern shows gaps. In severe cases, the printhead outputs nothing at all.
Horizontal Banding or Streaks: Prints have consistent white lines across the page. This happens every time, not just after long idle periods.
Error Codes on Screen: The printer displays “Service Required” (usually 0xE1 or 0xE4) or “Print Head Failure”. The error may appear on startup or during a cleaning cycle.
Unusual Sounds: During printing, you hear a grinding or clicking noise from the carriage area. This often indicates the printhead scraping against the platen or the ink pump stalling.
Ink Overflow: Ink leaks from the printhead during idle. You may find puddles inside the printer or on your paper.
When does it happen?
- Some users report sudden failure after a paper jam or a carriage crash.
- Others notice gradual degradation over weeks: first one color drops out, then more.
- It can happen after a firmware update that forces a heavy cleaning cycle, stressing the printhead.
How does it progress?
- Gradual: streaks become wider, colors fade, eventually the printhead stops printing entirely.
- Sudden: one day the printer fails with an error code, refusing to print anything.
How to Diagnose the Problem Step by Step
Step-by-Step Diagnosis
Tools needed:
- A computer with the Epson printer driver installed
- A clear workspace with good lighting
- A multimeter (for advanced checks)
- A magnifying glass (to inspect tiny components)
Quick Check for Beginners
Run a Nozzle Check Pattern
- From the printer driver utility, select Nozzle Check.
- Normal: All lines are solid and continuous.
- Abnormal: Missing gaps or entire color blocks absent. If the gaps are regular and in the same place every time, the printhead is likely clogged or damaged.
Perform a Print Head Alignment
- From the utility, choose Print Head Alignment.
- Normal: The alignment pattern shows well-defined vertical lines.
- Abnormal: The lines are blurred, jagged, or offset. This indicates the printhead is mechanically misaligned or has bent nozzles.
Inspect Visually
- Open the printer cover and remove the ink cartridges.
- Look at the printhead surface (the metal part with tiny holes).
- Normal: Clean, no ink residue, no scratches.
- Abnormal: Dried ink crusts, bent or missing nozzles, cracks in the ceramic.
Detailed Check for Advanced Users
Measure Electrical Resistance
- Disconnect the printer from power and wait 5 minutes.
- Locate the printhead flex cable (part #2: 1PC Printhead Cable Epson 1390 L1800).
- Set multimeter to Ohms (Ω).
- Probe the contact pads on the printhead and the corresponding pins on the cable connector.
- Normal: Resistance values between 30–50 Ω for each nozzle group.
- Abnormal: Open circuit (infinite resistance) or short circuit (0 Ω) means the printhead is electrically dead.
Check the Ink Dampers
- Remove the printhead assembly and inspect the ink dampers (part #1: UV printer ink bag damper, used as a… — actually a damper for ink flow).
- Normal: The damper is flexible, not cracked, and ink flows freely when you manually push air through.
- Abnormal: The damper is hard, cracked, or blocked. This causes inadequate ink supply, leading to missing colors.
Test with a Known Good Printhead
- If available, swap the printhead with a known working one.
- If the problem disappears, the original printhead is faulty.
- If the problem persists, the issue lies in the carriage board, cables, or mainboard.
Why This Happens — Root Cause
Root Cause – Why the Printhead Fails
Engineering/Mechanics: The Epson L1800 uses a piezoelectric printhead (Micro Piezo technology). Tiny piezoelectric crystals expand when voltage is applied, forcing ink out of nozzles. Over time, these crystals can crack or lose their piezoelectric properties due to:
- Thermal stress: Repeated heating and cooling during use and idle cycles cause micro-fractures.
- Electrical overstress: A static discharge or a short in the ribbon cable can zap the fragile driver transistors right on the printhead substrate.
- Ink drying: Water-based pigment inks can dry and harden inside the nozzles. When the printer tries to eject, the force can break the nozzle plate.
Specific Part Names and Numbers:
- Printhead assembly: Epson part # 1216245 (original) or compatible.
- Printhead cable: Part #2 from your list – 1PC Printhead Cable Epson 1390 L1800 – this 40-pin flex cable is a known failure point.
- Ink dampers: Part #3 – L1800 Damper Printer Spare Print Head… – these regulate ink flow and prevent air bubbles.
Conditions that Accelerate Failure:
- High ambient temperature: above 85°F (30°C) softens ink and increases clogging.
- Low humidity: static electricity builds up, zapping the printhead.
- Frequent power cycling: each power-on sends a high-voltage pulse to the printhead.
- Paper jams: forced removal of jammed paper can flex the carriage, bending the printhead.
- Third-party inks: non-viscosity-matched inks can cause premature clogging.
Known Issues:
- The L1800 is particularly prone to printhead failure after extended idle periods (2+ weeks) without use.
- Many users report failure within 12–18 months of moderate use.
- The ribbon cable (part #2) can develop intermittent contact due to fatigue from carriage movement.
Can You Fix It Yourself?
Can You Fix It? – Honest Assessment
Difficulty Level: 4 out of 5
- The repair is complex because you need to disassemble the printer deeply, handle delicate flex cables, and align components precisely.
Time Required:
- 45–90 minutes for an experienced person.
- 2–3 hours for a first-timer.
Skill Level Needed:
- No soldering required.
- Screwdriver skills: You’ll need to remove many screws (JIS #0 and #1 sizes).
- Patience and dexterity: The printhead is a delicate part; one misstep can break the cable or damage the new printhead.
- Basic multimeter usage (for the advanced electrical check) is optional but recommended.
Risks:
- Damaging the flex cable during removal or installation is the #1 mistake. The cable is thin and tears easily.
- Bending the printhead pins – if you force the cable connector, you can permanently ruin the new printhead.
- Static discharge – you can fry the electronics if you don’t ground yourself.
- Incorrect alignment – after installation, prints may be skewed if the printhead isn’t seated properly.
Tools Required (exact):
- JIS #0 screwdriver (Phillips #0 will work but may cam out).
- JIS #1 screwdriver.
- Tweezers (fine tip, for cable handling).
- Plastic spudger (to pry open clips without scratching).
- Multimeter (set to Ohms).
- Isopropyl alcohol (99%) and lint-free wipes (to clean contacts).
- Anti-static wrist strap (highly recommended).
- Replacement parts: printhead, cable (part #2), dampers (part #3).
Cost Breakdown — DIY vs Professional
DIY vs Professional – Real Cost Comparison
DIY Cost:
- Printhead assembly (generic compatible): ~$35–60 (Epson OEM is $80–120).
- Printhead cable (part #2: 1PC Printhead Cable Epson 1390 L1800): $1.08. This is essential if you suspect a bad connection.
- Ink dampers (part #3: L1800 Damper Printer Spare Print Head…): $1.19 each – you need 6 (one per color). Total: $7.14.
- UV printer ink bag damper (part #1): $1.00 – not typically needed unless you have a UV-modified printer, but included for reference.
- Total DIY parts: approximately $9.41 (if you only need the cable and dampers) or $45–70 with a new printhead.
- Tools: if you don’t have screwdrivers and a multimeter, budget an extra $20.
Professional Repair Cost:
- Shop diagnosis fee: $30–50 (often credited toward repair).
- Labor: $80–120 per hour; typical job is 1–2 hours.
- Parts: Markup on printhead (they charge $80–150).
- Total professional repair: $190–350.
When to Skip DIY:
- If the printhead is electrically shorted (multimeter shows 0 Ω), replacement is the only option, and the risk of damaging the new one is high.
- If you are uncomfortable disassembling electronics or have trembling hands, professional repair is safer.
- If the printer mainboard is also fried (rare, but possible after a power surge), DIY can become a money pit. A shop can diagnose that quickly.
- If you value time over money and need the printer working tomorrow, a professional repair (turnaround 1–2 days) is better.
Repair Process Overview
Repair Process Overview
Major Steps:
- Power off and unplug the printer. Remove ink cartridges and paper.
- Remove the top cover – unscrew about 10 screws (JIS #0) along the back and sides. Pry off gently with a spudger.
- Disconnect the carriage board cables – carefully unplug the six ink damper tubes and the 40-pin printhead cable (part #2). Label each tube to avoid mix-ups.
- Remove the carriage assembly – unscrew the four screws holding the printhead to the carriage. Note the spring positions.
- Extract the printhead – lift it straight up. Do not tilt it sideways to avoid bending pins.
- Inspect and clean the carriage slot – wipe any dried ink with 99% IPA on a lint-free cloth.
- Install the new printhead – place it into the carriage, ensuring the alignment pegs fit properly. Secure with screws (do not overtighten).
- Reattach the printhead cable – align the cable’s conductive traces with the slot, press down the locking lever. Make sure the cable is flat and not twisted.
- Connect ink tubes and dampers – slide each damper (part #3) onto the printhead’s ink inlet. Push until it clicks.
- Reassemble the printer – put the top cover back, install cartridges.
- Prime the system – run the printer’s Head Cleaning utility 2–3 times from the driver. This fills the dampers and purges air.
- Run nozzle check – verify all nozzles fire.
Common Mistakes and How to Avoid Them:
- Mistake: Pulling the printhead cable too forcefully, tearing it. Avoid: Use tweezers to gently rock the connector back and forth before pulling.
- Mistake: Installing the cable upside down (metal contacts facing the wrong side). Avoid: Look for the small triangular notch on the cable; it should align with the key on the connector.
- Mistake: Not pressing the dampers fully, causing air leaks. Avoid: Listen for a distinct click when seating each damper.
- Mistake: Forgetting to reattach ground springs, leading to static buildup. Avoid: Refer to a teardown video or take photos before disassembly.
After the Repair — Testing & Verification
After Repair – Verification
How to Know the Repair Worked:
- Nozzle Check: Run it immediately after priming. All color blocks should be solid with no gaps. If gaps remain, run one more cleaning cycle.
- Print a Test Page: Print a monochrome text document and a color photo. Check for banding, misregistration, or color shifts.
- Alignment Test: Run the Print Head Alignment utility. The pattern should produce clean vertical lines without jagged edges.
- Listen for Normal Operation: The carriage should glide smoothly and quietly. No grinding or clicking sounds.
What to Watch for in the First Few Hours:
- Ink Leaks: Check the area under the printhead after the first few prints. A small amount of ink is normal, but puddles indicate a leaky damper or incomplete seal.
- Dried Nozzles: If you let the printer sit for an hour and then print again, the first nozzle check should still be perfect. If not, the dampers may not be holding a prime.
- Electrical Issues: If the printer suddenly shows a Carriage Error or Service Required code, the cable connection may be loose or the new printhead is defective.
- Perform a Stress Test: Print 20 pages continuously. If any color drops out after page 10, you may have an ink supply issue (clogged damper or tube).
- Monitor Error Codes: Any new error code within the first 24 hours (especially 0xE1) suggests a faulty printhead or improper installation.
If all checks pass, your L1800 is back to full health.
Parts You’ll Need
Here are the parts that match this repair. Click the link to check the current price on AliExpress.
| Product | Price |
|---|---|
| UV printer ink bag damper, used as an… | $1.00 |
| 1PC Printhead Cable Epson 1390 L1800 … | $1.08 |
| L1800 Damper Printer Spare Print Head… | $1.19 |
Prices and availability are subject to change on AliExpress.