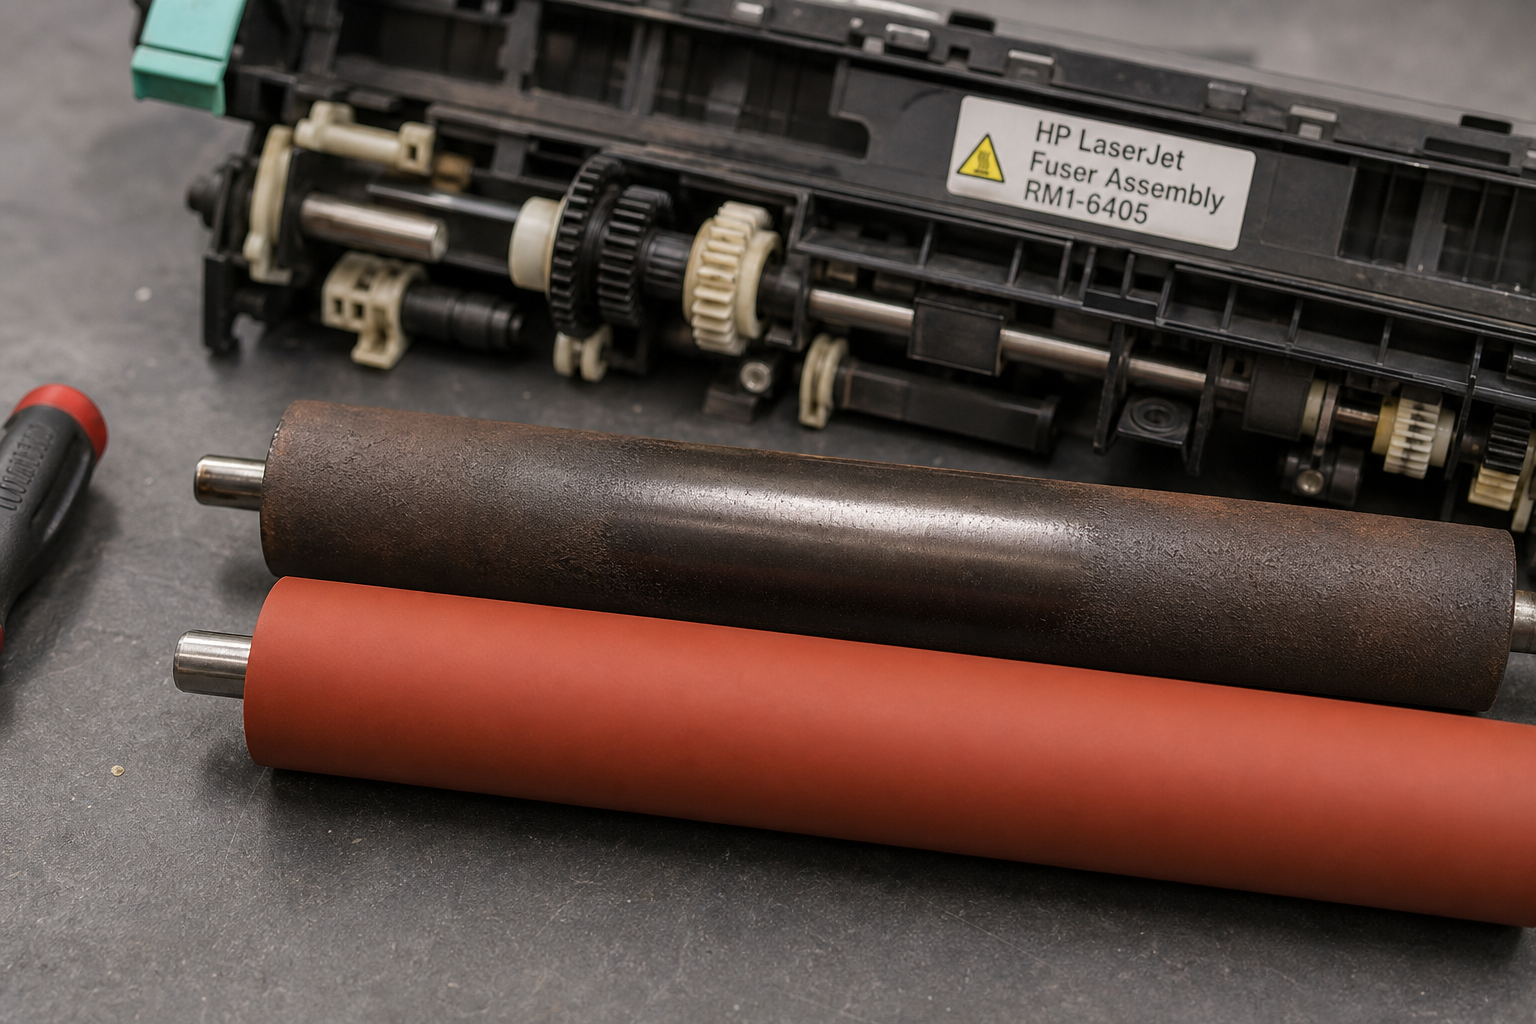
If your printer suddenly makes a loud squealing or grinding noise, produces wrinkled or jammed paper, or shows a fuser error code like Service Call 50.1 or Fuser Error, the fuser pressure roller is likely worn or seized. This guide walks you through exact symptoms, step-by-step diagnosis, root causes, and a cost-effective fix.
What’s Happening — Symptoms in Detail
When does the problem appear?
- Sudden onset: The printer worked fine yesterday; today it refuses to print with an error code.
- Gradual worsening: A faint squeak turns into a high-pitched screech over a few weeks. Paper jams become more frequent.
- After a paper jam: You cleared a jam, but now the printer makes a grinding sound when feeding paper.
What does the user experience exactly?
- Error codes on screen:
- HP LaserJet: 50.1, 50.2, 50.3 Fuser Error
- Brother: Fuser Error, or just a blinking red light
- Canon: E000, E001, E003
- Generic: “Fuser Unit Failure” or “Service Call”
- Sounds: A screeching, squealing, or grinding noise from the rear of the printer. In some cases you hear a thumping sound (a flat spot on the roller).
- Visual symptoms:
- Paper exits with wrinkles, creases, or a wavy finish.
- Toner smears or rubs off the paper because the roller no longer provides uniform pressure.
- A burning smell if the roller seizes and the fuser overheats.
- Behavior changes:
- The printer tries to feed paper but stops with a jam before the fuser.
- Multiple pages fuse together or the paper wraps around the fuser roller.
- The printer takes longer to warm up or goes into an endless warm‑up cycle.
How does it progress?
- Sudden failure: The roller seizes completely – often due to a failed bearing. The printer immediately throws a fuser error and refuses to print.
- Slow failure: The rubber surface wears down, developing a glossy or hard spot. Pressure becomes uneven. Paper jams slowly increase until the printer becomes unusable.
Recognize the pattern: If you hear noise only when paper is passing through the fuser (not during idle), the pressure roller is the prime suspect. If noise happens even when the fuser rotates empty, the upper fuser roller or its bushing might also be worn.
How to Diagnose the Problem Step by Step
Tools needed:
- Phillips screwdriver (size #2)
- Flashlight
- Needle‑nose pliers (optional, for spring clips)
- Multimeter (only if checking thermistor continuity)
Quick Check (2 minutes, no tools):
Listen carefully: Start a print job. Is the noise high‑pitched and coming from the rear of the printer? Does it change pitch when paper enters the fuser? Normal: quiet whir. Abnormal: squealing, grinding, or thumping.
Inspect the paper output: After a failed print, look at the paper. Wrinkles or a shiny streak on one side? That’s a classic pressure roller flat spot. Normal: paper comes out flat and smooth.
Smell for burning: If you smell hot rubber or plastic, the roller may be overheating due to friction. Abnormal – stop using the printer immediately.
Detailed Check (requires opening the printer):
Remove the fuser assembly: Follow your printer’s service manual. Typically: open rear door, press green tabs, slide the fuser out.
Visual inspection of the pressure roller:
- Look at the rubber surface. Normal: uniform matte black, no cracks. Abnormal: shiny, glazed, or has a flat spot. Deep cracks or peeling mean imminent failure.
- Rotate the roller by hand. Normal: it spins smoothly with slight resistance. Abnormal: it’s hard to turn, or it makes a gritty, grinding sound from the bearing.
Check the gear: On the end of the pressure roller there is a gear (like Part #1 or #3). Normal: teeth intact, no chips. Abnormal: missing teeth, hairline cracks, or the gear slips on the shaft. A broken gear will cause intermittent jams and a clicking noise.
Feel the bearing/bushing: Gently rock the roller side‑to‑side. Normal: minimal play. Abnormal: noticeable wobble indicates worn bushing (like Part #2). This can cause misalignment and paper jams.
Check the thermistor (optional): If the error code is temperature‑related, probe the thermistor (small glass bead touching the roller). Normal: resistance changes smoothly when you heat it with a hair dryer. Abnormal: open circuit (infinite resistance) or short circuit – replace the fuser.
Why This Happens — Root Cause
Why does the pressure roller fail?
The pressure roller is a consumable that wears over time. It is typically a steel core covered with a silicone rubber sleeve or a hard rubber compound. Its job is to press paper against the heated upper roller with a specific force (often 40–80 N). Constant heat and pressure cause the rubber to degrade.
Primary failure modes:
Bearing failure: The small ball bearings or bronze bushings in the roller ends dry out or break. This creates friction, which creates heat, which seizes the roller. Common in HP LaserJet 400–500 series and Brother HL‑L2300.
Flat spots: When a printer sits idle with the pressure roller pressed against the heated roller under load, a hard, flattened area forms. This creates a thumping sound and wrinkled paper. Common in Canon imageCLASS and Samsung ML‑2500.
Glazing: High temperatures (especially if the fuser runs too hot) cause the outer layer to become brittle and shiny. Glazed rollers slip, leading to jams and uneven fusing.
Gear tooth breakage: The drive gear (Part #1 or #3) is often plastic. Sudden reversals during jam clearance or jamming can snap teeth. The roller no longer rotates, causing a fuser error.
Bushing wear: Plastic bushings (Part #2) crack or warp after many heat‑cool cycles. The roller then wobbles, causing misalignment and paper edge damage.
Accelerating factors:
- Dusty environment (paper dust clogs bearings)
- Frequent heavy‑stock printing (higher pressure, more heat)
- Ignoring paper jams (trying to pull paper out while fuser is hot bends gears)
- Using non‑OEM toner that has a higher fusing temperature
Specific models with known issues:
- HP LaserJet P2055: Pressure roller bearing seizes after ~60,000 pages.
- Brother HL‑5450DN: Bushing (Part #2) cracks around 40,000 pages.
- Canon LBP‑7100: Gear (Part #1) strips when clearing jams incorrectly.
- Samsung Xpress M2070: Roller glazes at 30,000 pages.
Can You Fix It Yourself?
Difficulty level: 2 out of 5 (moderate) – requires careful disassembly but no soldering.
Time required: 30–60 minutes for first‑time repair; 20 minutes for experienced technicians.
Skill level needed:
- Comfortable with a screwdriver and small parts handling.
- Ability to follow a service manual (download one for your model).
- No soldering or electronics work required.
Risks:
- Damaging the heater lamp inside the fuser if you drop it.
- Stripping plastic gear teeth (Part #1 or #3) if you force alignment.
- Reinstalling the fuser incorrectly can cause short circuits.
- High voltage – always unplug the printer and wait 5 minutes for capacitors to discharge.
Tools required:
- Phillips screwdriver #2 for most screws
- Flat‑head screwdriver for prying spring clips
- Circlip pliers (if your model uses C‑clips to hold the roller)
- Thermal paste (only if the roller does not have a pre‑greased bushing – check service manual)
- Multimeter optional for thermistor test
Can you fix it? Yes, if you have: visible access to the fuser assembly, the correct replacement parts, and a model with a serviceable fuser (most standard LaserJet, Brother, Canon, and Samsung models are repairable). Some fusers are sealed units – those must be replaced entirely. Check if your fuser has screws or rivets; riveted means replacement only.
Cost Breakdown — DIY vs Professional
DIY cost breakdown (using referenced parts):
- Part #1: Lower fuser roller gear for Ricoh MP series – $1.48 (if only the gear broke)
- Part #2: Fuser Upper Roller Bushing Pressure L‑shaped bushing – $1.00 (if bushing is cracked)
- Part #3: Lower Pressure Roller Gear Fuser Gear – $0.50 (another generic gear option)
- Full pressure roller assembly (if roller itself is worn): usually $15–$30 from third‑party sellers; OEM about $40–$60
- Shipping: $3–$6
- Total DIY: $5–$40 depending on which components need replacement
Professional repair cost:
- Diagnostic fee: $30–$50 (often waived if you proceed with repair)
- Labor: $60–$100 per hour (typical repair time 30–45 min)
- Parts markup: repair shops charge 100–200% over retail – expect $50–$80 for a pressure roller
- Total professional: $110–$200
When to skip DIY:
- Your printer is still under warranty (DIY voids it).
- The fuser is a sealed unit (common in ultra‑compact printers like Canon MF240 series).
- You cannot find a service manual for your exact model.
- The error code indicates a thermistor failure or lamps short – those require soldering expertise.
- You don’t have the time to wait for parts (professional shops often stock common rollers).
Cost comparison verdict: If the only broken part is a gear (Part #1 or #3), DIY is a no‑brainer. If the entire roller is glazed, DIY still saves 60–80%. For high‑end production printers (costing >$2000), consider professional repair for warranty and reliability.
Repair Process Overview
Major steps – generic fuser repair (consult your model’s service manual for exact disassembly):
Unplug the printer and allow it to cool for 20 minutes. Remove the toner cartridge and any paper trays.
Remove the fuser assembly: Open the rear cover, press release latches (often green or white), and slide the fuser out. Place it on an antistatic mat.
Disassemble the fuser:
- Remove the upper cover panel (2–4 screws).
- Detach the thermistor and thermostat wires (note their routing – take a photo).
- Remove the two side brackets (4–6 screws).
- Separate the upper roller assembly from the lower pressure roller assembly.
Remove the old pressure roller:
- Note orientation – the gear is on one side (usually the rear).
- Use circlip pliers to remove the retaining clip or unscrew the bushing holder.
- Slide the roller out. If it’s seized, you may need to tap it gently with a soft mallet.
Inspect and replace parts:
- Check the upper fuser roller – if it’s also damaged, replace it now.
- Install the new pressure roller (or new gear/bushing) in reverse order.
- Apply a small amount of high‑temperature grease to the new bushings (if not pre‑greased).
Reassemble the fuser:
- Align gears carefully – ensure the drive gear meshes smoothly.
- Reconnect thermistor and thermostat wires. Torque screws to the spec in the manual (don’t overtighten).
Reinstall the fuser into the printer. Connect all harnesses. Close the rear door. Insert toner cartridge.
Common mistakes and how to avoid them:
- Mistake: Bending the thermistor wire. Avoid: Route wires exactly as the factory did; use a photo reference.
- Mistake: Overtightening the side bracket screws – can warp the fuser frame. Avoid: Use a torque screwdriver set to 3–5 in‑lb (or just snug by hand).
- Mistake: Installing the pressure roller backward (gear side wrong). Avoid: Mark the left/right side with a pen before removal.
- Mistake: Forgetting to apply grease. Avoid: Check service manual – some models require silicone grease on bushings.
- Mistake: Reusing a glazed pressure roller. Avoid: Even if it looks okay, if it’s more than 50,000 pages old, replace it now.
After the Repair — Testing & Verification
Verification steps after installing the new pressure roller:
- Print a test page: Start with a single plain‑paper page. Listen for any abnormal noise. A slight whir is normal; squealing means the roller is still misaligned or the bushing is dry.
- Check for errors: The printer should not display any fuser error codes. If you see “Fuser Error” again, double‑check the thermistor connection or the roller gear engagement.
- Inspect the output: The test page should be flat, with no wrinkles, creases, or toner smears. Run your fingernail across the toner – it should not flake off.
- Monitor 24 hours: Run 20–30 pages over the next day. Early signs of failure reappear within that time.
What to watch for in the first few hours:
- Noise: Any new grinding or clicking? Stop immediately – you may have a loose gear or a fastener hitting the roller.
- Burning smell: If you smell rubber, the roller might be overheating due to incorrect bushing material or lack of grease.
- Warm‑up time: The fuser should reach operating temperature within 30 seconds. If it takes longer, the thermistor may be mispositioned.
- Paper jams: The most common post‑repair issue is a paper jam at the fuser entrance. This usually means the guide flaps were not reinstalled correctly.
- Toner density: If prints appear light on one side, the pressure roller may be unevenly seated – remove and reseat it.
Final tip: Run a full‑speed multiple‑page print (e.g., 10 pages) to stress the fuser. If no issues, the repair is successful.
Parts You’ll Need
Here are the parts that match this repair. Click the link to check the current price on AliExpress.
| Product | Price |
|---|---|
| 1PCS Lower fuser roller gear Ricoh MP… | $1.48 |
| Fuser Upper Roller Bushing Pressure L… | $1.00 |
| Lower Pressure Roller Gear Fuser Gear… | $0.50 |
Prices and availability are subject to change on AliExpress.