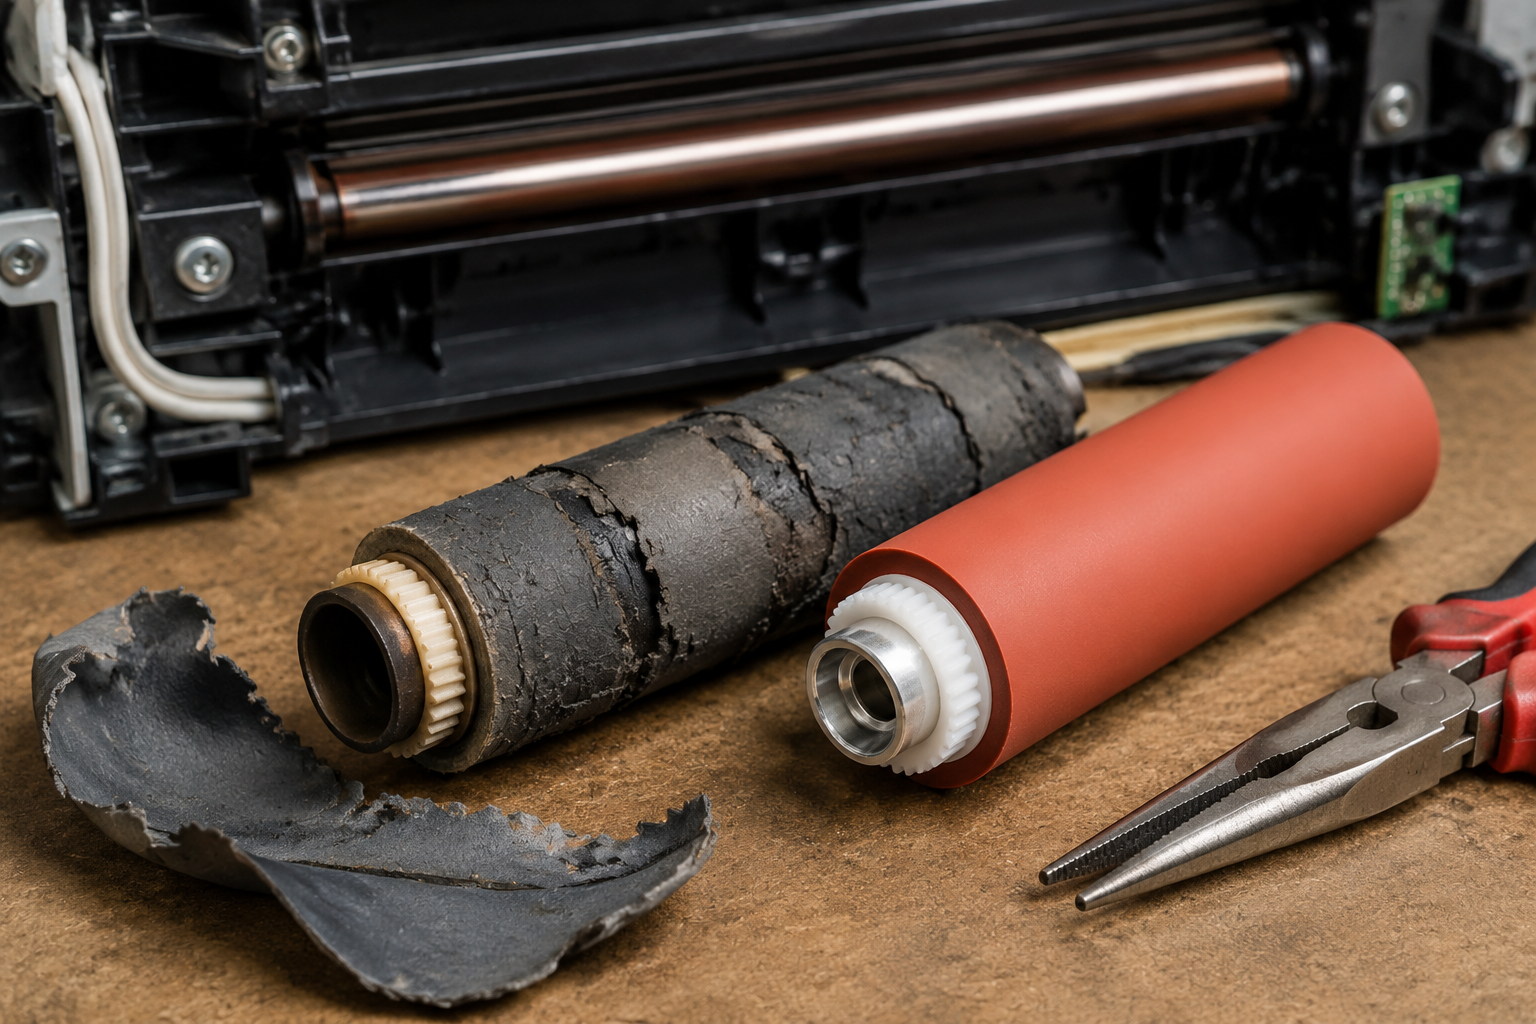
Your printer is printing with wrinkles, jamming frequently, or displaying a ‘50.x Fuser Error’? This guide walks you through exactly what’s wrong with the fuser pressure roller, how to diagnose it in 10 minutes, and whether you can fix it yourself for under $2 or need a pro.
What’s Happening — Symptoms in Detail
The Problem in Detail
Your printer suddenly refuses to feed paper cleanly, or the output is covered in creases and smears. Here’s what you’re experiencing:
Paper Jams at the Output Tray – The paper stops halfway out of the printer, crumpled. This happens on every print, not just heavy stock.
Wrinkled or Wavey Print Output – Even when the print completes, the paper has permanent ridges or a corrugated look. Toner may flake off at the wrinkles.
Scraping or Grinding Noise – A low-frequency rubbing or high-pitched squeal coming from the rear of the machine (the fuser area) during the first few seconds of printing.
Error Codes on Screen – On HP LaserJets: 50.1 Fuser Error or 50.3 Fuser Error. On Canon: E000 or E001. On Ricoh: SC545. These codes indicate the fuser isn’t reaching the correct temperature or the pressure roller is stuck.
Scorched Marks on Paper – Brown or black burn spots that appear in a repeating pattern – this is the pressure roller’s coating burning toner onto the page.
When does it happen?
- Some users report it starts gradually: first only on thick paper, then on all paper.
- Others experience sudden failure after a paper jam where they pulled the paper out forcefully, damaging the roller.
- It can also appear after a firmware update that changed fuser temperature control (rare, but documented on certain HP models).
How does it progress?
Left unchecked, the pressure roller will develop permanent flat spots, cracks, or delamination of its silicone or rubber coating. This causes uneven pressure, leading to poor fusing, toner flaking off, and eventually a complete fuser lock-up that triggers an error code requiring a reset or replacement.
How to Diagnose the Problem Step by Step
Step-by-Step Diagnosis
Quick Check (5 minutes, no tools)
Error Code Check – Look at the printer’s display panel. Note any error code (e.g., 50.1, E000, SC545). If you see one, the printer has already detected a fuser fault. Proceed to detailed check.
Visual Inspection of Output – Take a failed printed page. Hold it up to light. Normal: the page is flat, toner is fused smoothly. Abnormal: you see wave patterns, repeating dark bands, or melted toner stuck to the paper.
Sound Test – Print a single blank page (or use the maintenance menu’s ‘Test Page’). Listen closely. Normal: a quiet whir of gears, then a soft click when the page exits. Abnormal: a repetitive thumping (flat spot on roller), a scraping sound (roller hitting frame), or silence (fuser motor stalled).
Detailed Check (15 minutes, need screwdriver and multimeter)
Tools needed:
- Phillips screwdriver #2 (for most HP/Canon fuser removal)
- Flathead screwdriver (for clips on Ricoh models)
- Digital multimeter (optional, for heating element check)
- Flashlight
- Rubber gloves (fuser is hot during operation – even after 10 minutes off, parts may be warm)
Remove the Fuser Unit – Power off the printer, unplug it, wait 30 minutes for cooling. Open the rear access door. On HP, release two blue levers and slide the fuser out. On Ricoh, remove two thumb screws. Normal: the fuser slides out smoothly. Abnormal: it’s stuck, indicating paper debris or gear obstruction.
Inspect the Pressure Roller Surface – The pressure roller is the lower roller (usually black or gray). Rotate it by hand. Normal: smooth, uniform surface, no cracks, no shiny spots. Abnormal: you see flat areas (they feel hard), cracks, or a torn silicone sleeve (looks like a wrinkled rubber sock).
Check Roller Width vs. Original – Measure the roller’s diameter with a caliper if you have one. Compare to the pressure roller width specification (usually around 30mm wide for A4 printers). Abnormal: the roller has worn thin at the edges, or there is a visible gap between the roller and the pressure plate.
Resistance Test for Pressure Spring – Inside the fuser, there are two springs that push the pressure roller against the fuser film or heating roller. Use a multimeter in continuity mode to check if the spring is broken (no reading). Normal: spring is intact, you can compress it with moderate force. Abnormal: spring is collapsed or rusted solid.
Gear Check – Look at the gear on the end of the pressure roller. It should have all teeth intact. Normal: even tooth profile. Abnormal: missing or chipped teeth – this causes a clicking sound and intermittent jamming.
Why This Happens — Root Cause
Root Cause – Why This Happens
The fuser pressure roller’s job is to apply even force against the fuser film (or upper roller) to press toner into the paper. Over time, several factors cause failure:
Mechanical Wear from Heat and Pressure
The roller is coated with a silicone rubber sleeve (sometimes with a Teflon layer). Constant exposure to 190–220°C (380–430°F) hardens the rubber, making it brittle. After 50,000–100,000 pages, the sleeve cracks or delaminates.
Flat spots form when the printer is left on but idle for long periods – the roller sits under constant pressure without rotating. The rubber takes a ‘set’ and never recovers.
Debris and Toner Buildup
- Paper dust and excess toner accumulate on the roller surface. They form hard clumps that create high spots, causing uneven pressure and wrinkles.
- Oil contamination from over‑greasing the fuser bearing can cause the roller to slip, wearing a groove.
Crash Force from Paper Jams
- If you pull a jammed piece of paper out backwards (against the feed direction), the paper edge can slice into the rubber sleeve, cutting it. The next print tears the sleeve further.
- Forcing a thick envelope or cardstock that is thicker than the fuser gap can bend the pressure roller shaft or break its brackets.
Specific Model Known Issues
HP LaserJet P3015 / M601–M603 – The pressure roller bearing (part #RM1-1313) fails often, causing the roller to wobble and rub against the frame, producing a grinding noise.
Ricoh SP 311 / SP 330 – The lower fuser roller gear (part #M0BK1460) cracks after prolonged use, making the roller stop rotating entirely – this triggers SC545 error.
Canon imageCLASS LBP252dw – The pressure roller’s rubber sleeve separates from the metal core after 30k pages. You’ll see a white or gray band on the roller where the sleeve has lifted.
Conditions That Accelerate Failure
- High‑duty printing – Running continuous jobs without cool-down cycles.
- Cheap third‑party toner – Excess residue sticks to the roller.
- Humid environments – Moisture causes paper fibers to stick more aggressively.
- Age – Even with light use, the rubber degrades after 3–5 years.
Can You Fix It Yourself?
Can You Fix It? – Honest Assessment
Difficulty Level: 3 out of 5
Why not easier? The fuser is a sealed assembly with multiple heating elements and high voltage connections. You need to disassemble it carefully to avoid damaging the fuser film (which is very fragile). If you break the film, you’ll need a whole new fuser.
Time Required: 45–75 minutes
- First time: 75 minutes – includes troubleshooting and careful reassembly.
- Experienced: 30–45 minutes.
Skill Level Needed
- No soldering required – All connections are plug‑in connectors or wire harness splices.
- You need basic screwdriver skills – You must follow a service manual or video guide.
- Comfort with springs and small parts – The pressure springs are under tension and can fly across the room.
Risks and What Could Go Wrong
- Risk 1: Damaging the fuser film – The upper roller (film sleeve) is extremely thin. If you scratch it or misalign it, it will tear on first heat cycle. Cost to replace film: $20–40.
- Risk 2: Breaking plastic clips – The fuser frame is held together by plastic tabs that snap off easily if forced.
- Risk 3: Electrical shock – High voltage (up to 600V) can be stored in the fuser’s lamp or heater wires even after unplugging. Wait at least 30 minutes and use insulated tools.
- Risk 4: Error codes after reassembly – If the pressure roller is not seated perfectly, the printer will still throw a fuser error (e.g., 50.1) even with a new roller.
Tools Required (Specific Sizes)
- Phillips screwdriver #2 – 150mm shaft recommended.
- T10 Torx screwdriver – for some HP fuser frame screws.
- Needle‑nose pliers – for clip springs.
- Multimeter – to test continuity of the thermistor and heater lamp.
- Cleaning cloth – lint‑free, coffee filter works.
- High‑temperature grease – only if replacing bearings (e.g., Krytox GPL205).
Conclusion
If you are comfortable with disassembling electronics and have solid patience, you can replace the pressure roller yourself for under $2 in parts. But if you have shaky hands or short nerves, pay a pro – a botched repair could cost you a new printer.
Cost Breakdown — DIY vs Professional
DIY vs Professional – Real Cost Comparison
DIY Repair Costs (Parts + Optional Items)
Pressure roller gear (if gear is broken) – $1.50 (Part #1: 1PCS Lower fuser roller gear Ricoh MP…). This fits Ricoh SP 311/330 series. If your gear is cracked, replace just the gear, not the whole roller.
Fuser lamp / heat unit (rarely needed) – $0.59 (Part #2: 1PC RU7-0028-000 RU5-0964-000 Fuser L…). This is the halogen lamp inside the fuser. If your error says ‘fuser cold’ and the lamp tests open circuit, use this.
Complete lower pressure roller set – $0.80 (Part #3: 1set JC61-01960A Lower Pressure Rolle…). This includes the roller, sleeve, and one bearing – a great value for a full replacement on Samsung CLP-600/CLP-610 models.
Optional: Thermal paste – $5 for a syringe (re‑apply between the thermistor and heater).
Optional: Service manual – $10–20 online (PDF).
Total DIY: $0.59 to $1.50 for the critical part, plus a few dollars for consumables.
Professional Repair Costs
- Diagnostic fee: $50–$100 (many shops waive it if you proceed with repair).
- Fuser pressure roller replacement labor: $80–$150 (1–2 hours at $80/hr).
- New OEM pressure roller (if needed): $15–$50 for the part itself.
- Total professional invoice: $150–$300.
When to Skip DIY and Go Pro
- Your printer is under $200 new – It may be cheaper to buy a new printer than pay a shop $150.
- The fuser is welded shut – Some HP models (e.g., LaserJet P1102) have a sealed fuser that cannot be disassembled without cutting plastic – not recommended.
- You already broke a clip while diagnosing – A broken fuser frame means the roller won’t align. Stop and take it to a shop before you destroy more clips.
- You need the printer back today – Professional shops can often do the repair same‑day.
Bottom line: If you have the tools, the manual, and an hour of quiet time, the DIY route for under $2 is unbeatable. If you’re already stressed, just buy a new printer.
Repair Process Overview
Repair Process Overview
Major Steps
Remove the Fuser Unit – As described in Diagnosis Step 1. Unplug all cables. If your model has a halogen lamp wire, note its routing; take a phone photo.
Disassemble the Fuser Frame – Remove the metal or plastic cover (4–6 screws). Separate the upper and lower halves. NOTE: On some models, you must first remove the fuser film and its metal sleeve – handle only by the ends, not the film surface.
Remove the Old Pressure Roller – Push the pressure springs aside with needle‑nose pliers. Slide the roller out of its bearing mounts. If the roller gear is seized, use a small screwdriver to gently pry it off.
Inspect the New Part – Compare the new roller with the old one – same width, same gear orientation. If the new part is slightly shorter (common with aftermarket), you may need to add a washer to center it.
Install the New Pressure Roller – Apply a tiny amount of high‑temperature grease to the bearings (not the roller surface). Slide the roller into the brackets, re‑engage the springs. Rotate the roller by hand to ensure it spins freely.
Reassemble the Fuser – Reattach the upper and lower halves. Screw in the four corner screws cross‑wise (tighten a little each). Re‑install any thermistor or safety switch wires – they must be in their original grooves.
Reinstall the Fuser Unit – Slide the fuser back into the printer, lock the levers, connect any wire harnesses. Close the rear door.
Common Mistakes and How to Avoid Them
- Mistake: Forgetting to reconnect the thermistor wire. Consequence: Blinking fuser error immediately. Avoid: Check your photo from step 1.
- Mistake: Overtightening frame screws. Consequence: Warping the fuser frame → uneven pressure → repeat failure. Avoid: Screw until snug, then 1/8 turn extra.
- Mistake: Touching the fuser film with bare fingers. Consequence: Fingerprints burn on, causing ghosting on prints. Avoid: Wear gloves or handle only the metal ends.
- Mistake: Installing the roller backwards (if it has a drive gear on one end only). Consequence: Gear won’t mesh, no rotation. Avoid: Check that the gear aligns with the printer’s drive mechanism before closing.
After the Repair — Testing & Verification
After Repair – Verification
How to Know the Repair Worked
Power‑on test – Turn on the printer. Listen: it should do its warm‑up cycle (10–15 seconds) without any grinding or clicking. Error codes should clear automatically. If an error remains, the printer may need a firmware reset (check manual).
Test print on plain paper – Print a single sheet of standard 20 lb paper. Check the output: no wrinkles, no toner flaking, and the paper lies flat. If you see a repeat pattern every 3–5 inches, the roller has a flat spot or misalignment – stop and re‑check.
Test print on envelope – If you plan to print envelopes, test one now. Envelopes stress the fuser more. If it jams or wrinkles, the pressure may be too high.
Temperature check – After printing 5 pages, touch the fuser cover (outer metal) – it should be warm, not scorching hot. If it’s extremely hot, the thermistor may be misplaced.
What to Watch for in the First Few Hours
- Strange odors – A faint burning smell is normal for the first 10 pages (new parts outgassing). If it smells like electrical burning, power off immediately.
- Ghosting – If the previous page’s image appears faintly on the next page, the fuser temperature is too low or the pressure roller not cleaning. Solution: Clean the fuser film with a dry cloth (after cooling).
- Wrinkles returning – If the first 5 pages are fine but wrinkles start after 50 pages, the pressure roller sleeve is slipping. Solution: Re‑tighten the mounting screws.
- Loud gear noise – If you hear a whine after 30 pages, the new gear may be too tight. Apply a dab of grease to the gear mesh.
Final tip: Write down the printer’s total page count (from the embedded web server or LCD) and the new pressure roller’s part number. This helps future troubleshooting – if the roller fails again in 6 months, you’ll know it’s a different issue (like worn fuser bearings).
Parts You’ll Need
Here are the parts that match this repair. Click the link to check the current price on AliExpress.
| Product | Price |
|---|---|
| 1PCS Lower fuser roller gear Ricoh MP… | $1.50 |
| 1PC RU7-0028-000 RU5-0964-000 Fuser L… | $0.59 |
| 1set JC61-01960A Lower Pressure Rolle… | $0.80 |
Prices and availability are subject to change on AliExpress.