Your printer is crumpling paper, leaving wavy lines, or jamming halfway through a print job. This guide explains exactly how a worn or damaged fuser pressure roller causes these symptoms, provides a step-by-step diagnosis to confirm the problem, and walks you through the repair process with specific part numbers and costs.
What’s Happening — Symptoms in Detail
The fuser pressure roller is a critical component that presses the paper against the hot fuser roller to melt toner into the fibers. When it fails, you will see one or more of the following symptoms:
- Paper Wrinkling (Cockling): The paper comes out with waves, creases, or a rippled surface. This happens because the roller has a flat spot or uneven surface that fails to apply uniform pressure.
- Vertical Lines or Bands: Faint, repeating lines parallel to the paper feed direction. These are caused by a worn, glazed, or contaminated roller surface that cannot transfer heat evenly.
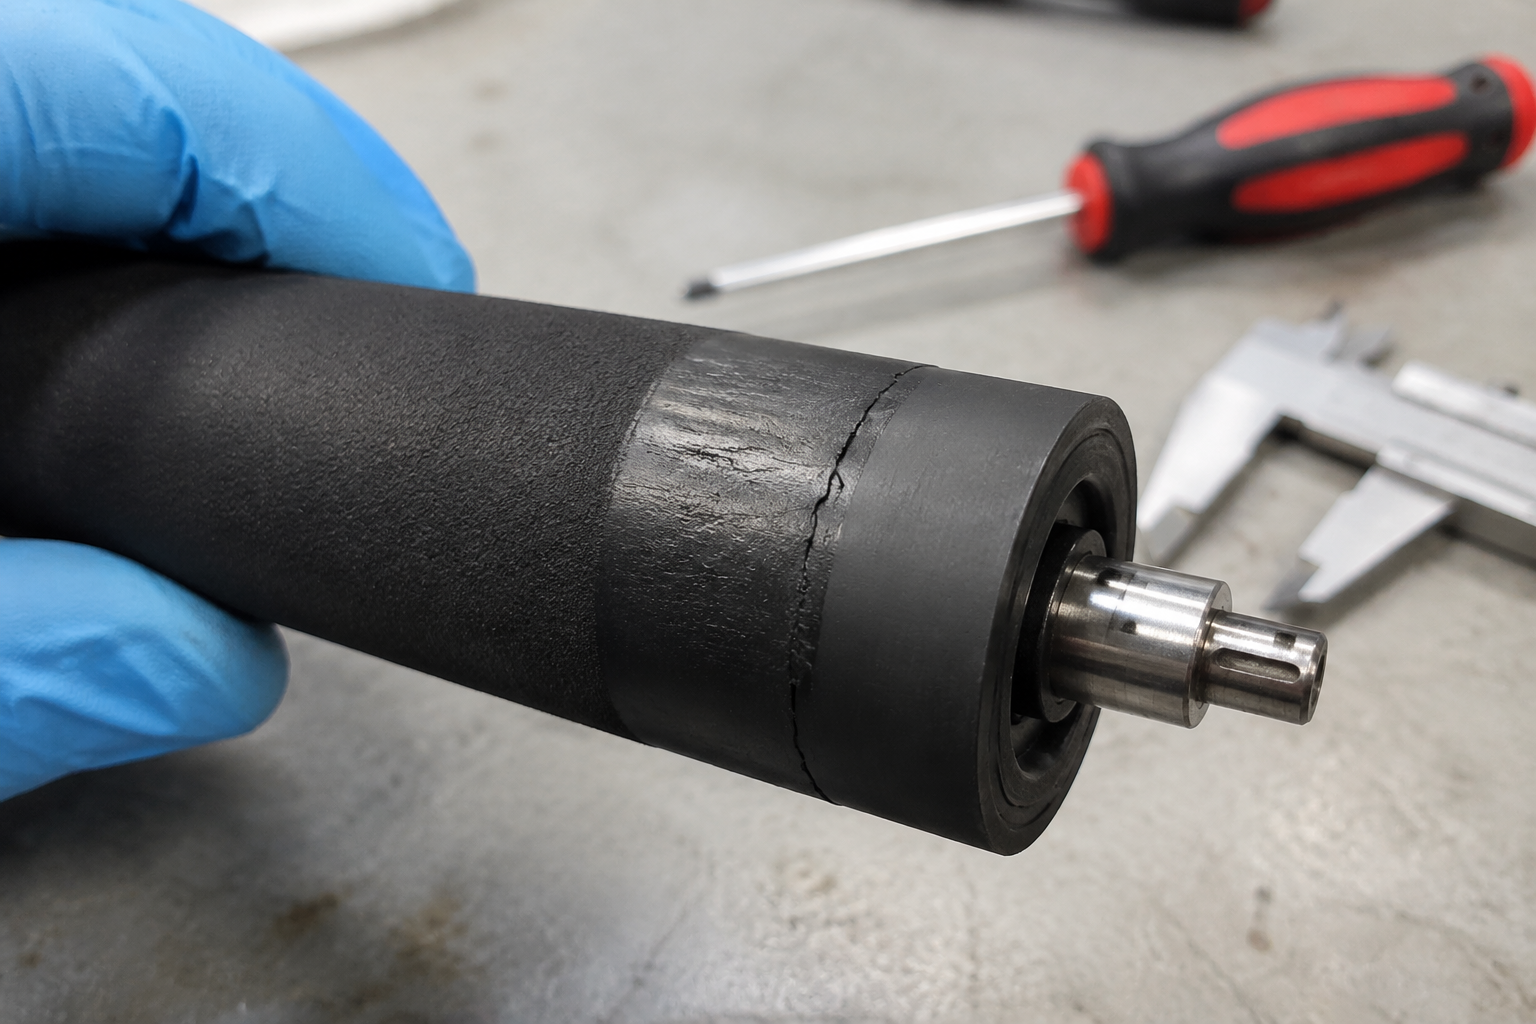
- Frequent Paper Jams: The paper stops halfway through the fuser, often with a crumpled leading edge. The roller may have a crack or a missing chunk that catches the paper.
- Ghost Images: A faint, repeating image from a previous page appears on the next print. This occurs when the pressure roller fails to clean residual toner off the fuser roller.
- Error Codes on Screen: Common codes include
Error 50.1 Fuser Error(HP),Error E000(Canon),Service Call Fuser Error(Brother), or024-910 Fuser Unit Error(Xerox). These codes may indicate a temperature or pressure fault. - Scorching or Burning Smell: The roller’s rubber coating has degraded, causing friction that overheats the unit.
When does it happen?
- Symptoms usually appear gradually over hundreds or thousands of pages. Some users report a sudden jam after a paper misfeed that tore a chunk out of the roller.
- It can also happen immediately after a firmware update that changes fuser temperature profiles, accelerating wear.
- High-humidity environments cause the roller surface to become tacky, increasing the chance of paper sticking.
How does it progress?
- Initially, you might see occasional wrinkles on heavy paper. Over time, the wrinkles appear on all paper types.
- Ghost images become darker and more frequent.
- Finally, the printer will refuse to feed paper through the fuser, displaying a persistent error code.
Specific Models with Known Issues:
- HP LaserJet Pro M404/M405: The lower pressure roller (JC61-02337A) develops flat spots after 50,000 pages.
- Canon imageCLASS LBP226dw: The lower pressure roller (JC61-01960A) cracks at the seam, causing paper jams.
- Brother HL-L2350DW: The lower sleeve (G029-4174) delaminates from the metal core, causing vertical bands.
- Xerox Phaser 6510: The pressure roller assembly fails due to worn bearings, causing noise and jams.
How to Diagnose the Problem Step by Step
Do not order a new fuser yet. Follow these numbered steps to confirm the pressure roller is the problem.
Quick Visual Check – No Tools Required
- Open the printer’s rear access door or fuser access panel. Locate the fuser unit (usually a metal box with two rollers visible).
- Normal: The pressure roller (the lower one) should have a smooth, uniform dark gray or black rubber surface. It should spin freely when you turn it with your finger.
- Abnormal: Look for flat spots, cracks, missing chunks, or a shiny glazed surface. If the roller has any visible damage, it is the cause.
Paper Wrinkle Pattern Test
- Print a single sheet of plain copy paper. Observe the wrinkles.
- Normal: Paper comes out perfectly flat.
- Abnormal: Wrinkles that run parallel to the paper feed direction (from top to bottom) indicate a pressure roller issue. Wrinkles that are diagonal or random indicate a different problem (e.g., pickup roller or registration roller).
Ghost Image Confirmation
- Print a page with a large black rectangle. Then print a blank page immediately after.
- Normal: The blank page is clean.
- Abnormal: A faint image of the rectangle appears on the blank page. This confirms the pressure roller is not cleaning the fuser roller properly.
Detailed Check – Requires Tools (Phillips #2 screwdriver, flashlight)
- Remove the fuser unit from the printer (usually two screws and a connector).
- Place the fuser on a clean surface. Use the flashlight to examine the pressure roller from both ends.
- Normal: The roller diameter is consistent across its entire length. The rubber feels firm but slightly pliable.
- Abnormal: Measure the roller diameter at multiple points using a caliper. A difference of more than 0.5 mm indicates a flat spot. Also, check the ends of the roller for worn bearings (rough spinning).
The Tape Test
- Press a piece of masking tape onto the pressure roller surface, then peel it off.
- Normal: The tape comes off clean.
- Abnormal: If you see black rubber stuck to the tape, the roller is degrading and shedding material. This will contaminate the printer.
If any of these checks show abnormal results, the pressure roller needs replacement.
Why This Happens — Root Cause
The pressure roller fails due to a combination of mechanical stress, heat, and material degradation.
Engineering Mechanics:
- The pressure roller is made of a metal core covered with a silicone or rubber compound. It is pressed against the hot fuser roller by springs at both ends.
- During printing, the roller rotates at high speed (hundreds of revolutions per minute) while being compressed. This creates a constant, high-stress zone at the nip (where the two rollers meet).
- Over time, the rubber compound loses its elasticity due to heat cycling (from room temperature to 180°C/356°F). This causes the rubber to take a permanent set, forming flat spots.
Specific Conditions That Accelerate Failure:
- Heat: Running the printer continuously for long jobs (over 1000 pages) without cooldown periods. The rubber overheats and oxidizes, becoming brittle.
- Dust and Toner Spills: Paper dust and loose toner accumulate on the roller surface. This creates a hard, glazed layer that reduces friction and causes slips, leading to uneven wear.
- Crash Force: A paper jam that requires forceful removal can tear the rubber or dent the metal core. This is a sudden failure, not gradual.
- Age: Even if the printer is lightly used, the rubber degrades over 3-5 years due to ozone exposure and natural outgassing from the rubber itself.
- Incorrect Paper: Using rough paper (e.g., textured cardstock) acts like sandpaper, wearing the roller faster.
Part-Specific Failures:
- JC61-02337A (HP M404/M405): The rubber sleeve is thin (approx. 1.5 mm). It develops flat spots after 50,000 pages because the metal core is not perfectly round, creating uneven pressure points.
- JC61-01960A (Canon LBP226dw): The roller has a seam where the rubber is molded. This seam is a weak point that opens into a crack after 20,000 pages.
- G029-4174 (Brother HL-L2350DW): The rubber sleeve is bonded to the metal core with adhesive. The bond fails due to heat, causing the sleeve to slide or bubble, creating vertical bands.
Can You Fix It Yourself?
Difficulty Level: 2 out of 5 (Basic mechanical skill required) Time Required: 30 to 60 minutes (first time) | 15 minutes (experienced) Skill Level Needed: Ability to use a Phillips #2 screwdriver and handle small parts. No soldering or electronics work.
Risks and What Could Go Wrong:
- Risk of damaging the fuser roller: The fuser roller has a delicate Teflon coating. If you scratch it with a tool, the fuser is ruined. Solution: Use plastic tools (spudgers) to remove the old roller.
- Risk of incorrect roller installation: The roller must be oriented correctly (some have a specific rotation direction). Solution: Mark the roller’s orientation with a marker before removal.
- Risk of stripped screws: The fuser unit screws are often tight. Solution: Use a quality screwdriver that fits snugly.
- Risk of electrical shock: The fuser unit contains high voltage components. Solution: Unplug the printer and wait 30 minutes for capacitors to discharge.
Tools Required:
- Phillips #2 screwdriver (magnetic tip recommended)
- Flathead screwdriver (small, for prying clips)
- Plastic spudger or guitar pick (to avoid scratching rollers)
- Flashlight
- Caliper or ruler (for measuring roller diameter)
- Isopropyl alcohol (90% or higher) and lint-free cloth (for cleaning fuser roller)
- Thermal grease (optional, for some models that require it on the roller bearings)
Note: Some fuser units require removing the entire fuser assembly from the printer before accessing the pressure roller. This adds 10 minutes to the repair.
Cost Breakdown — DIY vs Professional
DIY Cost:
- Part #1: 1SETX JAPAN JC61-02337A Fuser Lower Pressure Roller – $2.54 (perfect for HP M404/M405)
- Part #2: 1set JC61-01960A Lower Pressure Roller – $0.80 (for Canon LBP226dw)
- Part #3: 1PCS G029-4174 Lower Fuser Sleeve Pressure Roller – $1.54 (for Brother HL-L2350DW)
- Total DIY Cost: $0.80 to $2.54 for the part. Add $5 for shipping if not free.
Professional Repair Cost:
- Repair Shop Rate: $80 to $150 per hour (typical minimum 1 hour).
- Total Professional Cost: $80 to $150 (labor) + part cost ($5-$20 if marked up).
- Total: $85 to $170.
When to Skip DIY:
- If you have no mechanical experience and the printer is under warranty, send it to the manufacturer.
- If the fuser roller shows damage (scratches, gouges), you may need to replace the entire fuser assembly instead of just the pressure roller. That is a more expensive repair ($50-$100 for a new fuser).
- If you cannot remove the old roller without damaging the fuser unit (e.g., the roller is seized onto the shaft), stop and take it to a shop.
Cost Comparison Summary:
- DIY: $2.54 (part) + 1 hour of your time = $2.54.
- Professional: $85 to $170.
- Savings: $82 to $167 by doing it yourself.
Repair Process Overview
Follow these steps exactly. Work on a clean, well-lit surface.
Prepare the Printer
- Turn off the printer and unplug it from the wall outlet.
- Wait 30 minutes for the fuser to cool down completely.
- Remove the toner cartridge and set it aside in a dark place.
Remove the Fuser Unit
- Open the rear access door. Locate the fuser unit (usually held by two screws, one on each side).
- Use a Phillips #2 screwdriver to remove the screws. Place them in a small container.
- Disconnect the fuser unit’s electrical connector (usually a ribbon cable or a 2-pin plug).
- Slide the fuser unit out of the printer. Be careful not to touch the fuser roller (the top roller) – it may still be hot.
Disassemble the Fuser Unit
- Place the fuser unit on a clean surface. Identify the pressure roller (the lower roller).
- Remove any metal clips or plastic covers that hold the pressure roller in place. Use a flathead screwdriver or spudger to pry them off carefully.
- Note the orientation of the pressure roller. Some rollers have a gear on one end or a specific rotation direction (marked with an arrow). Take a photo for reference.
Remove the Old Pressure Roller
- Lift the pressure roller out of its bearings. It may be held by spring clips – compress the clips with your fingers or pliers.
- If the roller is stuck, gently tap the end of the metal core with a wooden mallet. Do not hit the rubber.
- Once removed, inspect the bearings. If they are rough or worn, replace them too (available separately for a few dollars).
Clean the Fuser Roller
- Use a lint-free cloth dampened with isopropyl alcohol to wipe the fuser roller (the top roller). Remove any toner residue or debris.
- Do not use paper towels – they leave fibers that can cause jams.
- Let the roller dry completely (2 minutes).
Install the New Pressure Roller
- Take the new pressure roller (e.g., JC61-02337A) and align it with the orientation you noted earlier.
- Insert it into the bearings. Ensure it spins freely.
- Reattach any clips or covers. Make sure they are fully seated.
Reassemble and Test
- Reinstall the fuser unit into the printer. Connect the electrical connector.
- Replace the two screws that hold the fuser unit.
- Close the rear access door.
- Reinstall the toner cartridge.
- Plug in the printer and turn it on. Wait for the printer to initialize (may take 2 minutes).
Common Mistakes to Avoid:
- Forgetting to clean the fuser roller: Old toner on the fuser roller will stick to the new pressure roller, causing immediate ghost images.
- Installing the roller backward: The roller may have a directional arrow. If installed backward, it will cause jams.
- Over-tightening screws: The fuser unit screws are small – tighten them snugly but do not strip them.
- Touching the fuser roller surface: Skin oils will cause toner to stick, creating defects. Wear gloves if possible.
After the Repair — Testing & Verification
How to Know the Repair Worked:
- Print a test page (a simple text document). The page should come out flat with no wrinkles.
- Print a blank page. It should be completely clean – no ghost images.
- The printer should not display any error codes.
What to Watch for in the First Few Hours:
- First 10 Pages: Listen for any unusual noises (grinding, squeaking). A slight rubbing sound is normal as the new roller seats. If you hear a loud click or screech, stop and check the roller installation.
- First 50 Pages: Check for any new wrinkles or lines. If they appear, the roller may not be seated correctly, or the bearings are damaged.
- First 100 Pages: The roller may have a slight odor (burning rubber) as it heats up for the first time. This is normal and should fade after 20 pages. If the smell persists or you see smoke, turn off the printer immediately – the roller may be misaligned.
- First 500 Pages: The roller should now be fully broken in. Prints should be consistent.
Long-Term Monitoring:
- The new pressure roller should last 50,000 to 100,000 pages, depending on the model.
- To extend its life, use only plain paper (avoid textured cardstock), and let the printer cool down between large print jobs.
- Clean the pressure roller with a dry lint-free cloth every 10,000 pages to remove dust and toner buildup.
If the Problem Returns:
- If wrinkles or jams reappear within the first 1,000 pages, the roller may be defective. Contact the seller for a replacement.
- If the printer still shows an error code (e.g., 50.1), the fuser thermistor or heater may have failed – this is a separate issue requiring professional repair.
Parts You’ll Need
Here are the parts that match this repair. Click the link to check the current price on AliExpress.
| Product | Price |
|---|---|
| 1SETX JAPAN JC61-02337A Fuser Lower P… | $2.54 |
| 1set JC61-01960A Lower Pressure Rolle… | $0.80 |
| 1PCS G029-4174 Lower Fuser Sleeve Pre… | $1.54 |
Prices and availability are subject to change on AliExpress.