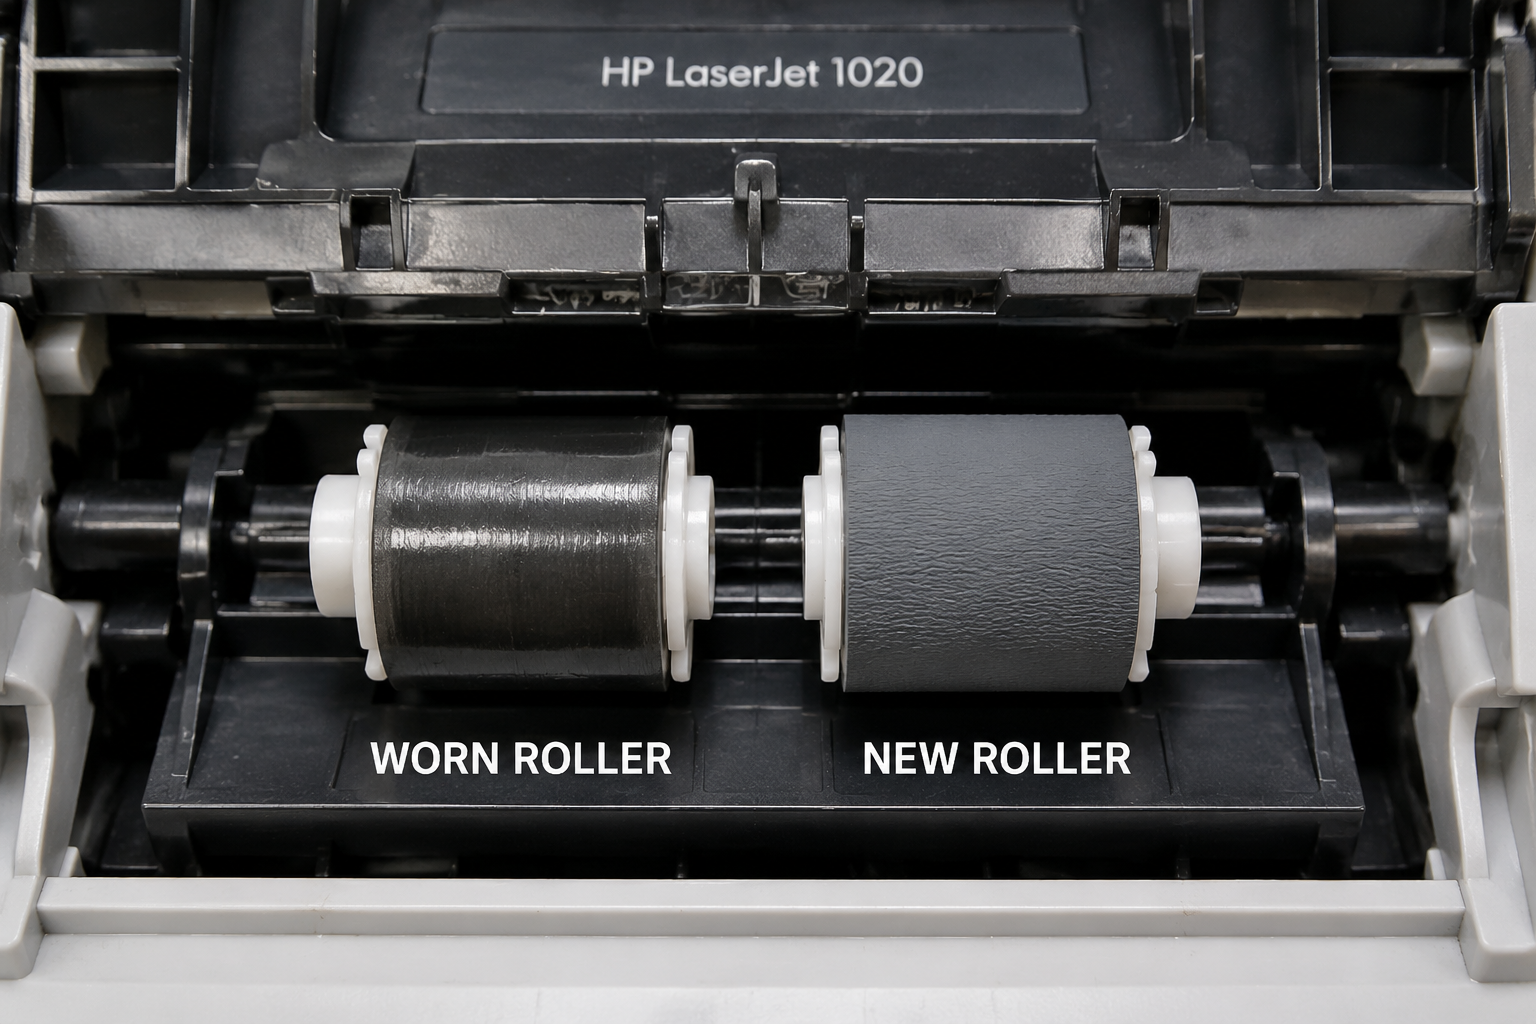
If your HP LaserJet 1020 is making a grinding noise, showing multiple paper jams, or feeding multiple sheets at once, the pickup roller is likely worn or glazed. This guide explains exactly how to diagnose the problem, why it happens, and how to replace the roller for under $2.
What’s Happening — Symptoms in Detail
The Problem in Detail
Your HP LaserJet 1020 has suddenly stopped feeding paper reliably. Here’s what you’re experiencing:
Grinding or slipping noise – When you press the Start button, you hear a high-pitched whine or a rubber-against-plastic screech. The paper either doesn’t move at all or only moves a few inches before stopping.
Paper Jam error – The LCD shows 13 PAPER JAM or JAM IN TRAY 1. You open the printer and find the paper is stuck just past the pickup roller, often wrinkled or folded.
Multiple sheets feed at once – Instead of one page, the printer pulls in two or three sheets, causing a jam deeper in the fuser area.
Blank pages or partial prints – The paper goes through but nothing is on it, or only a faint image appears. This happens because the roller slips and the paper doesn’t advance at the correct speed.
Some users report the problem starts gradually: first only when the paper stack is low, then every time. Others say it failed suddenly after a paper jam that was force‑pulled out. The issue is not related to firmware updates or power cycles—it is purely mechanical.
When does it happen?
- On the first print after the printer has been idle (dust settles on the roller).
- When the paper tray is more than half empty (less downward force on the roller).
- When using cheap, thin, or glossy paper (reduced friction).
How does it progress? The rubber surface of the pickup roller hardens and develops a shiny glaze from years of rubbing against paper. This glaze reduces grip. It’s a slow degradation that suddenly crosses a threshold where the roller can no longer pick at all.
How to Diagnose the Problem Step by Step
Step-by-Step Diagnosis
You can diagnose this in under 5 minutes with no special tools. Follow these steps:
Observe the paper path – Open the top cover and remove the toner cartridge. Look at the position of a paper jam. Normal: paper is curled around the fuser or straight in the output tray. Abnormal: paper is stuck right at the entrance near the gray rubber roller.
Check the pickup roller visually – Remove the paper tray. Look up into the printer. You will see a gray rubber roller (about 1 inch in diameter) mounted on a metal arm. Normal: the roller surface is matte, dark gray, and has a slight texture. Abnormal: the roller is shiny, smooth, or has a white or glossy ring around the center.
Manual friction test – With the printer off and the power cord unplugged, reach in and press the pickup roller with your thumb. Try to rotate it slightly. Normal: it grips your thumb and turns with moderate resistance. Abnormal: it slips against your thumb like a polished marble, or it doesn’t turn at all (the mechanism is seized).
Paper feed test – Place a single sheet of paper in the tray, press the Start button, and watch the roller engage. Normal: the roller rotates and the paper enters smoothly, no sound. Abnormal: the roller spins but the paper doesn’t move, or you hear a chatter.
Separator pad inspection – While you are at it, check the small rubber pad inside the tray that separates sheets. Normal: it is dark and firm. Abnormal: it is shiny, compressed, or missing. A worn separator pad can cause multi‑feeding.
Quick check for beginners: Just do steps 2 and 3. If the roller looks shiny and doesn’t grip your thumb, you have the problem.
Detailed check for advanced users: Use a magnifying glass and a flashlight. Look for cracks, chunks missing, or a layer of paper dust that has melted into the surface. Also measure the roller’s diameter – a new one is 10 mm; worn ones are 9.5 mm or less.
Why This Happens — Root Cause
Root Cause — Why This Happens
The pickup roller (part number RC1-2029-000 for HP LaserJet 1020) is a simple rubber cylinder that presses against the top sheet of paper. Over time, the rubber undergoes two forms of degradation:
Glazing: The constant friction with paper and ambient heat (the fuser radiates heat into the printer) causes the rubber’s surface layer to harden and become glossy. This happens just like a car tire gets shiny when it’s worn out. Glazed rubber has almost no coefficient of friction – it slides instead of grips.
Wear: The roller’s outer diameter shrinks by 0.3–0.5 mm after thousands of pages. This reduces the amount of compression against the paper, so it can’t generate enough friction to move the sheet.
What accelerates this failure?
- High humidity – paper absorbs moisture, making it slicker, requiring more grip from the roller.
- Dusty environments – paper dust accumulates on the roller and acts like a lubricant.
- Frequent thin paper use – lightweight paper (60 gsm) has less surface texture, causing faster glazing.
- Age – even if not used, the rubber oxidizes and hardens. A 10‑year‑old printer will have a brittle roller.
Specific known issue: The HP LaserJet 1020 was sold between 2005 and 2012. The original rollers were made from a compound that tends to harden after about 30,000 pages. This is not a design flaw but a material limitation. Later revisions of the roller (still RC1-2029-000) use a slightly softer compound, but they are mechanically identical.
Can You Fix It Yourself?
Can You Fix It? — Honest Assessment
- Difficulty level: 1 out of 5 (requires no special skills)
- Time required: 10–15 minutes for the first time, 5 minutes after that
- Skill level needed: None – you only need to use a screwdriver and snap a part into place. No soldering, no electronics.
- Risks: Very low. The biggest risk is breaking a plastic clip if you force it. The pickup roller is held by a simple metal clip. If you snap it, you can still buy a replacement arm cheap. Also, if you leave the printer on while working, you could pinch your fingers – always unplug first.
- Tools required: A Phillips #1 screwdriver (standard small size) and optionally a flat blade screwdriver to pry the clip.
This is one of the easiest printer repairs you can do. Even if you have never opened a printer before, you can do it. The worst that can happen is you take longer than 15 minutes.
Cost Breakdown — DIY vs Professional
DIY vs Professional — Real Cost Comparison
DIY route:
- New pickup roller (RC1-2029-000): $1.33 on Amazon (single piece)
- Paper jam roller kit (includes pad): $0.91
- Bulk pack of 10 rollers: $1.21 (just $0.12 each!)
- Total DIY cost: around $1.50 if you buy one roller + shipping (often under $5 total)
Professional repair:
- Typical labor charge at a local shop: $30–$50 for diagnosis and replacement (labor only)
- If they use genuine HP parts: add $10–$15 for the roller
- Total professional cost: $40–$65
When to skip DIY:
- If your printer has severe internal damage (e.g., a broken gear from a previous jam), the pickup roller is not the only issue. In that case, the cost of repair may exceed the printer’s value ($50–80 used).
- If you are extremely uncomfortable with small plastic clips and don’t want to risk breaking the printer. But honestly, you should still try – the part is cheap and you can learn.
For most people, DIY is the obvious choice. The part costs less than a cup of coffee and the job is trivial.
Repair Process Overview
Repair Process Overview
Unplug the printer – Wait 10 minutes for the fuser to cool.
Remove the paper tray – Slide it out completely and set it aside.
Open the top cover and remove the toner cartridge (lift the green handle).
Locate the pickup roller – It is the gray rubber roller mounted on the left side (facing the printer). It sits inside a metal bracket attached to the main frame.
Release the retaining clip – You’ll see a small metal or plastic clip that holds the roller shaft. Use a flat blade screwdriver to gently pry the clip out. Do not lose it.
Slide the old roller off the metal shaft. It will come free easily. Some versions have a D‑shape shaft – make sure to note the orientation.
Install the new roller – Slide it onto the shaft. It should snap into place. Rotate it by hand to confirm it spins freely.
Reinstall the clip – Push it back until it clicks. Tug the roller gently to verify it doesn’t slide off.
Clean the separator pad (optional) – While you have access, wipe the rubber pad inside the tray with a lint‑free cloth and isopropyl alcohol. If it is glossy, consider replacing it (part included in the jam roller kit).
Reassemble – Put the toner cartridge back, close the top cover, and reinsert the paper tray.
Common mistakes and how to avoid them:
- Not matching the roller orientation: Some rollers have a flat side that aligns with the shaft. Forcefully pressing will break the shaft. Tip: Align the flat side of the roller hole with the flat side of the shaft.
- Losing the retaining clip: Put the clip in a bowl while working.
- Forgetting to clean the pad: A glazed separator pad can cause multi‑feeding even with a new pickup roller.
After the Repair — Testing & Verification
After Repair — Verification
Immediate test: Load a few sheets of plain paper (80 gsm). Press the Start button without connecting to a computer (use the self‑test: press and hold the GO button for 5 seconds). Listen for a smooth feeding sound. The paper should exit without jams.
First 10 pages: Print a series of test pages from a PC – use a text document. Check that each page is picked individually, not doubles. After 10 pages, inspect the pickup roller – it should be clean and not heating up excessively.
Watch for:
- Any slipping sound: if you hear it, the roller might not be seated correctly. Recheck the clip.
- Paper curling or skew: could indicate a secondary roller issue (transfer roller).
- Errors returning: if jams reappear, the separator pad might be the culprit – replace it.
Long‑term verification: If the printer works for 50 pages without issue, the repair is successful. The new roller should last another 30,000–50,000 pages if you use good quality paper.
Parts You’ll Need
Here are the parts that match this repair. Click the link to check the current price on AliExpress.
| Product | Price |
|---|---|
| 1PCS RC1-2029-000 BASE PICKUP ROLLER … | $1.33 |
| 1pc Paper Jam Roller Kit HP LaserJet … | $0.91 |
| 10PCS RL1-0266-000 Paper Pickup Rolle… | $1.21 |
Prices and availability are subject to change on AliExpress.