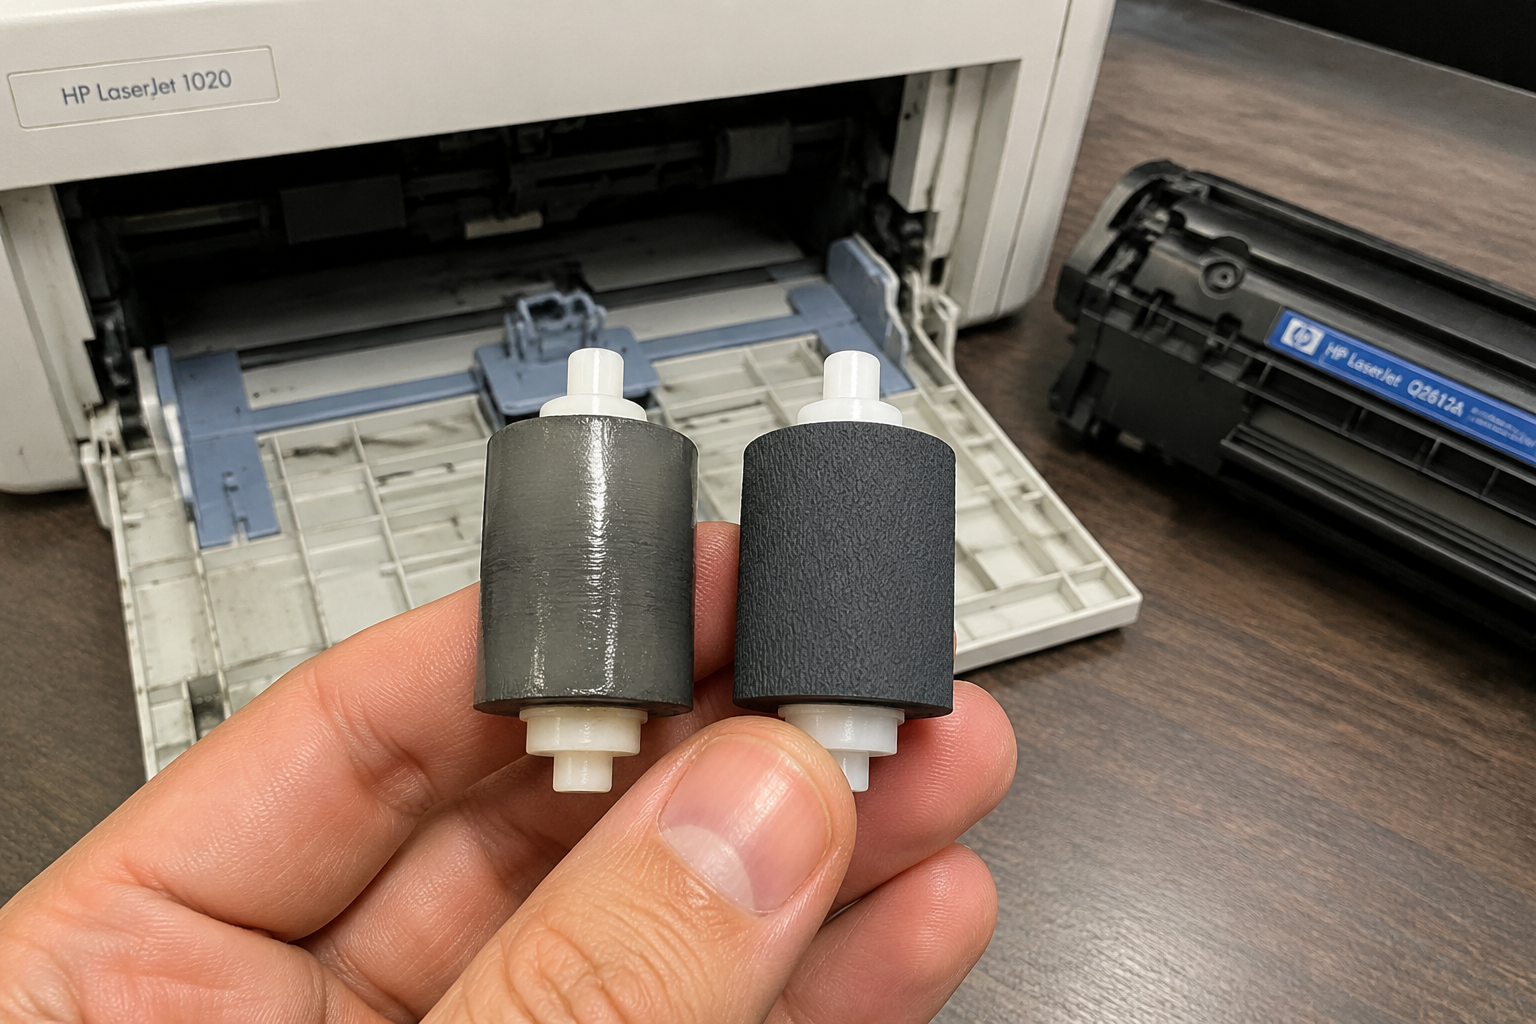
If your HP LaserJet 1020 won’t pick paper, feeds multiple sheets, or shows jam errors, the pickup roller is likely worn or glazed. This guide gives you exact symptoms, step-by-step diagnosis, root cause, and a full repair walkthrough using a $1-2 part.
What’s Happening — Symptoms in Detail
Exact Symptoms You May Be Seeing
Your HP LaserJet 1020 suddenly refuses to grab paper from the input tray. The printer sounds like it’s trying – you hear a loud thunk or a grinding noise – but no paper enters. Alternatively, it grabs multiple sheets at once (multi‑feed), causing paper jams halfway through. The control panel shows Error 13 Paper Jam or Check Paper even when paper is loaded correctly. The problem may start as occasional misfeeds that worsen over time, or fail completely after one heavy print session. Some users report that pressing down on the paper stack helps temporarily, but that’s a sign the roller is losing grip.
When It Happens
- On every print job, or only on the first page after idle time.
- After printing on rough or glossy paper (accelerates wear).
- After the printer has been used for more than 2-3 years without any roller maintenance.
How It Progresses Initially you see occasional skipped pages or tilted paper. Then it becomes a persistent feed failure. Eventually the roller feels glassy smooth and spins without moving paper.
How to Diagnose the Problem Step by Step
Step‑by‑Step Diagnosis
Tools needed: #2 Phillips screwdriver, flashlight, and a clean cloth.
Open the printer and remove the toner cartridge.
- Pull the front cover down, then pull the toner cartridge straight out. Set it on a clean surface away from light.
Locate the pickup roller assembly.
- It’s at the rear of the paper tray opening, just above where paper sits. On the HP LaserJet 1020, it’s a small rubber roller mounted on a plastic arm. Use a flashlight to see it clearly.
Rotate the roller by hand.
- Normal: The rubber feels slightly tacky, with visible texture (tiny ridges or a matte finish). It rotates smoothly with mild resistance.
- Abnormal: The roller feels hard, shiny like glass, or has flat spots. If it spins very easily with almost no friction, it’s glazed.
Feed test with a single sheet.
- Tear a piece of paper into a 2-inch strip. Insert it just under the roller, then gently pull it while the printer is off. Normal: you feel friction and the paper resists pulling. Abnormal: the paper slides out with no resistance.
Advanced check – measure roller diameter.
- Use a caliper if you have one. A new roller measures about 19.5 mm across. If yours is below 18.5 mm, the rubber has worn down and must be replaced.
Check the paper separator pad (optional).
- This is the gray rubber pad beneath the tray where paper rests. If it’s also shiny or worn, you may need to replace it too (available as part of the Paper Jam Roller Kit).
Why This Happens — Root Cause
Why the Pickup Roller Fails
The pickup roller is a rubber composite (polyurethane or EPDM) designed to grip paper by friction. Over time, two things happen:
- Rubber hardening: Heat from the fuser and ambient temperature changes cause the rubber to lose its elasticity. It becomes rock-hard and cannot conform to paper surface.
- Glazing: Paper dust, toner residue, and fingertip oils build up on the roller surface. This creates a glossy, non‑stick coating. The roller spins but slides over paper instead of grabbing it.
Accelerating Factors
- High print volume (over 10,000 pages without cleaning).
- Using recycled or high‑cotton content paper (more dust).
- Leaving the printer idle for months – the roller can develop a flat spot from constant pressure.
- Handling the roller with bare hands – skin oils accelerate glazing.
Known Issue Reference HP documented this as a wear item on the LaserJet 1020/1022 series. The RC1-2029-000 replacement roller is the OEM equivalent. Third‑party kits (like the Paper Jam Roller Kit) include both the pickup roller and a new separator pad, which is a good preventive measure.
Can You Fix It Yourself?
Difficulty Level: 2 out of 5 (easy, but requires careful handling of small clips)
Time Required: 15–30 minutes
Skill Level: No soldering or electronics. Basic screwdriver skills are enough.
Risks:
- You might break the thin plastic arm that holds the roller if you force it. Apply gentle even pressure.
- The small E‑clip (retaining ring) can fly off when released – work inside a clear bag or use tweezers to hold it.
- Installing the roller backward – make sure the tabs align with the slots.
- Forgetting to plug back a connector (only if you removed a sensor cable – unlikely on this model).
Tools Required:
- #2 Phillips screwdriver (or small flathead for prying clips)
- Needle‑nose pliers (to remove the E‑clip)
- A clean, lint‑free cloth (to wipe any debris)
- Optional: tweezers for handling the clip
Cost Breakdown — DIY vs Professional
DIY Cost
- Pickup roller only: Part RC1-2029-000 – $1.27 (single) or $1.28 (similar listing).
- Paper Jam Roller Kit (includes roller + separator pad) – $0.87.
- Total DIY cost: $0.87 to $2.55 including possible shipping.
- No other parts needed.
Professional Repair Cost
- Bench fee: $50–$80 just to look at it.
- Replacement part: $10–$20 (marked up).
- Labor: $30–$50.
- Total: $80–$150.
When to Skip DIY
- If you are uncomfortable removing small clips or have very shaky hands.
- If you’ve already broken the plastic arm or a nearby cable clip – then it’s better to let a shop handle the repair.
- If your printer is still under warranty (rare for this model, but worth checking).
Bottom line: DIY saves you over $75–$145 and takes less than 30 minutes.
Repair Process Overview
Step‑by‑Step Repair Process
Power off and unplug the printer. Remove the toner cartridge and the paper tray.
Locate the pickup roller assembly. It’s behind a small plastic cover (sometimes a half‑moon shield). Gently pry the cover off with a flathead screwdriver – it snaps into two clips.
Remove the old roller.
- On the right side of the roller shaft you’ll see a small metal E‑clip. Use needle‑nose pliers to slide it off. Watch it – it may spring away.
- Slide the shaft out of its plastic bushing on the left side. The roller will now come free.
Clean the roller housing. Wipe away any paper dust or toner debris with a dry cloth. Do not use liquids – they can leave residue.
Install the new roller.
- Slide the new roller onto the shaft. Make sure the two flats on the shaft align with the internal flats on the roller. The roller should not spin independently of the shaft.
- Insert the shaft back into the left bushing, then push the right side into place and secure with the E‑clip.
Reattach the plastic cover. Snap it back firmly. Reinstall the paper tray and toner cartridge.
Common Mistakes
- Forcing the roller on backward – the shaft has a D‑shape flat; match it.
- Losing the E‑clip – if you lose it, you can use a small zip tie as a temporary fix, but order a replacement clip.
- Over‑tightening clips – they break easily. Use gentle pressure.
After the Repair — Testing & Verification
After Repair – Verification
Test print: Print a single blank page. It should feed smoothly with no noise.
Print a job: Print a 5‑page text document. Watch the first few sheets come out – they should be straight, no skew, no multi‑feeds.
Check for error codes: The Error 13 Paper Jam should be gone. If it reappears, recheck the roller installation or the separator pad.
First 24 hours: Print a few more jobs. If the roller squeaks, it may be seated incorrectly. Remove and reinstall.
Final test: Print on both plain paper and an envelope (if your printer supports it). A good roller will handle both without hesitation.
Parts You’ll Need
Here are the parts that match this repair. Click the link to check the current price on AliExpress.
| Product | Price |
|---|---|
| 1PCS RC1-2029-000 BASE PICKUP ROLLER … | $1.27 |
| 1pc Paper Jam Roller Kit HP LaserJet … | $0.87 |
| 1X RC1-2029-000 BASE PICKUP ROLLER co… | $1.28 |
Prices and availability are subject to change on AliExpress.