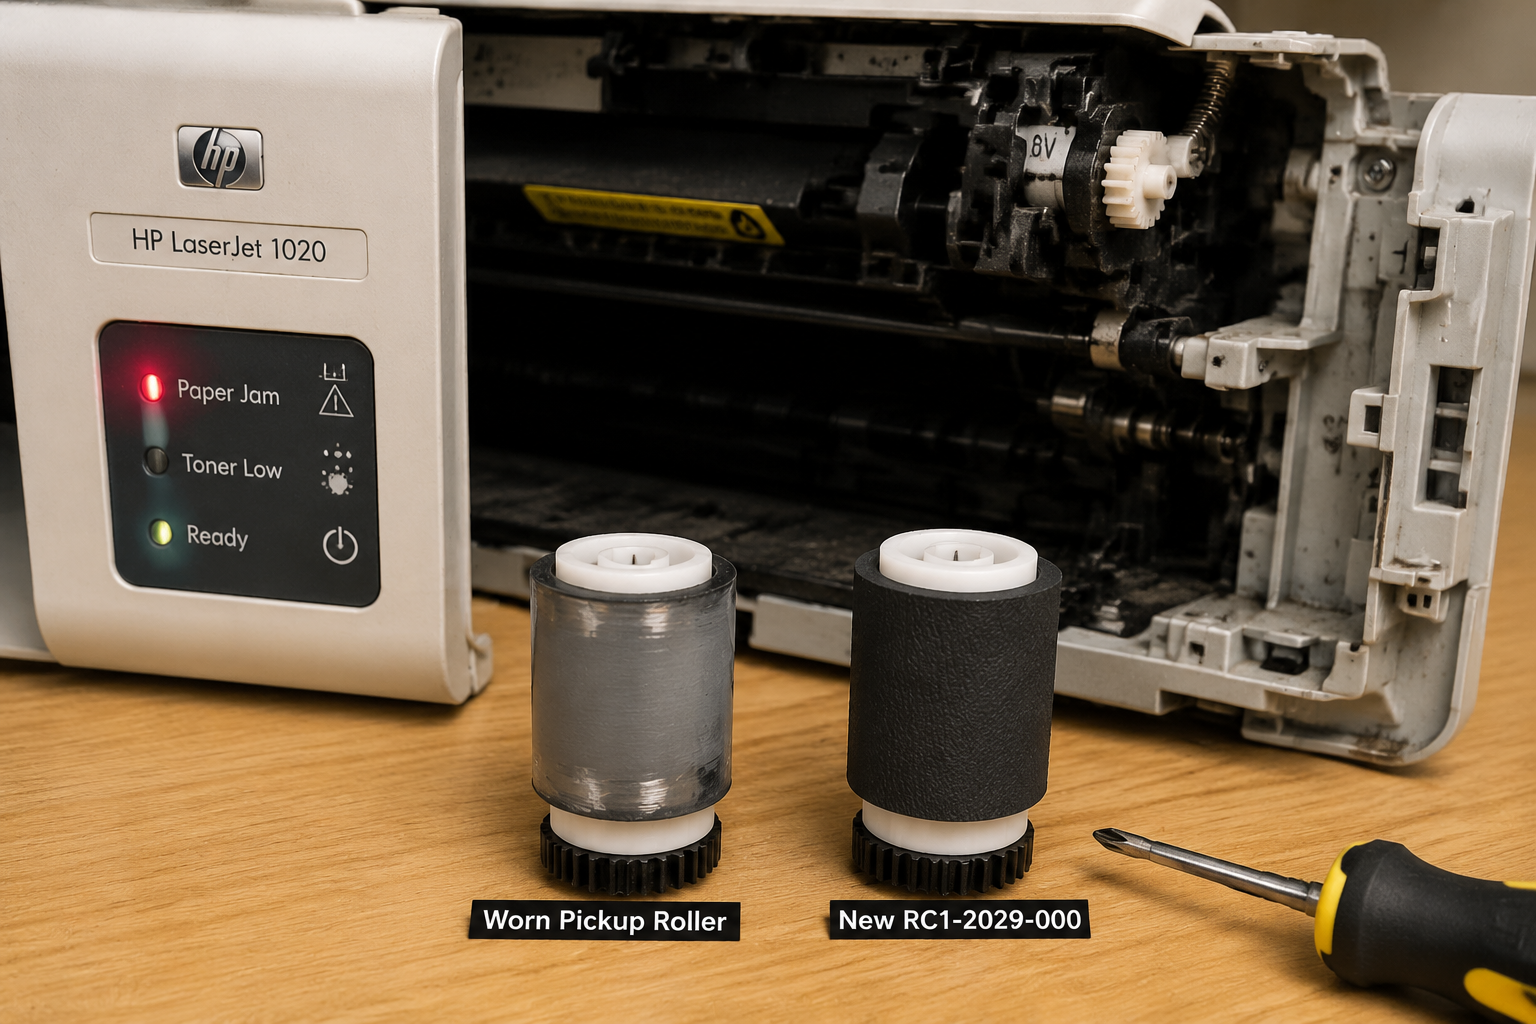
Your HP LaserJet 1020 stops pulling paper, shows 13.1 paper jam errors, and the pickup roller makes a clicking sound. This guide explains exactly what’s happening, how to diagnose the pickup roller, and whether you should replace it yourself or call a pro.
What’s Happening — Symptoms in Detail
What You’ll Experience
- The printer tries to grab paper but nothing feeds; you hear a clicking or grinding sound from the right side of the printer.
- The display shows error 13.1 Paper Jam even though no paper is visible inside.
- Some users report multiple paper feeds where the roller grabs two sheets at once, or wrinkled paper output.
When It Happens
- Usually during the first print after a long idle period.
- Gets progressively worse: jams become more frequent from 1 per 50 prints to 1 per 5 prints.
- Can happen suddenly if the roller’s rubber coating has dried out and cracked after a few weeks of no use.
Specific Scenarios
- Scenario A: The paper stops halfway out, crumpled at the exit. This indicates the pickup roller failed to feed equally on both sides.
- Scenario B: The paper enters but gets stuck at the separation pad – often a sign the pickup roller is too slick.
- Scenario C: No paper movement at all; the motor spins but the roller slips. You might see a flat spot on the roller if you inspect it.
Error Codes vs Sounds
- No LCD screen on the 1020 base model – errors appear via blinking orange light (2 blinks = paper jam).
- Click-click-click from the pickup roller area means the roller’s one‑way clutch has failed or the rubber is glazed.
Progression
- If the roller is still turning but slipping, the problem worsens over weeks.
- If the roller has a missing chunk (common from sharp staples or torn envelopes), the failure can become instant – no paper feeds at all.
How to Diagnose the Problem Step by Step
Visual Inspection – Open the top cover and remove the toner cartridge. Look at the grey pickup roller located at the rear of the paper tray area.
- Normal: The roller surface is uniform, dark grey, with a slight tacky feel when you touch it.
- Abnormal: Shiny, smooth, cracked, flat spots, or missing rubber pieces.
Spin Test – Use a small flathead screwdriver to gently rotate the pickup roller shaft from the exposed gear on the right side.
- Normal: The roller turns with even resistance and the rubber follows the rotation.
- Abnormal: The shaft spins but the roller stays still (slipping hub), or the roller turns but the shaft is loose (busted internal clutch).
Paper Slippage Test – Insert a single sheet of plain paper into the tray. Manually push it against the pickup roller while you rotate the gear.
- Normal: The paper moves forward about 1 inch per half turn.
- Abnormal: The paper doesn’t move, or the roller slides over the paper without gripping.
Separation Pad Check – Look at the small rubber pad on the paper tray (white or black) directly below the pickup roller.
- Normal: The pad has a rough texture and is not deformed.
- Abnormal: The pad is shiny, flattened, or missing. A glazed separation pad can cause double feeds even if the pickup roller works.
Quick Check for Beginners – Run the self‑test (hold the GO button for 5 seconds while powering on). If the fuser, main motor, and gears are okay, the printer will attempt to feed a blank page. Listen for the pickup roller. If you hear it spin but no paper comes out, the roller is likely dead.
Why This Happens — Root Cause
Why the Pickup Roller Fails
The HP LaserJet 1020 uses a RC1‑2029‑000 pickup roller (also known as base pickup roller). Over time, the rubber coating oxidizes and hardens due to exposure to ozone from the corona wire, heat (the fuser operates at ~200°C), and paper dust that acts like sandpaper.
Mechanical Mechanism
- The roller is driven by a one‑way clutch that allows it to rotate only in the feed direction. After thousands of pages, the clutch’s spring tabs break or the lubricant dries, causing the roller to spin freely or not engage.
- The rubber loses its coefficient of friction (from >0.8 to <0.4) – it becomes too slick to pull paper.
- If the separation pad (RL1‑0266‑000) is also worn, the pickup roller has to fight against a slick pad, accelerating rubber wear.
Conditions That Accelerate Failure
- High humidity ( above 70% ) makes paper curl and reduces friction; the roller must work harder.
- Low humidity (below 20%) causes the rubber to dry out and crack.
- Using cardstock or envelopes puts extra mechanical stress on the roller’s hub and clutch.
- Dusty environments (wood shops, garages) cause abrasive particles to embed in the rubber.
- Infrequent use – the roller sits compressed for weeks, developing a permanent flat spot.
Model‑Specific Issues
- The HP LaserJet 1020 (and 1022, 1018) shares the same pickup roller assembly. A known weakness is the right‑side gear that can crack if the tray is slammed shut – this mimics a roller failure.
- Early 1020 models (manufactured 2005–2007) had a softer rubber compound that wore out in 15,000 pages rather than the 50,000 page rating.
Can You Fix It Yourself?
Difficulty Level: 2 out of 5
- Why: No soldering or electrical work. Requires only a screwdriver and some patience.
Time Required: 15–30 minutes
- First‑time repair: 30 minutes
- Experienced: 10 minutes
Skill Level: Beginner to Intermediate
- Tools needed: Phillips #1 screwdriver, small flathead screwdriver (for prying clips), tweezers (optional for small springs).
- No solder: Everything is mechanical with snap‑fits and screws.
Risks
- Breaking the plastic gear on the right side of the roller. The gear is fragile; use gentle pressure when sliding it off the shaft.
- Losing the small metal spring that tensions the roller against the paper. It sits inside the left‑side holder. If it drops, you’ll need to retrieve it with tweezers.
- Installing the roller backwards – the hub has a notch that must align with a tab on the shaft. If forced, the roller won’t turn.
What Could Go Wrong
- The replacement roller might be slightly larger in diameter (common with cheap third‑party parts). It can rub against the paper tray cover, causing extra friction. If that happens, lightly sand the roller surface with 600‑grit sandpaper.
- The one‑way clutch may not be included with the roller kit. If your original clutch was the problem (slipping), you may need to replace the entire roller assembly, not just the rubber tire.
Advanced Option
- If you want to try rejuvenating the old roller, you can clean it with isopropyl alcohol and bake it in a 150°F oven for 10 minutes to soften the rubber – but this is a temporary fix (lasts 200–500 pages).
Cost Breakdown — DIY vs Professional
DIY Cost
- Pickup Roller (RC1‑2029‑000) – $1.33 each (sold in single piece). This is the exact OEM part number.
- Paper Jam Roller Kit – $0.91 for a kit that includes the pickup roller and separation pad. Better value if both are worn.
- 10‑pack of RL1‑0266‑000 rollers – $1.21 for ten. Only worth it if you fix multiple printers.
- Total for a single repair: $1.33 (roller only) + $0 shipping if bought from a reliable seller. Usually you can get the complete kit for under $3.
Professional Repair Cost
- Typical repair shop rate: $50–$75 for diagnosis and labor, plus $10–$20 for a generic roller. Total $60–$95.
- Authorized HP service center: $80‑$120 flat fee, which includes a pickup roller and fuser cleaning.
When to Skip DIY
- If you don’t have a Phillips #1 screwdriver and a well-lit workspace. The small clips and springs can be easy to lose.
- If the printer has additional problems like a failing fuser (error 50.x) or main motor. A professional can diagnose the whole machine.
- If you are unable to remove the stubborn screw on the right side of the roller assembly (it’s often over‑torqued from the factory). Some techs use a drop of WD‑40 to loosen it – risky near paper paths.
- If the separation pad is broken (the plastic tab snapped), you need to replace the entire paper tray (approx $25), which is beyond DIY for most users.
Repair Process Overview
Major Steps
- Power off and unplug the printer. Remove the toner cartridge and the paper tray.
- Remove the right side cover – two screws on the back (Phillips #1). Slide the cover downward to release it. You’ll see the pickup roller gear.
- Remove the pickup roller – use a small flathead screwdriver to pry the C‑clip off the left side of the roller shaft (the metal ring). Slide the roller out from the left, tilting it to clear the gear on the right.
- Separate the roller from its plastic hub – squeeze the tabs on the hub to release the rubber tire. Dispose of the old tire.
- Install the new roller – align the notch on the hub with the tab on the shaft. Push until it snaps. Make sure the one‑way clutch (the black sleeve) is facing the correct direction (arrow marks on the old one).
- Reassemble – slide the roller back into the printer, ensuring the right‑side gear meshes with the drive gears. Replace the C‑clip. Reattach the side cover and paper tray.
Common Mistakes to Avoid
- Not marking the spring position: The left side has a small torsion spring. Take a photo before removing. If the spring pops out, it’s a 10‑minute hunt.
- Forcing the gear: The gear on the roller shaft is press‑fit. If it feels stuck, check for a hidden screw or clip. Never use pliers on the gear – it will crack.
- Mixing up the separation pad: The pad goes into a slot on the paper tray. If you bought a kit, the pad might be loose. Insert it textured side up. A reversed pad won’t separate paper.
- Skipping the clutch check: If your old roller had a smooth hub and the new roller still slips, the one‑way clutch is damaged. Replace the entire roller assembly (available as RL1‑0266‑000).
After the Repair — Testing & Verification
Immediate Verification
Test with a single sheet of plain paper. Load the tray, close it, and press the GO button to print a self‑test page. Listen for a clean thunk as the roller picks the paper. No clicking or slipping.
Print 10 pages one after another. Check for: no paper jams, no multi‑feeds, no wrinkling. The output should be perfectly flat.
What to Watch in the First 24 Hours
- First page delay: If the first print after sleep takes too long, the roller might be hardening again. Normal is less than 3 seconds from tray to fuser.
- Ghosting or vertical lines: Could indicate toner spilled during roller replacement. Clean inside with a lint‑free cloth.
- Roller noise: A squeaking sound after 50 pages means the bushing is dry. Apply a drop of silicone grease to the shaft ends (not the rubber).
Long‑Term Monitoring
- Keep a log of page count. The new roller should last 50,000 pages under normal conditions. If jams return at 10,000 pages, the separation pad may need replacement.
- Clean the roller every 5,000 pages with a damp cloth (no alcohol) to remove paper dust.
- Store the printer in a moderate humidity environment (40–60%) to extend rubber life.
Parts You’ll Need
Here are the parts that match this repair. Click the link to check the current price on AliExpress.
| Product | Price |
|---|---|
| 1PCS RC1-2029-000 BASE PICKUP ROLLER … | $1.33 |
| 1pc Paper Jam Roller Kit HP LaserJet … | $0.91 |
| 10PCS RL1-0266-000 Paper Pickup Rolle… | $1.21 |
Prices and availability are subject to change on AliExpress.