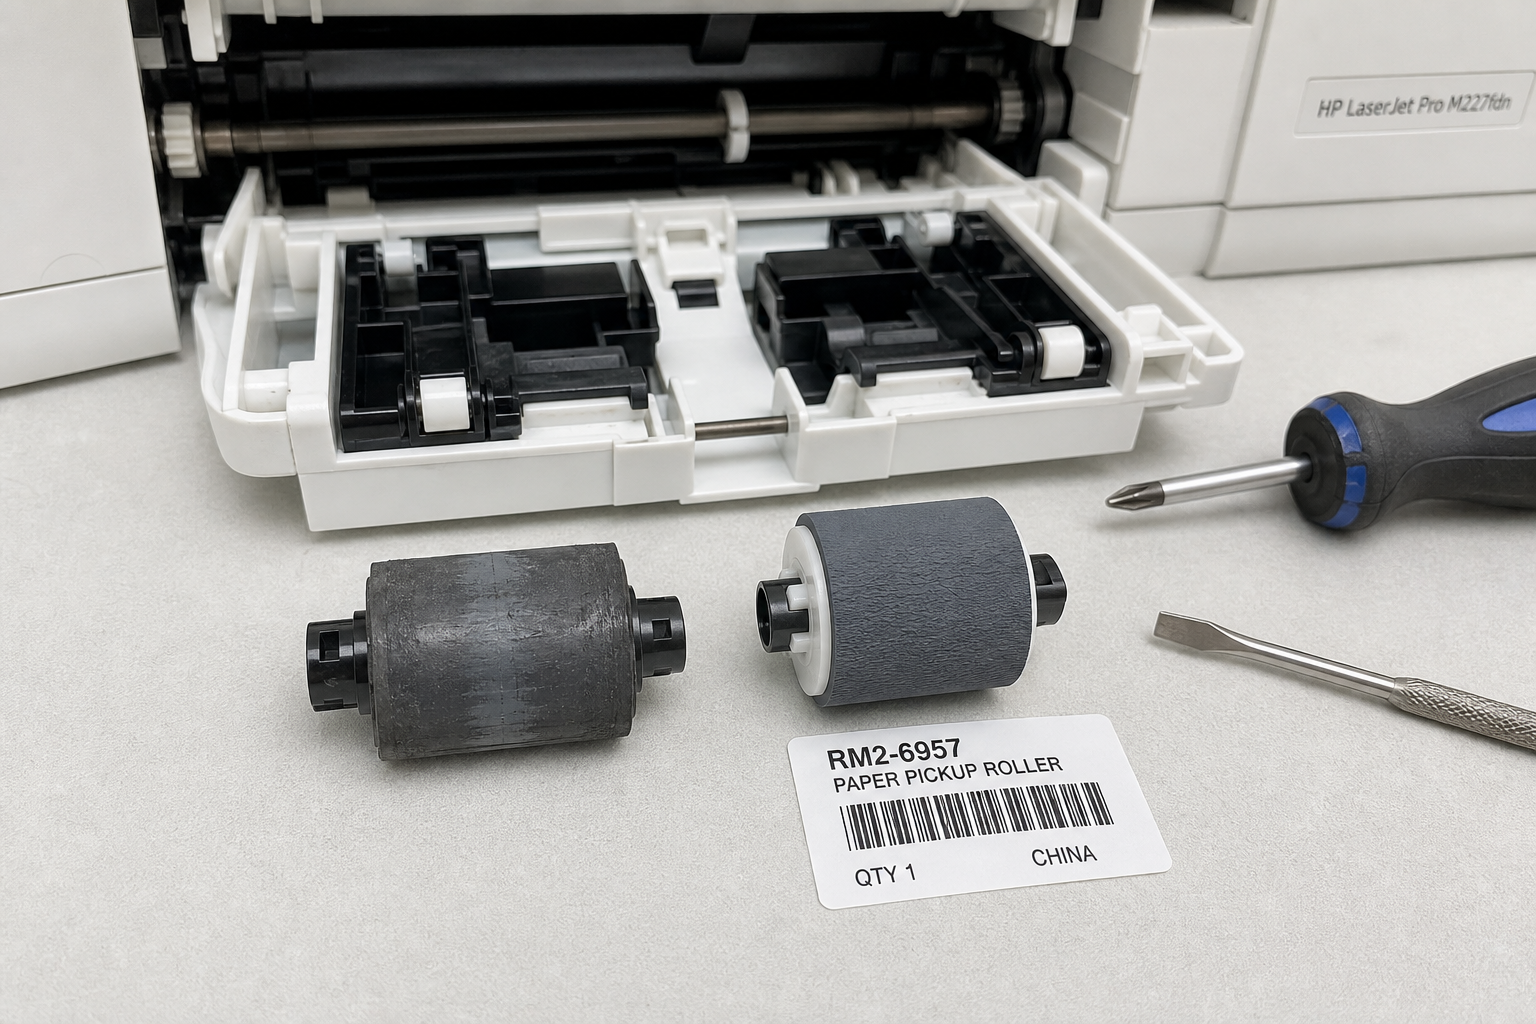
Is your HP LaserJet M227 jammed, feeding multiple pages, or making a screeching noise? This guide covers the exact symptoms, a step-by-step diagnosis to confirm the separation roller is the culprit, the engineering reasons why it fails, and a clear repair plan—including part costs and difficulty level.
What’s Happening — Symptoms in Detail
What You Experience When the Separation Roller Fails
The separation roller (also called the separation pad or pick roller) is a small rubber part inside the paper tray. When it wears out, the printer cannot reliably separate one sheet of paper from the next. You will notice one or more of the following:
- Paper jams – The printer stops with a “Paper Jam” error (e.g., 59.F0, 59.F1, or simply “Jam in Tray 1”). The paper may be crumpled or only partially fed.
- Multifeeds – Multiple sheets are pulled into the printer at once, causing jams or printed pages stuck together.
- Skewed feeding – Paper goes in crooked, leading to off-center prints or folded corners.
- Screeching or grinding sounds – A high-pitched noise when the roller tries to grip the paper, especially during the initial pick-up.
- Intermittent failure – Sometimes the printer works fine, other times it jams. This is typical as the roller rubber hardens unevenly.
When does it happen? Most often during the first page of a print job, or when printing on heavy or glossy paper. If the roller is severely worn, even plain paper will fail.
How does it progress? It usually gets worse over weeks. Initially you might see occasional multifeeds, then more frequent jams until the printer becomes unusable. A sudden failure (e.g., after dropping the printer or a firmware update) is rare—this is a wear-and-tear problem.
Error codes to look for: On the M227 control panel you may see error codes like:
- 59.F0 – Paper feed jam at pickup roller
- 59.F1 – Paper feed jam at separator
- 13.XX.YY – General jam errors that can point to the feed system
The printer may also flash orange or show a rotating “Jam” icon.
How to Diagnose the Problem Step by Step
Step-by-Step Diagnosis
Quick Check (2 minutes)
- Open the front cover and remove the toner cartridge. Inside, look at the black rubber pickup roller above the paper tray. Normal: it has a smooth, slightly glossy surface. Abnormal: it is shiny, flat, or cracked.
- Remove the paper tray and look at the separation roller at the back of the tray (near the metal guide). Rotate it with your finger. Normal: the rubber feels slightly tacky and rotates smoothly. Abnormal: it feels hard, slippery, or rotates with a grinding feel.
- Try the multifeed test: Insert a single sheet of paper into the tray and start a print. If the printer does NOT pick up the paper at all, the roller may be completely worn. If it picks up two sheets, the separation function is failing.
Detailed Check (for advanced users)
Tools needed: A small flathead screwdriver (to release clips) and a bright flashlight.
- Remove the separation roller from the tray. On the M227, the roller is held by a plastic clip on the left side (facing the printer). Push the clip inward and slide the roller out.
- Inspect the roller surface under bright light. Normal: the rubber is uniform, soft, and about 1-2mm thick. Abnormal: there is a flat spot worn down to the plastic core, or the rubber is glazed and shiny.
- Check the separation pad (the white/gray rubber pad under the roller). If the pad is worn, the paper will not separate even with a good roller. Normal: the pad has visible texture. Abnormal: it is smooth or has a groove worn into it.
- Compare with a known good roller: If you have another M227, swap rollers and see if the problem follows the roller. That confirms the fault.
What normal looks like vs abnormal:
- Normal roller: Rubber is flexible, slightly sticky, diameter ≥ 15mm (roughly dime-size).
- Abnormal roller: Hard as plastic, diameter < 13mm, flat contact area, or rubber missing chunks.
Why This Happens — Root Cause
Why the Separation Roller Fails
The separation roller on the HP LaserJet M227 is made of a soft rubber compound that needs to maintain a specific coefficient of friction to separate sheets. Over time, three factors cause failure:
- Wear – Each page that passes under the roller abrades a microscopic layer of rubber. After about 30,000–50,000 pages (or less with rough paper), the rubber becomes too thin to maintain proper grip.
- Glazing – Heat from the fuser and dust from paper cause the rubber surface to harden and become glossy. A glazed roller cannot grip paper, leading to slips and multifeeds.
- Deformation – If the printer sits unused for weeks, the roller can develop a flat spot from constant pressure against the separation pad. This flat spot causes intermittent pickup failures.
Specific part names and numbers:
- Separation roller assembly (RM2-6957) – includes the rubber roller and a metal/plastic shaft.
- Separation pad (RL1-2593) – the rubber pad under the roller that actually separates sheets.
Conditions that accelerate failure:
- High humidity – Causes paper curl and increases friction, wearing the roller faster.
- Dusty environments – Paper dust and debris mix with the rubber, turning it into a abrasive slurry.
- Heavy or coated stock – Glossy paper, labels, or envelopes require more traction and wear the roller quickly.
- Continuous printing – Running the printer non-stop heats the roller, accelerating rubber degradation.
Known issues on the M227 series: The M227sdn, M227fdn, and M227fdw all share the same feed system. Engineers designed the roller to last for the printer’s rated duty cycle of about 50,000 pages, but users report failures as early as 20,000 pages when printing on recycled paper or in dusty offices. The separation pad often wears out at the same time as the roller, which is why many repair kits include both parts.
Can You Fix It Yourself?
Can You Fix It? Honest Assessment
- Difficulty level: 2 out of 5 – Very easy. No soldering, no electronics. Just basic disassembly.
- Time required: 15–20 minutes for first-timers. 5 minutes if you’ve done it before.
- Skill needed: Basic manual dexterity. You only need to remove one or two screws and a plastic clip. No firmware updates or calibration required.
- Risks:
- Breaking the plastic retaining clip on the roller (easy to avoid by applying gentle inward pressure).
- Misaligning the new roller – it must snap into both ends evenly.
- Dropping small screws inside the printer (use a magnetic screwdriver).
- Tools required:
- Phillips #1 screwdriver (to remove the toner cartridge access cover if needed, though usually not required).
- Small flathead screwdriver (to release the roller clip).
- Flashlight (to inspect the roller and pad).
- Tweezers (optional, to help align the clip).
When to skip DIY: If the printer is still under warranty (HP provides 1 year parts/labor), or if you have already damaged the plastic frame of the paper tray, it’s better to call a professional. Also, if you are uncomfortable removing a tiny clip, a repair shop will do it in 5 minutes.
Cost Breakdown — DIY vs Professional
DIY vs Professional Cost Comparison
DIY Costs
- Separation pad with roller (RM2-6957 RL1-2593) – $0.88 (from the parts list)
- Alternative: 1x RM2-6957 RL1-2593 Separation Pad – $1.10
- Total parts cost: $0.88 to $1.10 (plus shipping, often under $5 total)
- Tools cost: $0 if you already have a screwdriver; otherwise ~$5 for a basic set.
Professional Repair Costs
- Typical shop labor: $50–$100 (15 minutes minimum charge, often $50+)
- Parts markup: Shops may sell the same separation roller for $15–$30
- Total professional repair: $65–$130
When to Skip DIY
- If you lack a clean work area and are prone to losing small parts.
- If the separation pad (the part under the roller) is also worn – you should replace it as well. The separate pad is included in the RM2-6957 kit, but you could skip the roller and just replace the pad. However, doing both is best.
- If your printer has already had a major paper jam that bent the metal guides inside the tray – that requires more extensive repair.
Real cost conclusion: For $1 you can fix the problem yourself in 15 minutes. Professional repair costs 50–100x more. DIY is almost always the smarter choice unless you have no time or tools.
Repair Process Overview
Repair Process Overview
Major Steps
- Power off and unplug the printer. Remove the toner cartridge and set it aside on a cloth.
- Open the paper tray (tray 1) and remove any paper.
- Locate the separation roller at the back of the tray. It is a black rubber roller about 1.5 inches wide, held by a clear plastic clip on the left side.
- Release the clip – Use a small flathead screwdriver to gently push the clip inward. The roller will pop out from the right side. Slide it out completely.
- Remove the separation pad (if you are replacing it). The pad is a gray rubber rectangle under the roller. It is held by two snap tabs – press them inward and lift the pad out.
- Install the new roller – Align the left side of the new roller with the clip, then push the right side into its socket until it clicks. Rotate the roller by hand to ensure it spins freely.
- Install the new pad (if replacing) – Snap it into place under the roller. Make sure the textured side faces up toward the roller.
- Reinstall the toner cartridge and close the front door. Plug in and power on the printer.
Common Mistakes and How to Avoid Them
- Forgetting to remove the paper from the tray before working – the roller won’t come out otherwise.
- Breaking the clip by prying outward instead of pushing inward – always push the clip toward the center of the printer.
- Installing the roller backwards – The roller is symmetrical, but the clip only fits on the left side. Check the orientation before pressing.
- Not cleaning the rubber guides – Before installing the new roller, wipe the metal paper guides with a dry cloth to remove debris that could cause new jams.
- Overtightening screws – There are no screws directly on the roller, but if you had to remove the tray cover, do not overtighten any screws – they strip easily.
Pro tip: Before reinserting the tray, manually rotate the new roller a few times with your finger. It should feel smooth and slightly tacky. If it feels stiff, double-check that the clip is fully seated.
After the Repair — Testing & Verification
After Repair – Verification
- Print a test page – Send a single page from your computer or use the printer’s built-in test (Menu > Reports > Configuration Page). The page should feed straight without jamming.
- Listen for noise – Normal: a soft whirring sound as the paper feeds. Abnormal: any screech, grind, or click that wasn’t there before the repair.
- Check for multifeeds – Print 10–20 pages of a simple document. No sheets should come out stuck together. If you see a double feed, the separation pad may be worn – replace it.
- Observe the first 24 hours – The new roller may have a slight static charge from packaging. If the first few pages are misaligned, that’s normal; after 10–20 pages the static dissipates. If jams continue after 20 pages, revisit the installation – the roller may be installed backwards or the clip not fully seated.
- Watch for error codes – Code 59.F0 should disappear. If you still see 59.F1, inspect the pickup roller (the larger roller above the tray) – it may also need replacement.
Long-term verification: After about 500 pages, the roller will break in. At that point, confirm that feeding is consistent even with different paper weights (20 lb bond, 24 lb, etc.). If you still encounter occasional jams, consider replacing the separation pad as well.
Parts You’ll Need
Here are the parts that match this repair. Click the link to check the current price on AliExpress.
| Product | Price |
|---|---|
| RM2-6957 RL1-2593 Separation Pad with… | $0.88 |
| 1x RM2-6957 RL1-2593 Separation Pad w… | $1.10 |
Prices and availability are subject to change on AliExpress.