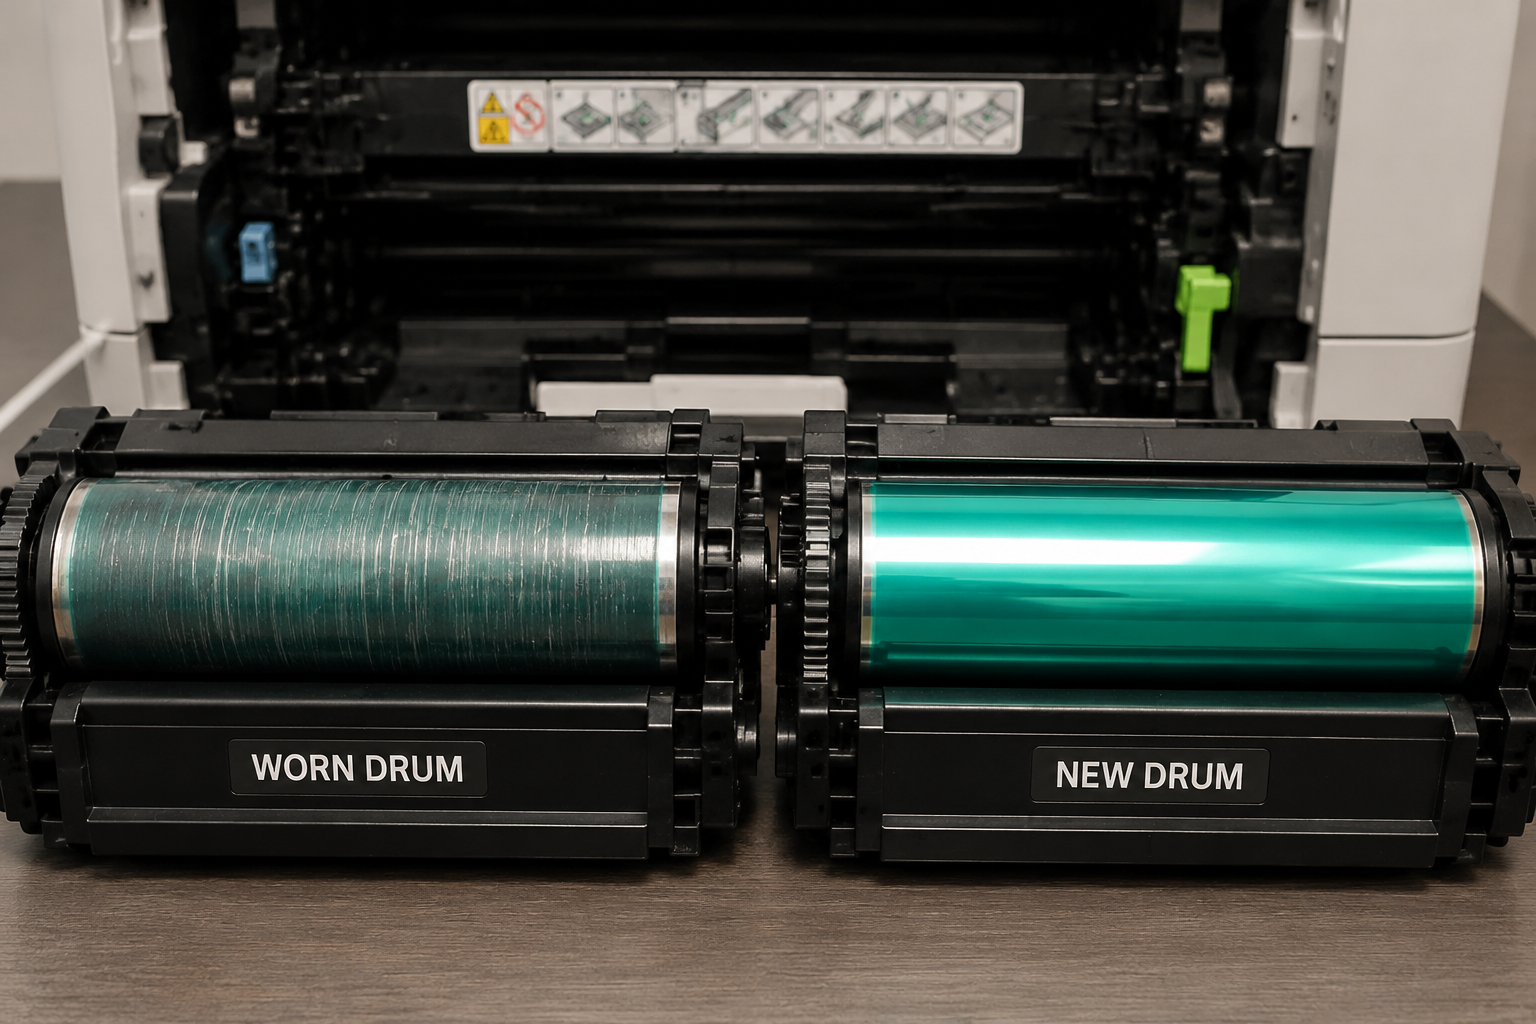
When your laser printer shows faded text, vertical streaks, ghost images, or a ‘Replace Drum’ error, the drum unit is likely worn or damaged. This guide provides step-by-step diagnosis and a clear, cost-effective DIY replacement process.
What’s Happening — Symptoms in Detail
Your printer suddenly stops printing correctly. You see vertical black lines or faded areas on every page. Some users report ghosting – a faint copy of a previous page appears on the next print. Others hear a grinding or squeaking noise during operation, especially when the drum rotates. The printer may display a ‘Replace Drum’, ‘Drum Near End’, or ‘Call Service’ message with an error code like 0xC0000xxx (HP), DRUM! (Brother), or E35 (Samsung).
This failure often happens gradually – prints get lighter over weeks, then suddenly streaks appear. In other cases, it’s sudden after a paper jam or a power surge. The problem occurs on every page, not just occasional sheets, and gets worse as the drum wears further. If you ignore it, the toner waste bin fills, causing leaks or further damage to the fuser and transfer belt.
How to Diagnose the Problem Step by Step
Visual Print Test – Print a full-page grayscale image (e.g., a 50% gray block from your computer). Normal: even gray tone. Abnormal: vertical stripes (lines), faded sections, or repeating marks every 3–4 inches (the drum circumference).
Error Code Lookup – Turn the printer on. Note any LED pattern or LCD message. For HP printers, error 0xC0000xxx with ‘Replace Drum’ indicates the drum chip is dead. For Brother, DRUM! means the drum counter reached 12,000 pages. For Samsung/XL, E35 points to a drum motor or rotation failure.
Physical Inspection – Power off and unplug the printer. Remove the toner cartridge (or drum/toner combo). Check the drum surface – a shiny green/blue cylinder. Normal: smooth, uniform color, no scratches. Abnormal: visible scratches, gouges, or a dull/pitted area. Also check the drum gear at the side for broken teeth.
Rotation Test – Gently rotate the drum by hand. Normal: smooth, even resistance. Abnormal: clicks, grinding, or it won’t turn freely. This indicates a seized bearing or broken gear.
Advanced: Conductivity Test – Using a multimeter on resistance mode, touch one probe to the drum’s metal shaft and the other to the drum’s charge roller (the black foam roller beside it). Normal: infinite resistance (no path). Abnormal: low resistance (leakage) – the drum is conductive and should be replaced.
Why This Happens — Root Cause
The drum unit contains a photosensitive drum – an aluminum cylinder coated with a photoconductive material (often OPC – organic photoconductor). This coating is eroded by friction, ozone, and UV light from the charge roller. Over time, the coating wears thin, causing charge leakage that produces light prints and streaks.
Specific models and known issues:
- HP 107A/108A drums – early failure due to weak drum shaft bearings; grinding noise common around 8,000 pages.
- Brother DR-420/DR-620 drums – the drum reset switch fails; printer gives ‘Drum Life End’ even when the drum is good.
- Samsung CLP-680 drum units – drum chip contacts corrode, causing intermittent ‘Replace Drum’ errors.
What accelerates failure:
- High humidity – moisture damages the drum coating.
- Using non-genuine toner – low-quality toner may be abrasive or chemically attack the drum.
- Paper jams – jamming pages can scratch the drum surface.
- Excessive printing of full-black pages – burns out the drum faster.
- Power outages during printing – may corrupt drum chip data, causing false ‘replace’ messages.
Can You Fix It Yourself?
- Difficulty Level: 3 out of 5 (requires careful handling of sensitive parts and possible firmware reset)
- Time Required: 30–60 minutes
- Skill Needed: No soldering; comfortable with screwdrivers and following a sequence. Need to reset the drum counter (via printer menu or button sequence).
- Risks:
- Touching the drum surface with bare hands (oils ruin it) – always use latex gloves or handle by edges.
- Damaging the charge roller or toner hopper if rough.
- Incorrect reset may lock the printer – have the service manual available.
- Tools Required:
- #1 Phillips screwdriver (for drum assembly screws)
- Flathead screwdriver (to pry clips)
- Latex or nitrile gloves (avoid fingerprints on drum)
- Soft cloth (for cleaning contacts)
- Isopropyl alcohol 90% (clean charge roller – optional)
- Multimeter (advanced diagnosis, not mandatory)
Cost Breakdown — DIY vs Professional
- DIY Drum Unit Replacement:
- A compatible drum unit (e.g., for HP M201 series) costs $25–$50 on Amazon or specialty parts sites.
- Optional: For printers with a reset chip (like Konica Minolta DR316), you can replace just the 4PCS DR316 Drum Chip at $0.94 each, but that only clears the error – if the drum is physically worn, you need the full unit ($20–$40).
- Professional Repair:
- Shop labor: $50–$100 per hour. Drum replacement by a tech: $80–$120 labor + parts. Total: $130–$180.
- When to Skip DIY:
- If the printer uses a belt-driven drum unit (e.g., large HP or Konica Minolta copiers) with complex timing, or if the printer is networked and requires firmware calibration.
- If you have no experience opening the printer and fear damaging the fuser or laser assembly.
- Savings: DIY saves 50–70% versus professional repair. But consider that some drum units include toner – if your toner is compatible, you can reuse it.
Repair Process Overview
Preparation – Unplug printer, remove paper, toner cartridge, and any covers. Wait 1 minute for residual charge to dissipate. Wear gloves to avoid oil on the drum.
Remove Old Drum Assembly – Locate the drum unit (usually behind a front or side door). Release retaining clips or screws (note positions). On Brother printers, you must also remove the developer roller (black foam). On HP, the drum and toner are combined – separate them gently.
Clean Contacts – With a soft cloth and isopropyl alcohol, wipe the metal spring contacts on both the printer and the drum. Corrosion here causes ‘Replace Drum’ errors even with good drums.
Install New Drum – Insert the new drum unit into the slots. Ensure the gear on the side mates with the printer’s drive. Secure clips or screws. Do NOT force – if it doesn’t seat, check obstruction.
Reset Drum Counter – The printer must be told the drum is new. Methods vary:
- HP: Press OK when ‘Replace Drum’ appears, then select Continue. Some models need a ‘Reset Drum Counter’ menu in the Service Menu (hold Left arrow + OK for 3 seconds).
- Brother: Press Menu, 1, 2, OK, Up arrow to Reset, OK. Or use ‘DRUM!’ button sequence.
- Konica Minolta: The DR316 chip auto-sets the count; just install it. If not, go into Admin Settings > Part Replacement > Drum Unit Reset.
Test Print – Run a test page (e.g., Engine Test Print from the printer’s menu). Check for even coverage, no streaks. If streaks appear, remove drum and check if the charge roller is clean.
After the Repair — Testing & Verification
- Immediate Check: Print one solid black page and one half-tone page. No streaks, no fading. The error message should be gone.
- Monitor for 24 Hours:
- Run about 20 pages of normal text. If streaks return, the problem may be in the laser unit or transfer belt, not the drum.
- Listen for grinding – new drum gears may need a short break-in. Slight whirring is normal, but grinding means improper alignment.
- Watch for Toner Spills: If the drum waste bin is full or the seal isn’t properly seated, toner powder may drift onto paper in the output tray. Clean the printer’s interior with a toner vacuum.
- Performance Indicators: Print speed should return to normal. Ghosting or blurry text indicates the drum chemistry is not compatible with your toner – replace the toner or use OEM supplies.
- Longevity: A new drum typically lasts 10,000–20,000 pages. Keep a log of prints to anticipate the next replacement.
Parts You’ll Need
Here are the parts that match this repair. Click the link to check the current price on AliExpress.
| Product | Price |
|---|---|
| 4PCS DR316 Drum Chip Konica Minolta b… | $0.94 |
Prices and availability are subject to change on AliExpress.