Your printer shows a ‘fuser error’, leaves smudged streaks, or makes a grinding noise? This guide walks you through the exact symptoms, step-by-step diagnosis, root causes, and cost analysis to fix the fuser assembly yourself or professionally.
What’s Happening — Symptoms in Detail
The printer suddenly stops mid-job with an alarming message on the display. Common error codes include 50.x Fuser Error (HP), ERR FUSER (Brother), Fuser Unit Error (Samsung), or Service Call (older Canon models). The machine might beep repeatedly and refuse all operations, even power cycles.
Some users report a burning smell before the error, like melting plastic or hot dust. Others experience paper jams where the sheet sticks to the fuser roller, wraps around it, or emerges with a creased, wavy texture. Toner may not fuse properly – prints rub off easily or show ghost lines. In severe cases, the fuser makes a grinding or clicking noise from a broken gear or bushing.
When does it happen? Often after a long print run (high heat buildup) or suddenly when using thick paper. It may start intermittently – error clears after a cooldown – then becomes permanent as a part fails completely. Some users report the first symptom as random horizontal streaks that appear only on one side of the page.
Progression: Simple wear failures (like bushings) degrade slowly – you’ll hear a faint chirp that turns into a grind over weeks. Electrical failures (thermistor, lamp) are sudden – the printer detects an out-of-range temperature and halts immediately. A broken gear can happen mid-print with a loud snap.
How to Diagnose the Problem Step by Step
Read the Error Code: Power cycle the printer. If the error persists, note the exact code (e.g., 50.1, 50.2, 50.3). A 50.1 indicates a fuser thermistor failure, 50.2 is overheat, 50.3 is underheat. These codes guide you to the faulty component.
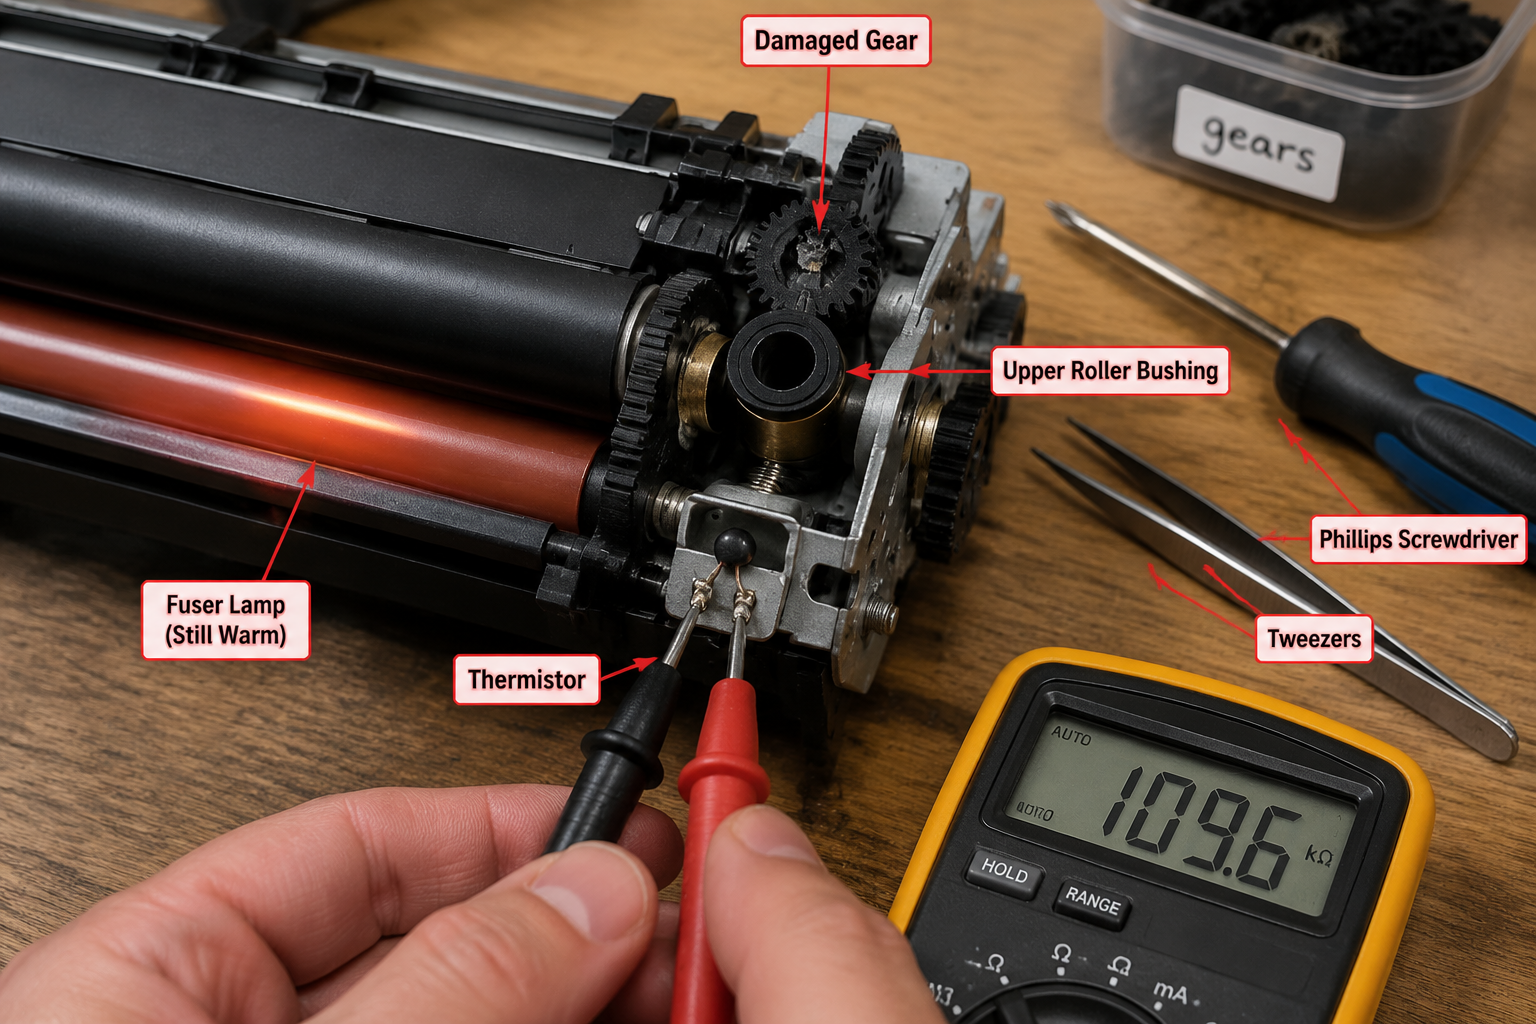
Visual Inspection – Open the Fuser Access Door: Normal: the fuser rollers look smooth, shiny, and free of debris. Abnormal: you see rips, grooves, melted toner, or a white/burned spot on the roller. The thermistor (small glass bead or ceramic part touching the roller) should be intact – if it’s cracked or broken off, that’s the problem.
Listen for Noises: While the fuser is still warm, manually turn the fuser drive gear (often accessible from the side). Normal: smooth, consistent resistance. Abnormal: grating, grinding, or skipping indicates worn bushings or broken gear teeth.
Measure Electrical Components (advanced – requires a multimeter set to ohms): Unplug the printer and disconnect the fuser harness. Check the fuser lamp (two large terminals) – should be ~5-30 ohms depending on model. Open circuit means dead lamp. Check the thermistor – should read a few hundred ohms at room temperature, decreasing when gently warmed with a hairdryer. If it reads OL (open) or 0 ohms (short) , replace it.
Quick Check for Beginners: Remove the fuser unit from the printer. Shake it gently near your ear. If you hear rattling, a screw or broken part is loose inside – that needs disassembly. Also look for paper bits wedged between rollers – these can cause jams and errors.
Why This Happens — Root Cause
Mechanical Wear: The fuser assembly contains rotating parts – the upper fuser roller, lower pressure roller, and drive gears. The Upper Fuser Roller Gear with Bushing (Part #1) is a common failure point on older HP LaserJet models (e.g., 1010, 1020, 1320). The bushing wears oval over time from heat and friction, allowing the gear to wobble. This misaligns the rollers, causing the famous ‘50.3 Fuser Error’ or paper wrap jams. Heat accelerates wear – running thousands of pages without cleaning accelerates this.
Thermal Failures: The thermistor (often a glass bead) can crack from repeated thermal cycling. It may also become contaminated with toner dust, insulating it and causing false temperature readings. The fuser lamp (halogen bulb) can burn out if the printer runs too hot or power surges occur. In some Brother models, the fuser film breaks or creases, leading to heat unevenness.
Electrical Shorts: High-voltage arcing inside the fuser (due to dust or toner buildup) can trip the safety circuit. This often produces a 50.1 error or immediate shutdown. Static discharge from paper can also damage the thermistor circuit on the fuser control board.
Specific Models: HP LaserJet 1012/1018 – known for worn bushings. Samsung ML-2510/2570 – fuser lamp failures. Brother HL-2270DW – broken fuser film. Canon imageCLASS LBP6000 – fuser gears strip from thick paper usage. The symptoms and codes vary, but the underlying physics is the same: heat, friction, and electrical stress degrade the sensitive assembly.
Can You Fix It Yourself?
- Difficulty: 3 out of 5 – moderate. Requires careful disassembly of the fuser unit, which varies by brand. Need to handle electrical components safely.
- Time Required: 30–60 minutes for a first-time repair. Experienced users can do it in 20 minutes.
- Skill Level: No soldering required – all connections are plug-in or screw terminals. You need basic hand tools: Phillips screwdriver, flathead screwdriver, possibly a Torx T10 or T15 (on HP models), and tweezers for small springs. A multimeter is strongly recommended for electrical checks.
- Risks:
- Burn risk – fuser gets extremely hot. Wait at least 30 minutes after use before touching.
- Electrical shock – unplug the printer; capacitors may hold charge for hours. Discharge by pressing the power button with printer unplugged.
- Breaking plastic clips – older fuser housings are brittle. Go slow, use plastic opening tools.
- Incorrect reassembly – gears must mesh perfectly. A misaligned gear will cause immediate failure or noises.
- Tools Required:
- Phillips #1 and #2 screwdrivers
- Flathead small (for prying)
- Multimeter (digital, set to ohms)
- Brush and compressed air for cleaning
- Thermal paste (for thermistor seating – optional, but recommended)
- Needle-nose pliers for springs
Cost Breakdown — DIY vs Professional
- DIY Part Costs:
- Upper Fuser Roller Gear with Bushing – $1.02 (Part #1). This single part often cures the grinding sound and 50.x errors on HP models.
- Upper Fuser Roller Kit – $1.13 (Part #2, JC66-03080A / JC61-03755A). Includes the roller, gear, and bushing – a more complete fix if the roller surface is damaged.
- Additional parts if needed: fuser lamp ($5-$15), thermistor ($3-$8), pressure roller ($8-$20). Total DIY cost: $1 to $30 depending on what’s broken.
- Professional Repair:
- Diagnosis fee: $40–$60 (often waived if you proceed with repair).
- Labor to replace whole fuser assembly: $60–$120.
- Parts markup: shops charge 2–3x retail for a full fuser unit (e.g., $80–$160 for a part that costs $30–$50 online).
- Total professional cost: $100–$250+.
- When to Skip DIY: If the fuser has severe electrical damage (burned board, melted harness), or if you’re dealing with a laser printer less than $150 new (e.g., basic Brother HL-L2350DW), the repair cost may exceed the printer’s value. Also skip if you lack patience for tiny springs or if the fuser uses riveted construction (some cheap models) – you can’t disassemble without breaking it.
- Cost Comparison: For a typical HP LaserJet, a $1.02 gear rebuild saves $200+. For a printer still under warranty, contact the manufacturer first – fuser is often covered for 1 year.
Repair Process Overview
Safety First – Unplug the printer and wait 30 minutes for the fuser to cool. Use a multimeter to check that the power cord socket is dead (no AC voltage).
Remove the Fuser Assembly – Open the rear access door (or side panel). Most fusers are held by two screws and a harness connector. Gently disconnect the wiring – note the orientation (take a photo). Slide the fuser out. On HP models, you may need to remove a metal support bracket.
Disassemble the Fuser Housing – Place the fuser on a clean, static-free surface. Remove the outer covers (usually 4–6 screws). Note the spring tensions – they control roller pressure. Use a screwdriver to release the spring hooks gently.
Replace Worn Parts – If the gear is stripped (missing teeth), remove the old Upper Fuser Roller Gear with Bushing (Part #1). Use a small punch to tap out the pin or unscrew the retaining clip. Install the new gear – ensure it meshes smoothly with the drive gear. For roller replacement (Part #2), slide off the old roller, clean the shaft, and press the new one on. Apply a drop of high-temp grease to bushings (if provided with kit).
Check and Replace Thermistor/Lamp – Use the multimeter to test the thermistor and lamp. If open, unscrew the old thermistor (or unplug it) and install the new one, ensuring it contacts the roller surface firmly. For the lamp, remove the two wire terminals (note which is which), slide the old lamp out, insert the new one (handle by ceramic ends only – oil from skin causes premature failure).
Reassemble and Reinstall – Reseat the housing covers, reattach springs with needle-nose pliers, tighten screws. Plug the harness back into the printer. Install the fuser into the printer, close doors.
Common Mistakes to Avoid:
- Forgetting to reconnect the fuser grounding wire – this can cause shocking or error codes.
- Overtightening screws – strip the plastic.
- Misrouting wires so they pinch under the roller – causes jams.
- Leaving old grease/oil on the roller – wipes off with isopropyl alcohol.
- Not testing the thermistor temperature range – if it’s not contacting the roller, error will return immediately.
After the Repair — Testing & Verification
- First Power On – Plug in the printer and turn it on. The fuser should warm up silently – you may hear a soft hum. No error codes should appear. If a new error (like 50.x) appears immediately, check the thermistor connection or lamp continuity.
- Test Print – Single Page – Print a plain paper test page (e.g., a configuration page from the printer menu). Normal: text is solid, no smudges, no wrinkles. Abnormal: if the paper comes out wavy or has ghost images, the fuser pressure may be uneven – check if both springs are seated properly.
- Monitor First Few Hours:
- Smell: A slight new-paper smell is fine. If you notice burnt plastic odor, shut down immediately – something is rubbing.
- Noise: Listen for any chirping or grinding as the fuser cycles during warm-up and after each page. A new gear may make a slight whir that disappears after 10-20 pages.
- Paper Jams: Try printing multiple pages (10+). If jams occur at the fuser exit, the rollers may not be gripping – clean the rollers with a lint-free cloth damp with water.
- Check Sensor Actuation: Many fusers have a paper exit flag or fuser sensor. Manually check that the flag moves freely – if a piece of plastic broke during reassembly, the printer will think a paper is jammed. You can test by inserting a piece of paper through the exit path – it should trip the sensor.
- Longevity: After a successful repair, expect the fuser to last another 30,000–50,000 pages (depending on brand and original design). Keep the fuser clean by using high-quality paper and avoiding envelopes with windows (they melt).
Parts You’ll Need
Here are the parts that match this repair. Click the link to check the current price on AliExpress.
| Product | Price |
|---|---|
| Upper Fuser Roller Gear with Bushing … | $1.02 |
| JC66-03080A JC61-03755A Upper Fuser R… | $1.13 |
Prices and availability are subject to change on AliExpress.