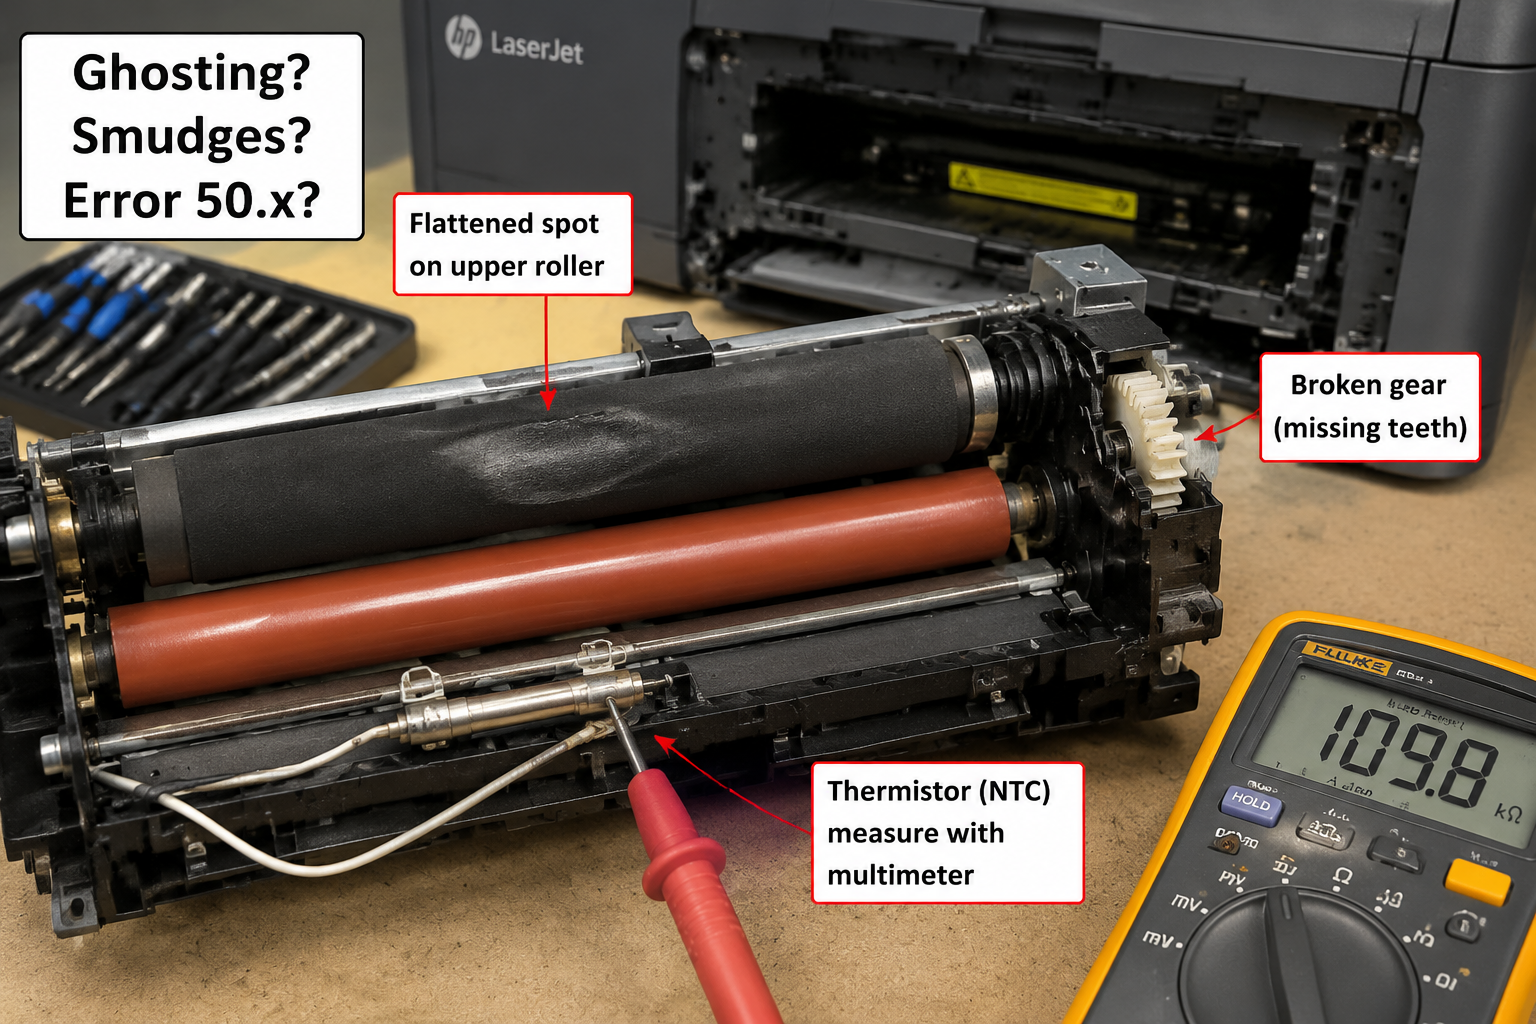
Your printer suddenly prints smudged, wrinkled pages, or shows errors like ‘Fuser Error’ or ‘50.x Fuser Malfunction’. This guide covers exactly what happened, how to diagnose it step by step, and whether you can fix the fuser assembly yourself for as little as $1.02.
What’s Happening — Symptoms in Detail
What You See and Hear
Ghosting: Images or text from a previous page appear faintly on new prints. This happens because the fuser isn’t reaching the correct temperature to fully bond toner to paper. Normal prints show crisp, solid black; abnormal shows a lighter replica of earlier content, especially in the same spot on the page.
Smudges and Toner Flakes: Dry toner rubs off when you touch the page. The fuser’s heat or pressure roller is damaged, so toner isn’t melted into the paper fibers. Normal pages are dry to the touch; abnormal leaves black residue on your fingers.
Paper Wrinkles or Jams: The fuser assembly has rollers that grab and guide the paper. If a roller is worn, cracked, or has a flattened spot, paper will crumple, crease, or stop mid‑exit. Some users hear a grinding noise (bad bearing) or a thumping sound (flat spot on pressure roller).
Error Codes on Display: Common codes:
- HP: 50.x Fuser Error (50.1 low temperature, 50.2 warmup timeout, 50.3 high temperature)
- Brother: Fuser Error (F1, F2, F3)
- Canon: E001, E003, or E005
- Xerox: 093-910 / 093-911 These usually appear at startup or mid‑print when the fuser fails to heat within a set time.
Smoke or Burning Smell: Rare but serious – indicates electrical short or complete meltdown of the heating element. Stop using the printer immediately.
When It Happens
- At power‑on: The printer runs a warmup cycle; if the fuser doesn’t reach 180°C within 30 seconds, it throws an error.
- Mid‑print: After many pages, the fuser overheats or a roller seizes, causing jam or image defects.
- After a paper jam: Forcing paper out can damage the fuser roller surface or gear teeth.
- Progressive: Ghosting gets worse over weeks, then suddenly a permanent error appears.
How to Diagnose the Problem Step by Step
Check Error Code on Screen
- Write down the exact code (e.g., 50.1, F2, E001). This tells you if it’s heat‑related (low/high temp) or mechanical (jam sensor).
Visual Inspection – Fuser Access Door
- Open the rear or top access cover. Locate the fuser assembly (two rubber rollers with heating lamp inside). Normal: the fuser surface is smooth, shiny, and free of cuts. Abnormal: you see pits, tears, or a blackened area.
- Quick check: Gently press the upper roller with your finger. Normal: it springs back immediately. Abnormal: it stays indented (flattened) – the foam core has collapsed.
Paper Path Test
- Remove the toner cartridge. Run a blank page through (print a test page with no content). Listen for grinding, squeaking, or thumping. Normal: quiet whirring. Abnormal: metal‑on‑metal noise means a gear is stripped.
Temperature Check (Advanced)
- Unplug printer, wait 10 minutes. Use a multimeter set to ohms. Measure resistance across the fuser thermistor (usually two wires near the heating lamp).
- Normal: around 100–300 kΩ at room temperature. Abnormal: ∞ (open circuit – broken thermistor) or near 0Ω (short – flameout risk).
- Tool: Digital multimeter, needle probes.
Engage the Fuser Gears Manually
- With power off, rotate the large gear on the side of the fuser assembly. Normal: smooth rotation for half a turn. Abnormal: jams after a partial turn – indicates a broken tooth or jammed bushing.
- Tool: Small flathead screwdriver to turn the gear.
Why This Happens — Root Cause
Why the Fuser Fails
Worn Upper Fuser Roller: The roller has a metal core, a foam layer, and a non‑stick Teflon coating. Over 20,000–50,000 pages, the foam compresses permanently, creating a flat spot. The coating also flakes off. This causes wrinkles and ghosting.
Broken Gears or Bushings: The fuser drivetrain uses small plastic gears (often 16‑tooth or 24‑tooth) that press into the roller shaft. High torque from jams snaps teeth. The Upper Fuser Roller Gear with Bushing (Part #1) is a known weak point on HP LaserJet P1102w, M201, and M202 models. Without this gear, the roller stops turning.
Thermistor Failure: The thermistor monitors fuser temperature. If it cracks (common on Canon LBP6000 and HP M404), the printer thinks the fuser is too cold and never starts printing, or it overheats, smoking the fuser. Freezing or drop impact can snap the ceramic bead.
Heating Lamp Burnout: The halogen lamp inside the fuser can burn open after many hours. This gives immediate 50.1 / low temperature error and the fuser stays cold.
Contamination: Toner dust, paper debris, or melted silicone oil builds up on the fuser surface. This causes toner offset – smudges on the next page. Dust also clogs the fuser’s cooling fan, causing thermal runaway.
What Accelerates Failure
- Heat: Continuous printing without rest (over 100 pages in one run) stresses the thermistor and lamp.
- Dust: Running in a garage or workshop clogs airflow.
- Crash Force: Dropping the printer during transport cracks the fuser roller or dislodges the thermistor.
- Age: Even unused, the foam in the roller hardens after 5 years, losing elasticity.
- Poor Paper: Warped or paper‑with‑staples causes jams that break gears.
Can You Fix It Yourself?
- Difficulty Level: 3 out of 5 (moderate)
- Time Required: 45–90 minutes for a first‑time repair; 30 minutes if experienced.
- Skill Needed: Comfortable with screwdrivers and handling electrical parts. No soldering required for replacing rollers or gears. Soldering only if you have to replace the thermistor on the wiring harness.
- Risks:
- Electric Shock if you touch the heating lamp contacts while plugged in. Always unplug for 30 minutes to discharge capacitors.
- Damaging the Teflon coating if you scratch the roller with metal tools.
- Misaligning gears – the fuser must go back in exactly. A crooked gear causes grinding and jams after repair.
- Losing screws – use a magnetic tray.
- Tools Required:
- Phillips screwdriver (size #2)
- Torx T10 screwdriver (for some HP models)
- Needle‑nose pliers (to remove clips)
- Multimeter (if testing thermistor)
- Thermal paste (for thermistor reinstallation, should come with replacement part)
- Isopropyl alcohol and lint‑free cloth for cleaning
Cost Breakdown — DIY vs Professional
DIY Part Costs (from available inventory):
- Upper Fuser Roller Gear with Bushing (Part #1) – $1.02 – fits HP P1102w, M201, M202
- Upper Fuser Roller (Part #2) – $1.13 – includes roller and pressure gear; direct replacement for many HP LJ Pro models
- Total for these parts: only $2.15 plus shipping (~$4). Cheapest fix.
- If you need a full fuser assembly (roller + lamp + thermistor): aftermarket units cost $25–$50.
Professional Repair Costs:
- Bench diagnostic fee: $30–$50
- Labor + part (typical shop sells full assembly): $80–$150
- Cheapest pro fix: $80 for gear swap (if they allow it) – but most shops replace the whole assembly, $130+.
When to Skip DIY:
- If the heating lamp is burned out (requires high‑voltage handling and exact lamp wattage, often hard to source).
- If the fuser frame (metal bracket) is bent from a heavy drop – alignment is almost impossible without a fixture.
- If you have no confidence in reassembling gears – a misaligned fuser can cause paper jams and damage the printer mainboard.
- If your time is worth more than $50 and you can afford the shop – DIY takes an hour.
Repair Process Overview
Power Down & Unplug – Wait 30 minutes for the fuser to cool and capacitors to discharge.
Remove the Fuser Assembly – Open the rear cover. Most printers have two screws (Phillips) or push‑tabs. Slide the fuser out. Note: on HP LaserJet Pro M404, you must remove the toner cartridge first, then the transfer roller, then the fuser.
Disassemble the Fuser Frame – Remove the side plates (usually 4–6 screws). Keep screws grouped by length. Gently lift the upper roller and pressure roller apart.
Inspect and Replace Gears – Look for cracked or missing teeth on the drive gear (the one that meshes with the printer motor). If broken, pry off the old gear with pliers. Press the new Upper Fuser Roller Gear with Bushing (Part #1) onto the shaft until it snaps. Apply a tiny drop of light machine oil to the bushing.
Replace the Upper Roller – If the roller surface has pits or flattening, slide it out from its metal shaft. Insert the new Upper Fuser Roller (Part #2). Ensure the foam is aligned with the shaft; the Teflon coating must face inward (toward the paper path).
Check the Thermistor – With a multimeter, verify resistance. If it’s open or shorted, replace it. The thermistor is usually a small glass bead clipped to the roller support. Desolder or cut wires, then solder new thermistor (or use crimp connectors).
Reassemble – Place the pressure roller back, then the upper roller. Close the side plates. Tighten screws diagonally to avoid warping. Turn the main gear by hand – it should rotate smoothly through a full cycle.
Reinstall Fuser – Slide the fuser assembly back into the printer. Secure screws. Close all covers, install toner cartridge, and plug in.
Common Mistakes:
- Forgetting to remove the orange shipping clip from the new gear (if present).
- Over‑oiling the bushing – oil drips onto the roller and causes smudges.
- Misaligning the thermistor wire – it can touch the hot roller and short.
- Not resetting the error code – some printers require a power cycle or service reset to clear the fuser error.
After the Repair — Testing & Verification
First Boot: Turn on the printer. Wait for the warmup cycle. Normal: the fuser heats up and the ready light turns solid. Abnormal: error code returns – recheck thermistor connections.
Print Test Page: Print a solid black page and a page with fine text. Check for:
- No ghosting – previous content should not reappear.
- No smudges – toner should not rub off.
- No wrinkles – paper comes out flat.
Listen for Odd Sounds: Run three pages in a row. A grinding noise means a gear is not seated. A clicking sound means a bushing is loose.
Temperature Monitoring: After printing 50 pages, touch the printer’s rear (near the fuser). Normal: warm but not hot (under 60°C). Abnormal: hot enough to burn skin – the thermistor is defective, causing overheat.
Jam Test: Feed a single sheet of 80gsm paper manually. It should exit without bending. If it jams near the fuser, the guide rails may be misaligned.
Watch for the First Week: Ghosting may reappear if the new roller has a break‑in period – but it should improve after 20 pages. If it gets worse, the roller or gear is the wrong model.
Reset Any Pending Errors: Some HP printers store the error even after repair. Perform a cold reset: with printer off, hold the Resume/Cancel button while powering on, then release when all LEDs flash. This clears the 50.x history.
Parts You’ll Need
Here are the parts that match this repair. Click the link to check the current price on AliExpress.
| Product | Price |
|---|---|
| Upper Fuser Roller Gear with Bushing … | $1.02 |
| JC66-03080A JC61-03755A Upper Fuser R… | $1.13 |
Prices and availability are subject to change on AliExpress.