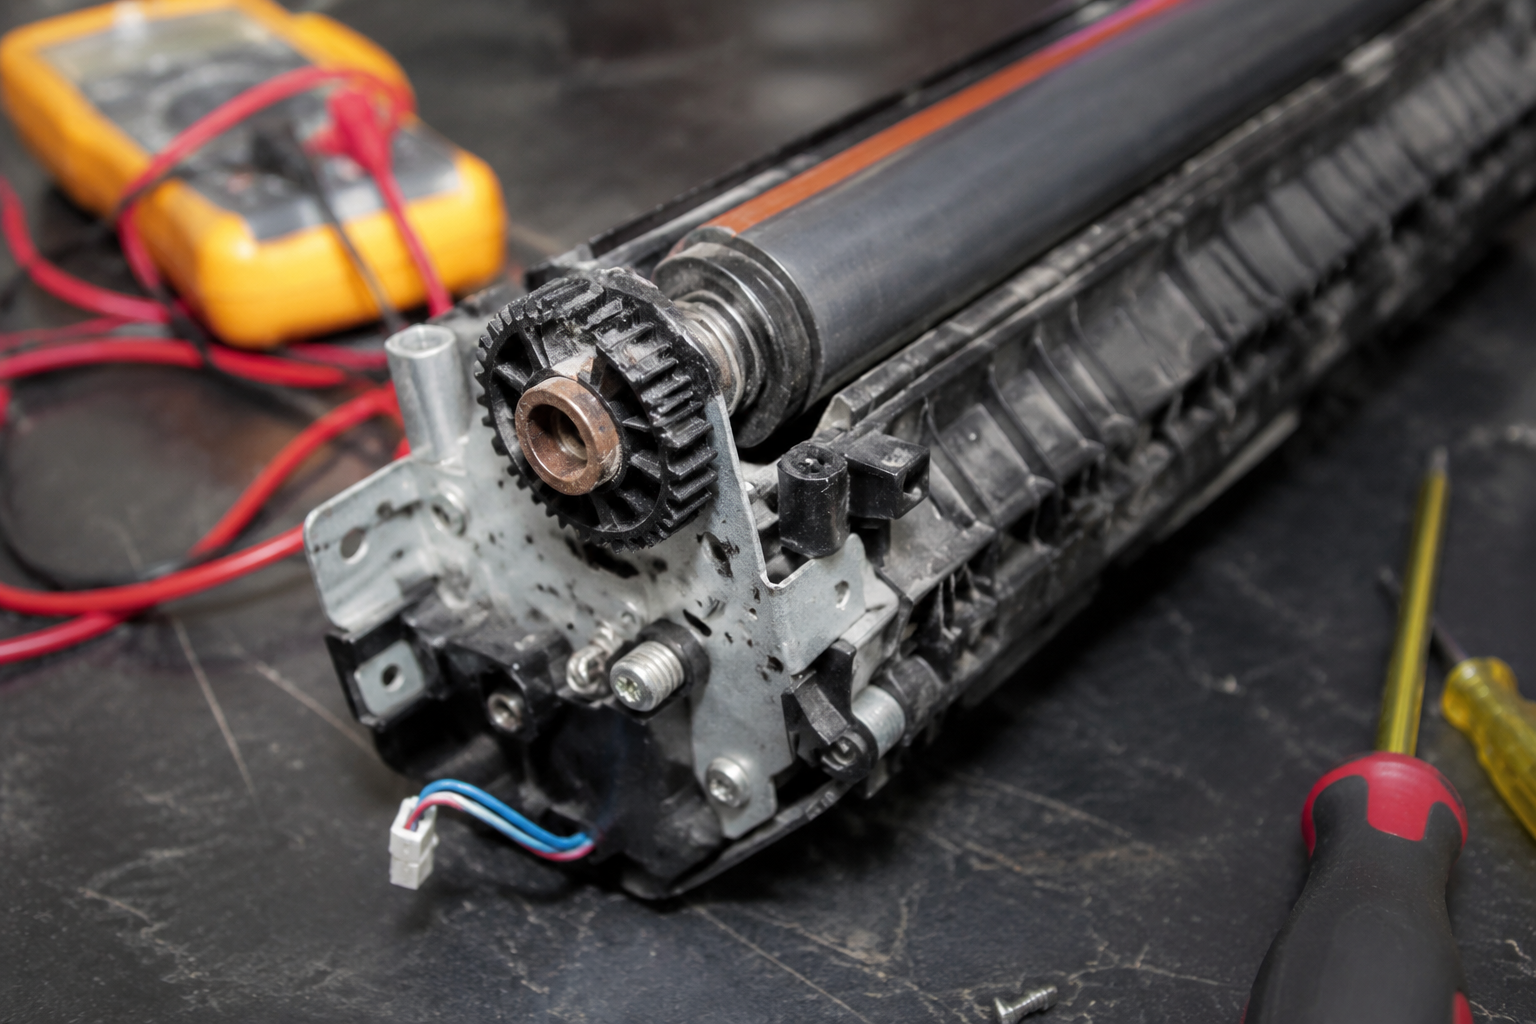
This guide helps you diagnose and fix a failed printer fuser assembly. You’ll learn the exact symptoms (like error codes E000 or 50.x, paper jams at the rear, and wrinkled or scorched paper), how to test the fuser with a multimeter, what causes failure, and whether to replace it yourself or hire a pro. Includes specific part numbers and costs.
What’s Happening — Symptoms in Detail
The Problem in Detail
Your printer just stopped working mid-print. You see one of these scenarios:
Error Code on Screen: Many printers display “Fuser Error” or specific codes like E000 (Canon imageRUNNER), 50.x (HP LaserJet), or SC554-01 (Ricoh). The printer stops immediately and won’t print again until fixed.
Paper Jams at the Rear: The paper feeds normally, but jams right where it exits the printer, near the back. You might see the paper is wrinkled, torn, or stuck halfway out.
Scorched or Smudged Pages: The print comes out with black streaks, ghosting (faint duplicate images), or toner that smears when you touch it. In severe cases, the paper feels hot or has a burned smell.
Strange Noises: You hear a grinding, clicking, or squealing sound during the print cycle. This often gets louder over time.
When It Happens: Some users report the failure happens suddenly (especially after a paper jam that was forcibly pulled out). Others notice symptoms gradually worsening over weeks—first occasional smudging, then more frequent jams, then the error code.
Progression: A failing fuser usually follows this path:
- Light ghosting or toner smudges on prints.
- Occasional rear paper jams.
- Loud grinding noises during warm-up.
- Permanent error code and printer shutdown.
Specific Model Issues:
- HP LaserJet P1102w: Known for fuser sleeve failure after ~20,000 pages.
- Brother HL-L2350DW: Fuser thermistor fails, causing SC549 error.
- Canon MF743Cdw: Fuser gear strips after a jam, leading to E000-000 error.
- Samsung CLP-325: Fuser pressure roller develops flat spots, causing wrinkled paper.
How to Diagnose the Problem Step by Step
Step-by-Step Diagnosis
Tools Needed:
- Flathead screwdriver (small)
- Phillips #2 screwdriver
- Multimeter (digital, with continuity mode)
- Flashlight
- Tweezers (for small debris)
Quick Check (5 minutes)
Check the Error Code: Look at the printer’s display or use the printer’s status report (usually by pressing the Cancel and Paper Feed buttons simultaneously). Write down the exact code.
Inspect the Exit Area: Open the rear access door (if present). Shine a flashlight into the fuser area. Normal: The fuser roller is smooth and rotates freely when you spin it with your finger. Abnormal: You see scorch marks, toner residue, ripped paper bits, or the roller doesn’t spin.
Paper Path Test: Remove the toner cartridge and any jammed paper. Try turning the fuser roller manually (use a screwdriver to push the gear). Normal: It rotates with moderate resistance. Abnormal: It’s locked solid (seized bearing) or spins too freely (broken gear).
Smell Test: Smell the rear of the printer. Normal: Slight warm plastic smell. Abnormal: Burning smell (burned wiring or melted roller).
Detailed Check (15 minutes)
Thermistor Resistance Test: Locate the thermistor (a small glass bead with two wires, usually touching the fuser roller). Disconnect the printer from power. Set your multimeter to resistance (Ω). Touch the probes to the thermistor’s terminals. Normal: You read 100-500kΩ at room temperature. Abnormal: You read 0Ω (short) or OL (open circuit). This indicates a failed thermistor.
Fuser Lamp Continuity Test: Locate the fuser lamp (a long quartz tube inside the roller). Disconnect its wires. Set multimeter to continuity (beep mode). Touch probes to the lamp’s terminals. Normal: The meter beeps (continuity). Abnormal: No beep (lamp is blown). Note: Some fusers use a heating element instead of a lamp; test for resistance around 10-50Ω.
Gear and Bearing Check: Remove the fuser assembly (usually 4 screws). Examine the upper fuser roller gear and bushing. Normal: Gear teeth are intact, bushing is not cracked. Abnormal: Teeth are stripped or missing, bushing is worn (oval-shaped hole).
Why This Happens — Root Cause
Root Cause — Why This Happens
Mechanical Failures
Stripped Gears: The upper fuser roller gear (often plastic) can strip after a paper jam. When a user pulls jammed paper out forcefully, the gear teeth shear off. This causes the roller to stop turning, leading to jams and error codes. Part #1: Upper Fuser Roller Gear with Bushing ($0.97) is a common replacement.
Worn Bushings: The fuser roller spins on plastic bushings. Over time (usually 50,000+ pages), the bushing wears down, causing the roller to wobble. This misaligns the paper path, causing wrinkles and jams.
Broken Pressure Springs: The pressure roller is held against the fuser roller by springs. These springs can fatigue or snap, reducing pressure. Result: toner doesn’t fuse properly (smudging).
Electrical Failures
Blown Fuser Lamp: The quartz halogen lamp inside the fuser roller can burn out after 100,000+ prints. The printer detects no heat and throws an error.
Failed Thermistor: The thermistor is a temperature sensor. If it fails open or shorted, the printer thinks the fuser is either too hot or too cold and shuts down. This is common in Brother and Canon printers after 3-5 years.
Damaged Thermal Fuse: A thermal fuse (a small, non-resettable fuse) blows if the fuser overheats. This is a safety device. Once blown, the printer won’t power the fuser lamp.
Conditions That Accelerate Failure
- Heat: Running the printer in a hot environment (>90°F) stresses the thermistor and lamp.
- Dust: Paper dust, toner dust, and debris can clog the fuser air vents, causing overheating.
- Crash Force: Pulling jammed paper out backward (against the paper path) is the #1 cause of stripped gears.
- Age: Rubber rollers harden over time (3-5 years), losing grip.
- High Volume: Printing heavy cardstock or envelopes puts extra strain on the fuser gears.
Can You Fix It Yourself?
Can You Fix It? — Honest Assessment
Difficulty Level: 2 out of 5 (Easy)
- Why Easy: The fuser assembly is a modular component. You replace it as a unit or swap a few parts. No soldering is required unless you’re replacing the lamp.
Time Required:
- 30 minutes for a full fuser assembly swap.
- 15 minutes for a gear or bushing replacement.
Skill Level Needed:
- Screwdriver skills only. You need to remove a few screws and unplug connectors.
- No soldering for assembly replacement.
- Basic multimeter skills if you want to test components.
Risks:
- Electrostatic Discharge (ESD): Touching the fuser’s circuit board without grounding can damage it. Use an anti-static wrist strap or touch the printer’s metal frame first.
- Sharp Edges: The fuser gets hot. Wait 30 minutes after use before handling.
- Breaking Plastic Tabs: Printer chassis often have fragile plastic clips. Use a flathead screwdriver gently.
- Incorrect Part: Buying a fuser for the wrong model. Double-check your printer’s model number (e.g., HP LaserJet M404dn vs M404dw).
Tools Required:
- Phillips #2 screwdriver (for most screws)
- Flathead screwdriver (for prying clips)
- Tweezers (for small connectors)
- Multimeter (optional, for testing)
- Flashlight
Cost Breakdown — DIY vs Professional
DIY vs Professional — Real Cost Comparison
DIY Costs
- Full Fuser Assembly: $30-$80 (generic) or $80-$200 (OEM) depending on printer model.
- Partial Parts:
- Part #1: Upper Fuser Roller Gear with Bushing — $0.97 (if only the gear is stripped)
- Part #2: JC66-03080A JC61-03755A Upper Fuser Roller Assembly — $1.08 (if the roller surface is worn)
- Thermistor: $5-$15
- Thermal Fuse: $2-$5
- Total DIY Cost: $1 to $200, depending on what’s broken.
Professional Costs
- Repair Shop Diagnostic Fee: $50-$100 (often waived if you proceed with repair)
- Labor: $50-$100 per hour (typical repair takes 1 hour)
- Parts Markup: Shops charge 50-100% over retail for parts. A $30 generic fuser becomes $60.
- Total Professional Cost: $150 to $400.
When to Skip DIY
- If your printer is under warranty: Let the manufacturer fix it for free.
- If the printer is older than 5 years: A new printer might cost less than a professional repair.
- If you’ve already damaged the main logic board: Replacing the fuser won’t fix electrical shorts.
- If you’re not comfortable with electronics: A multimeter test is essential for diagnosing thermistor/lamp failures.
Repair Process Overview
Repair Process Overview
Major Steps
Power Down & Cool Down: Unplug the printer. Wait 30 minutes for the fuser to cool.
Remove Toner & Waste Toner: Open the front cover. Remove the toner cartridge and waste toner container (if present).
Access the Fuser:
- For most HP and Canon printers: Open the rear access door. Remove the two screws holding the fuser in place. Pull the fuser out.
- For Brother printers: Remove the back panel (4 screws). The fuser is held by two screws and a connector.
- For Samsung printers: Remove the side cover first, then the fuser.
Replace the Faulty Part:
- If replacing the gear: Unscrew the old gear from the fuser roller. Snap on the new gear (Part #1: Upper Fuser Roller Gear with Bushing). Reinstall the fuser.
- If replacing the entire fuser assembly: Disconnect the wiring harness (2-3 connectors). Remove the old assembly. Install the new one. Reconnect wires.
Reassemble: Replace the toner cartridge, close all doors, and plug in the printer.
Common Mistakes & How to Avoid Them
- Mistake: Forgetting to remove the shipping lock from the new fuser (a plastic tab that prevents roller rotation). Avoid: Check the new part for any blue or orange shipping locks and remove them.
- Mistake: Overtightening screws. Avoid: Turn screws until snug, then stop. Plastic threads strip easily.
- Mistake: Misaligning the wiring harness. Avoid: Route wires exactly as the old one was routed. Use a photo as reference.
- Mistake: Using a non-OEM fuser that doesn’t match the printer’s firmware. Avoid: Buy from a reputable seller that guarantees compatibility.
After the Repair — Testing & Verification
After Repair — Verification
Power On Test: Plug in the printer. Turn it on. The printer should go through its warm-up cycle without error codes. Listen for the fuser’s click as it locks into place.
Print a Test Page: Print a configuration page (usually by pressing the Cancel and Paper Feed buttons simultaneously). Check for:
- No jams: The paper should exit smoothly.
- No smudging: The toner should be solid, not flaking off.
- No ghosting: No faint duplicate images.
- No smells: No burning or chemical odors.
First 10 Pages: Print 10 pages of normal text. Watch for:
- Consistent print quality across all pages.
- No error codes reappearing.
- Fuser temperature: The rear of the printer should feel warm, not hot.
First 24 Hours:
- Print a double-sided document to test the duplex path (if applicable).
- Print a heavy cardstock to test pressure roller grip.
- If any issue returns, the problem might be in the power supply or main logic board, not the fuser.
Parts You’ll Need
Here are the parts that match this repair. Click the link to check the current price on AliExpress.
| Product | Price |
|---|---|
| Upper Fuser Roller Gear with Bushing … | $0.97 |
| JC66-03080A JC61-03755A Upper Fuser R… | $1.08 |
Prices and availability are subject to change on AliExpress.