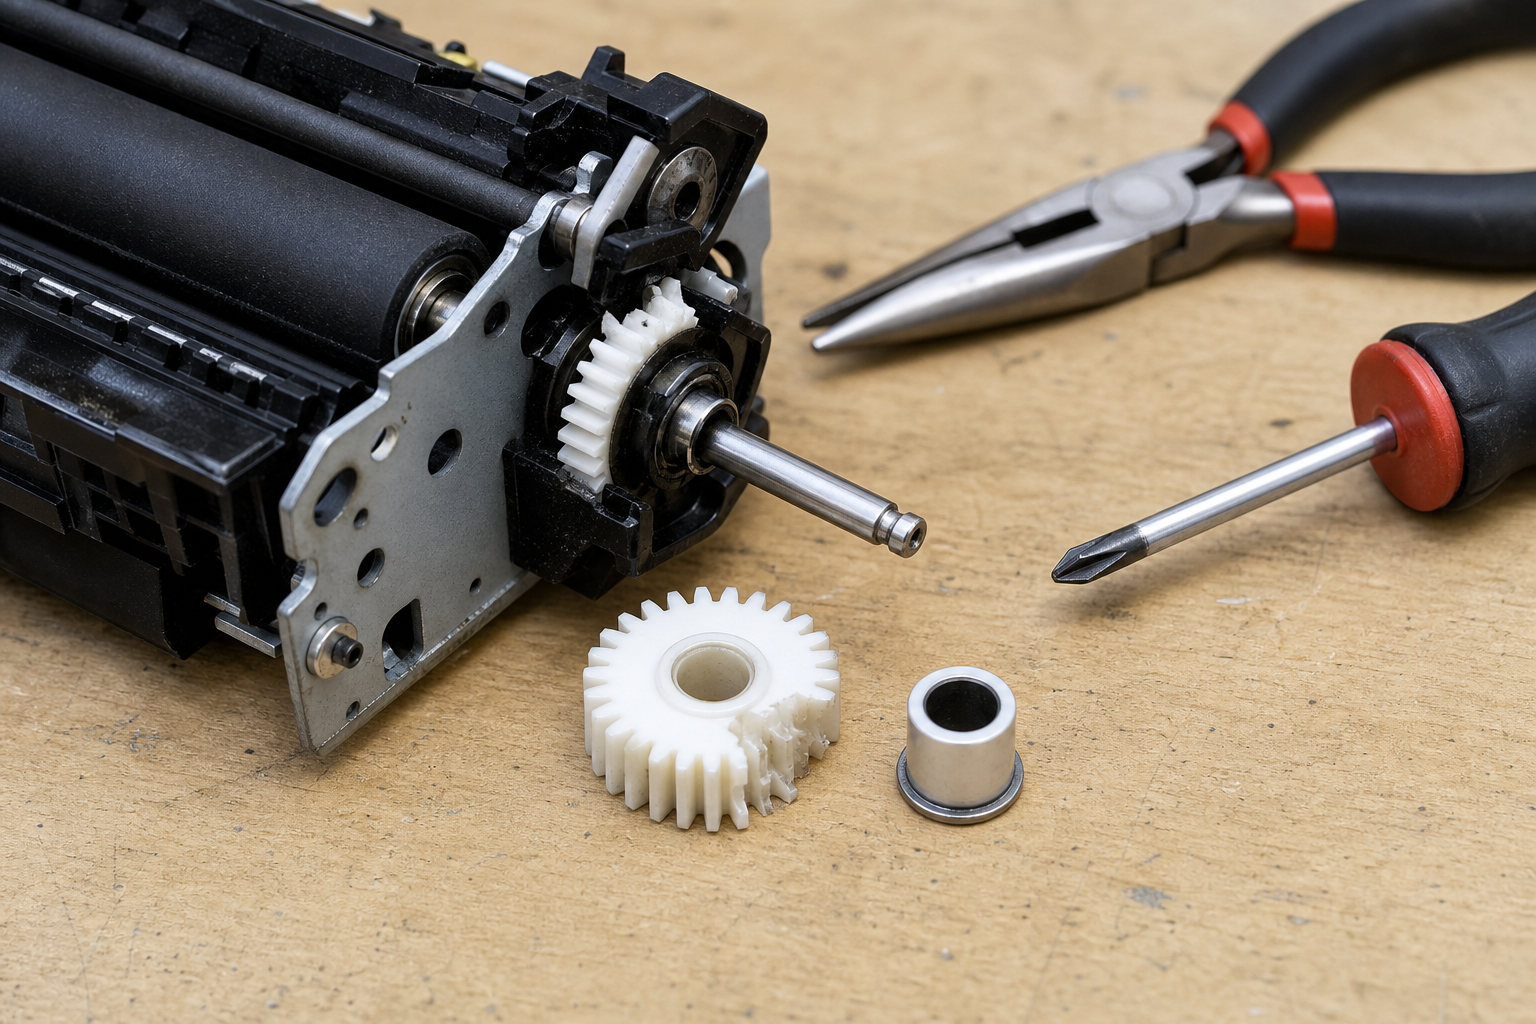
If your printer is making grinding or clicking sounds, displaying fuser error codes like 50.1, 50.2, 54.0, or producing smudged prints that don’t stick to the page, the fuser assembly gears or bushings are likely worn out. This guide walks you through diagnosing the exact failure, understanding why it happens, and replacing a broken gear with a low-cost part to restore full functionality.
What’s Happening — Symptoms in Detail
You turn on your printer or start a print job, and something is clearly wrong. Here’s exactly what you’ll experience:
Audible symptoms: A loud grinding, clicking, or rattling noise coming from the rear or center of the printer, especially when the printer warms up or during the first few inches of paper movement. Some users report a sudden loud pop followed by silence and a jam. Others hear a continuous scraping sound that gets worse over several prints.
Error codes on display: Common codes include:
- HP:
50.1 Fuser Error,50.2 Fuser Error,50.3 Fuser Error, or54.0 Fuser Error - Brother:
Fuser Error,Error 54, orMachine Error 50 - Canon:
E000-0000-0000orError Code 50 - Samsung:
Fuser Error #U1-2320or#U2-1110The printer may display a message like “Fuser Error” or “Call Service” and refuse to continue.
- HP:
Visual symptoms on prints: Smudged toner that can be rubbed off easily, wavy or wrinkled paper, or vertical streaks that appear every few inches. In severe cases, the paper emerges with melted plastic or scorch marks from the overheated fuser roller.
When it happens: Often on startup (during warm-up cycle when the fuser roller starts spinning), or mid-print after several pages. Some printers fail suddenly after a paper jam where the paper was forcefully pulled out, damaging the fuser drive gear.
Progression: In many cases, the noise starts quietly and intensifies over 20–50 prints. Other times, it’s an instant failure. The gear or bushing wears down until the fuser roller locks up completely, leading to a jam or error code every time.
This is not a software issue. A firmware update will not fix grinding gears. The problem is mechanical inside the fuser assembly.
How to Diagnose the Problem Step by Step
Follow these steps in order. You will need a Phillips #2 screwdriver, flathead screwdriver, small flashlight, and optionally a multimeter for continuity checks.
Quick Check – Listen and Look
- Turn the printer off, unplug it, and wait 5 minutes for the fuser to cool.
- Remove the toner cartridge and any jammed paper.
- Use a flashlight to look into the paper path near the rear of the printer. You should see two large rollers (the fuser rollers).
- Normal: The rollers look smooth, dark gray or black, and free of debris.
- Abnormal: You see chunks of broken white or black plastic, a gear tooth inside the path, or the roller surface is gouged or melted.
Manual Roll Test
- With the printer still off and cool, reach inside (if accessible) and try to rotate the lower fuser roller by hand using a flathead screwdriver on the gear teeth at the end of the roller (visible through the paper exit).
- Normal: The roller turns smoothly with even resistance.
- Abnormal: The roller is hard to turn, turns in jerks, or makes a clicking/grinding sound. If you feel a sudden jump or hear a snap, the drive gear is stripped.
Error Code Verification
- Turn the printer on. Note the exact error code on the display.
- Consult the manufacturer’s error code list. Codes like 50.1 (fuser warm-up failure), 50.2 (fuser overheat), or 54.0 (fuser drive gear problem) directly indicate a mechanical failure in the fuser assembly.
- If the printer gives a different code (e.g., paper jam codes), clear it and try a test print. If the noise returns, the gear issue is the root cause.
Resistance Check (Advanced)
- For experienced users: Unplug the printer, open the fuser assembly (requires removing several screws – see repair process). Locate the upper fuser roller gear and its mating drive gear.
- Normal: The gear spins freely without wobble, and the bushing is tight around the shaft.
- Abnormal: The gear has missing teeth, cracks, or wobbles. The bushing may be worn oval-shaped. Use a multimeter in continuity mode – if the bushing is broken, the metal shaft may touch the gear housing, causing a short (rare but possible).
Paper Feed Test
- Run a single-page test print on plain paper while watching the back of the printer.
- Normal: Paper exits smoothly and the fuser rollers spin evenly.
- Abnormal: Paper hesitates, makes a thumping sound, or exits with a torn edge. Toner smears if the fuser isn’t rotating properly.
Why This Happens — Root Cause
The fuser assembly uses gears and bushings to rotate the upper fuser roller (hot roller) and the lower pressure roller. Over time, these components fail due to:
Heat Degradation: The fuser operates at 180–220°C. The plastic gear and bushing are made from high-temperature nylon or POM, but constant thermal cycling makes them brittle. After thousands of pages, the gear teeth crack or the bushing wall thins, causing slop and eventual failure.
Paper Jam Force: When a user pulls a jammed sheet backward or forward aggressively, the fuser gear is subjected to sudden torque. This can snap one or more teeth off the upper fuser roller gear, especially on printers like HP LaserJet M402, M404, M407 or Brother HL-L2300, HL-L2350 where the gear is directly exposed.
Lack of Lubrication: The fuser drive train relies on a small amount of grease. Over time, grease dries up or becomes carbonized. Without lubrication, metal shafts grind into plastic bushings, creating an oval hole that causes the gear to bind.
Wear from Toner Contamination: Loose toner can enter the gear area and act as an abrasive. Mixed with heat, it forms a gritty paste that erodes gear tooth surfaces. This is common in printers that have used non-OEM toner cartridges with leaky seals.
Specific Models with Known Issues:
- HP LaserJet Pro M402/M404 series: The upper fuser roller gear (part number RM1-0830 or similar) often loses teeth after 50,000 pages. The bushing is integrated into the gear in some versions.
- Brother HL-L2300 series: The fuser gear (part number LV4402001) is prone to cracking at the bushing flange after high-volume use.
- Canon imageCLASS LBP series: The fuser drive gear (FC3-3201-000) can strip at the drive coupling due to thermal expansion.
Sudden vs Gradual: Gradual wear (over months) is from normal use and heat cycles. Sudden failure is almost always from a paper jam pull or a foreign object (like a staple) catching in the gear train.
Can You Fix It Yourself?
Difficulty Level: 3 out of 5 (Moderate)
- Requires disassembling the printer down to the fuser assembly.
- No soldering, but careful screw handling and alignment are needed.
Time Required: 30–60 minutes for first-time fix; 20 minutes if experienced.
Skill Level Needed:
- Comfortable with opening plastic housings and removing ribbon cables.
- Ability to follow a detailed teardown guide.
- No electronic repair experience required.
Risks:
- Breaking plastic clips on the printer frame if too much force is used.
- Damaging the fuser heater lamp if the assembly is mishandled while hot.
- Causing paper jams if gears are not re-aligned correctly.
- Electric shock if the fuser is not fully discharged (wait 30 min after unplugging).
Tools Required:
- Phillips #2 screwdriver (long reach)
- T10 Torx screwdriver (for some models)
- Small flathead screwdriver (for prying clips)
- Needle-nose pliers (to remove small E-clips if needed)
- Flashlight for inspection
- Optional: Multimeter for continuity check
Why it’s not a 1/5: You must access the fuser assembly deep inside the printer, often requiring removal of the toner cartridge, paper trays, and rear cover. The gear is small and can be tricky to align. However, once you see the part, replacement is straightforward.
Cost Breakdown — DIY vs Professional
DIY Cost:
- Replacement Upper Fuser Roller Gear with Bushing (Part #1): $1.07
- Shipping: usually $2–$5 unless combined with other parts
- Total: ~$6 (if you order just this part)
- No other consumables needed; reuse the fuser assembly.
Professional Repair Cost:
- Diagnostic fee: $30–$50 (often waived if you proceed with repair)
- Labor: $75–$150 per hour (typical 1-hour minimum)
- Part markup: $25–$40 for the same gear (shop often charges 300%+ over wholesale)
- Total: $130–$240
When to Skip DIY:
- If your printer is still under warranty (contact manufacturer).
- If you are uncomfortable disassembling electronics or have limited time.
- If the fuser assembly is damaged beyond a single gear (e.g., cracked roller, broken pressure arm). In that case, replace the entire fuser assembly ($60–$120 online) rather than individual gears.
- If the printer is very old or low-value (e.g., sub-$150 printer), professional repair may cost more than a new printer. DIY is still worth the $1.07 part if you have time.
ROI: For a $0.50 gear, you can save $130+. This is one of the cheapest fixes in printer repair.
Repair Process Overview
Safety First
- Unplug the printer and wait 30 minutes for the fuser to cool completely. The fuser heater stays hot for a long time.
- Remove the toner cartridge and any paper from all trays.
Access the Fuser Assembly
- Remove the rear cover (usually 4–6 screws, Phillips #2).
- On many HP and Brother printers, you also need to remove the rear paper output tray and the top cover (2–4 screws plus plastic clips). Refer to your printer’s service manual.
- Locate the fuser assembly: a metal box with two large rollers, two wire connectors (heater lamp and thermistor), and one or two gears visible on the end.
Remove the Fuser Assembly
- Disconnect the two wire connectors by pulling straight out (do not yank wires). Note their positions.
- Remove the screws holding the fuser assembly to the chassis (usually 2–4 screws, often T10 Torx).
- Slide the fuser assembly out toward the rear. Be careful not to bend any metal tabs.
Disassemble the Fuser to Access the Gear
- Place the fuser on a clean workspace. Remove the metal covers (small screws) over the gear train.
- Identify the upper fuser roller gear – it is the gear attached directly to the upper roller shaft. On some models, it is white, with small teeth around the perimeter and a bushing molded into the center.
- In many cases, the gear is held by an E-clip or a small retaining ring. Use needle-nose pliers to remove it.
Replace the Gear
- Slide the old gear off the shaft. If it’s stuck, gently rock it side-to-side.
- Inspect the shaft for burrs or damage. Clean with a lint-free cloth.
- Apply a tiny amount of white lithium grease to the shaft and bushing area (optional but recommended).
- Press the new gear (Part #1) onto the shaft until it seats fully. Reinstall any E-clip or retaining ring.
Reassemble and Test Before Full Reassembly
- Reattach the fuser metal covers.
- Place the fuser assembly back into the printer loosely (with a couple of screws).
- Reconnect the two wire connectors.
- Replace the rear cover loosely and insert the toner cartridge.
- Plug in the printer and turn it on. Let it warm up. Listen for any grinding noises.
- Print a single test page. If it comes out clean and quiet, proceed to full reassembly.
Full Reassembly
- Turn off and unplug the printer.
- Tighten all fuser screws securely.
- Reinstall all covers and trays.
- Run three test prints (black text, color block, double-sided) to confirm full functionality.
After the Repair — Testing & Verification
How to Verify the Repair Worked:
- No error codes: The printer displays no fuser errors and completes warm-up without interruption.
- Silent operation: No grinding, clicking, or rattling sounds during warm-up or printing. A low hum is normal.
- Print quality: Text is sharp and does not smudge when rubbed. No vertical streaks or wrinkles on the paper. Toner is fully fused (cannot be scratched off with a fingernail).
- Smooth paper exit: Paper comes out flat, not curled or torn. No hesitation at the fuser area.
What to Watch for in the First Few Hours:
- Re-check after 10–20 prints: The new gear may settle. Listen for any new noises. If a slight tick develops, the bushing may not be fully seated.
- Monitor for overheating: Touch the rear area gently after 20 prints. If it feels excessively hot (over 70°C/158°F), the thermistor may have been misaligned during reassembly. Recheck connections.
- Watch for toner leakage: If you notice toner dust inside the printer after the repair, the fuser seals may have been disturbed. Clean with a toner vacuum.
- Run a long print job: Print 50 single-sided pages to stress-test the gear under normal thermal expansion. If it passes, the repair is permanent.
- Check for repeat jams: If paper jams occur at the same spot (fuser exit), the gear may be misaligned or the roller not fully engaged. Reopen and verify gear engagement.
When to Seek Further Help: If the error code returns or the grinding resumes after the replacement, the problem may be the fuser drive motor or a broken frame bracket. In that case, consider full fuser replacement or professional diagnosis.
Parts You’ll Need
Here are the parts that match this repair. Click the link to check the current price on AliExpress.
| Product | Price |
|---|---|
| Upper Fuser Roller Gear with Bushing … | $1.07 |
Prices and availability are subject to change on AliExpress.