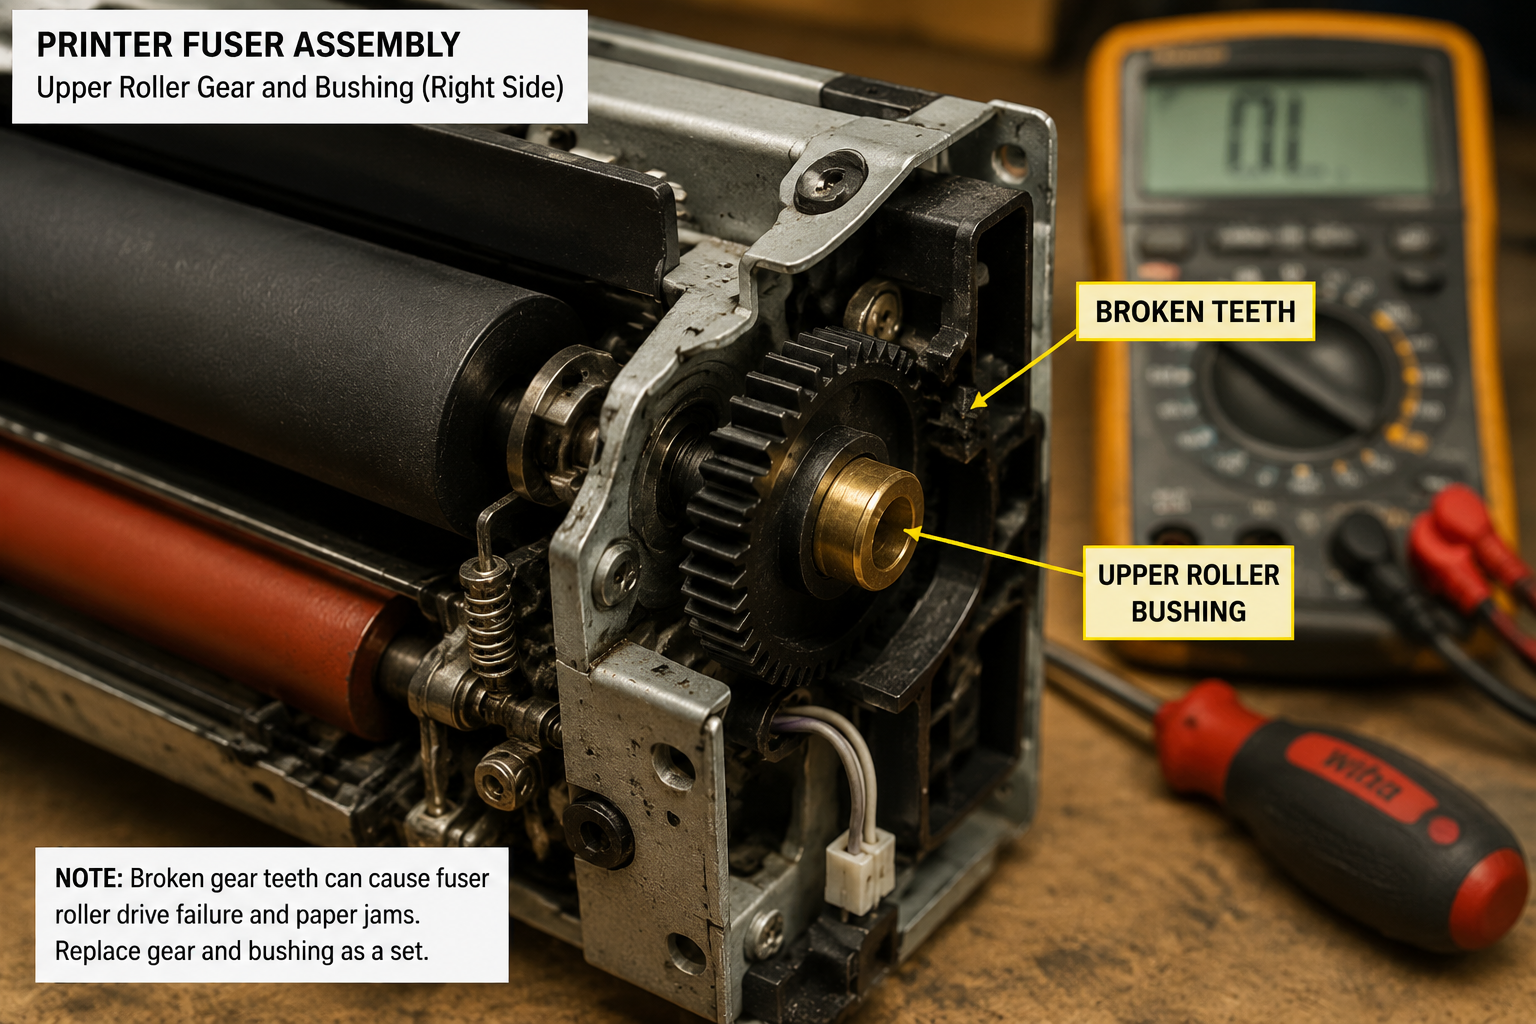
Your printer just stopped mid-print with a blinking error light and a grinding noise? The fuser assembly is likely the culprit. This guide walks you through the exact symptoms, step-by-step diagnosis, root causes (worn gears, burned-out lamps, or failed thermistors), and a realistic cost comparison between DIY repair using cheap replacement parts and professional service. You’ll know if you can fix it yourself in under an hour.
What’s Happening — Symptoms in Detail
Your printer suddenly refuses to print. Instead, it may display Error 50, Error 54, or a generic Fuser Error message. Some users see a message like “Replace Fuser” or “Fuser Malfunction.” The machine might start up but stop immediately, or it could begin a print job and then halt halfway through.
Specific symptoms you might encounter:
- Grinding or clicking noise during warm-up or printing – this points to damaged gears inside the fuser, especially the upper fuser roller gear with bushing.
- Paper jams right after the paper passes the toner cartridge – the paper gets stuck at the fuser entrance or exits crumpled.
- Print coming out with black streaks, wavy lines, or smudges – the fuser roller is damaged or the fuser lamp is unevenly heating.
- Burning smell – the fuser lamp is overheating or a piece of paper has caught fire inside.
- Printer beeps or flashes an orange light – on HP, Canon, Brother, or Samsung models, this often indicates a fuser error.
When does it happen?
- Immediately upon power-up – the printer detects an open or shorted thermistor during self-test.
- During warm-up – the fuser fails to reach the correct temperature within a set time (usually 30–60 seconds).
- Mid-print on a long job – the fuser lamp burns out or a gear shears off under heavy load.
- After a paper jam removal – you pulled out crumpled paper and accidentally dislodged a gear or snapped a clip.
How does it progress?
- Sudden failure – one minute it works, the next it doesn’t (typically lamp or thermistor failure).
- Gradual worsening – faint noise or intermittent jams that become more frequent over days or weeks, leading to a total stop (gear wear).
How to Diagnose the Problem Step by Step
Listen for the noise – Power on the printer. If you hear a clicking, grinding, or scraping sound that starts the moment the printer tries to warm up, suspect a broken gear or bushing inside the fuser. No noise? Skip to step 3.
Check the fuser error code – Write down the exact error code from the screen or LED pattern. Common codes: E50 (HP), E54 (HP), Fuser Error (Brother). These codes point to a temperature sensor or lamp issue, not gears.
Visual inspection of the fuser – Turn off the printer, unplug it, and wait 10 minutes for the fuser to cool. Open the rear door (if present) or remove the rear cover. Look at the fuser rollers:
- Normal: The rollers are black, smooth, and have even pressure across their length.
- Abnormal: You see flat spots, melted toner stuck to the roller, cracks, or a broken upper fuser roller gear with bushing (the plastic spur gear may be missing teeth).
Thermistor test (advanced) – Remove the fuser assembly (typically held by two screws and a flat cable). Locate the thermistor – a small glass bead or metallic button pressed against the roller. Use a multimeter set to resistance (ohms):
- Normal: Resistance changes when you warm it with a hair dryer (starts around 200-300kΩ, drops as heat is applied).
- Abnormal: Infinite resistance (open) or zero (short) – the thermistor is dead.
Fuser lamp continuity test – With the fuser removed, locate the fuser lamp (a long tube visible through a slit). Set multimeter to continuity (beep mode) across the two terminals:
- Normal: Beeps (continuity).
- Abnormal: No beep – the lamp is blown. Warning: The lamp may be covered by a metal shield; do not force it open.
Gear behavior check – Manually turn the drive gear on the end of the fuser. Rotate it by hand (use a small flathead screwdriver to turn the gear).
- Normal: Spins smoothly with consistent resistance.
- Abnormal: Grindy feel, skipping, or the gear doesn’t engage – the upper fuser roller gear with bushing has broken teeth or the bushing is seized.
Why This Happens — Root Cause
1. Worn or Broken Gears (most common in older printers)
Inside the fuser assembly, the upper fuser roller gear with bushing is a plastic gear that meshes with a second gear to rotate the roller. Over thousands of pages, the teeth wear down or the bushing (the sleeve around the shaft) dries out and causes friction. The gear then snaps under load. Dust, paper scraps, and high heat accelerate this failure. Models like HP LaserJet P1102w, Brother HL-L2350DW, and Samsung ML-3310ND are notorious for this.
2. Burned-Out Fuser Lamp
The fuser lamp is a halogen or quartz tube that glows bright red to heat the roller. It has a finite life – usually around 50,000 pages. When the filament breaks, the printer cannot reach operating temperature and throws an error. This is a sudden failure, often with no prior symptoms.
3. Failed Thermistor or Thermostat
The thermistor monitors temperature and sends feedback to the main board. The thermostat is a safety switch that cuts power if the fuser overheats. Both can fail open (high resistance) or shorted, causing the printer to think the fuser is too hot or cold. Heat cycling and power surges are typical causes.
4. Paper Jams and Stress
Forcing crumpled paper out of the fuser can crack the gear housing or bend metal guides. The resulting misalignment puts uneven pressure on the upper fuser roller gear with bushing, leading to premature wear.
5. Contamination
Toner powder builds up inside the fuser over time. This sticky dust can block ventilation, cause the roller to slip, and add friction to the gears. It also insulates the thermistor, making it read inaccurate temperatures.
Can You Fix It Yourself?
- Difficulty Level: 3 out of 5 – Requires careful disassembly of the printer and fuser housing. Not for absolute beginners but doable with patience.
- Time Required: 45-90 minutes. Most of the time is spent removing screws and handling cables.
- Skill Level Needed: Comfortable with a Phillips #2 screwdriver and small flathead. Ability to read a multimeter is helpful for diagnosis. No soldering required.
- Risks:
- You can break plastic clips or ribbon cables if you force them.
- The fuser lamp is fragile – avoid touching it with bare fingers (skin oils cause hot spots).
- Risk of electric shock if you handle the lamp while plugged in. Always unplug and wait 10 minutes.
- Tools Required:
- Phillips #2 screwdriver
- Small flathead screwdriver (for prying clips)
- Multimeter with resistance and continuity modes
- Hair dryer (for thermistor test)
- Tweezers (to handle tiny cables)
- Work surface with good lighting
Cost Breakdown — DIY vs Professional
- DIY Part Costs:
- Upper Fuser Roller Gear with Bushing – (Part #1) – $1.07 – This replaces the broken gear and bushing on the upper roller. You may also need the Upper Fuser Roller Assembly – (Part #2) – $1.13 if the roller itself is damaged (flat spots, toner buildup). Total DIY cost: $1.07 to $2.20.
- Additional parts if you find a bad lamp or thermistor – typical price $5-15 online.
- Professional Repair Costs:
- Diagnostic fee: $30-50
- Fuser assembly replacement (standard for shops): $100-200 for the assembly + labor $50-100. Total: $150-$300.
- Shop will not repair just the gear – they replace the entire fuser unit.
- When to Skip DIY:
- If you are not comfortable opening the printer main chassis.
- If error code indicates a main board failure (unlikely but possible).
- If your printer is still under warranty (contact manufacturer first).
- If you lack a multimeter and are not willing to buy one ($15-20).
- Verdict: DIY is highly cost-effective if the problem is a broken gear or bushing. The part costs pennies and the repair is straightforward with this guide.
Repair Process Overview
Unplug the printer and remove the toner cartridge and paper tray. Wait 10 minutes for the fuser to cool completely.
Remove rear covers – Use a Phillips #2 to take off the rear panel and any side covers blocking access to the fuser. Keep screws organized in a cup.
Disconnect the fuser cable – Inside, you’ll see a ribbon cable or wire harness connected to the fuser assembly. Gently release the clip and pull it out. Note the routing for reinstallation.
Unscrew the fuser assembly – Usually two or four screws hold the fuser in its metal frame. Remove them and slide the fuser out. Take a photo of the mounting orientation.
Disassemble the fuser housing – Remove small screws on the fuser end caps. Separate the two halves of the fuser shell. Be careful not to lose springs or small clips.
Extract the upper roller – Lift the upper roller (the one with the gear) out of its slots. In most designs, you can simply pull it upward. Note how the Upper Fuser Roller Gear with Bushing fits on the roller shaft.
Remove the old gear and bushing – The gear is press-fit onto the shaft. Use a flathead screwdriver to gently pry it off. Sometimes it is held by a screw; unscrew it. The bushing slides off the shaft.
Install the new parts – Slide the new bushing onto the shaft (grease lightly with thermal grease if provided). Press the new gear onto the shaft until it seats fully. Ensure it spins freely.
Reassemble the fuser – Reverse the disassembly. Place the upper roller back into the fuser shell, align the gears, secure the end caps, and reinstall the screws. Do not overtighten plastic parts.
Reinstall the fuser into the printer – Insert the fuser assembly, align screw holes, and fasten. Reconnect the cable. Replace rear covers.
Paper path check – Before powering on, turn the main drive gear manually to ensure the fuser gears engage without binding.
After the Repair — Testing & Verification
- First power-on – The printer should start up normally without error codes. Listen for any grinding – none should be present.
- Warm-up test – After 30-60 seconds, the printer should reach ready state. No burning smell.
- Test print – Print a single-page test from the computer or a built-in demo page (usually press and hold the Go button for 10 seconds).
- Normal: Paper exits smoothly, print is clean, no smudges.
- Abnormal: Paper jams at the fuser, prints have horizontal lines, or error returns.
- Watch for the first 5 prints – The new gear may settle in. If you hear a slight clicking that disappears after a few prints, that’s normal. Persistent clicking means the gear is not fully seated.
- Temperature check – After printing 10 pages, the fuser area should be warm (not scorching hot). If it feels excessively hot, the thermostat may be faulty.
- Final check – Run a longer job (20 pages). Monitor for any new error codes. If none occur, the repair is successful.
Parts You’ll Need
Here are the parts that match this repair. Click the link to check the current price on AliExpress.
| Product | Price |
|---|---|
| Upper Fuser Roller Gear with Bushing … | $1.07 |
| JC66-03080A JC61-03755A Upper Fuser R… | $1.13 |
Prices and availability are subject to change on AliExpress.