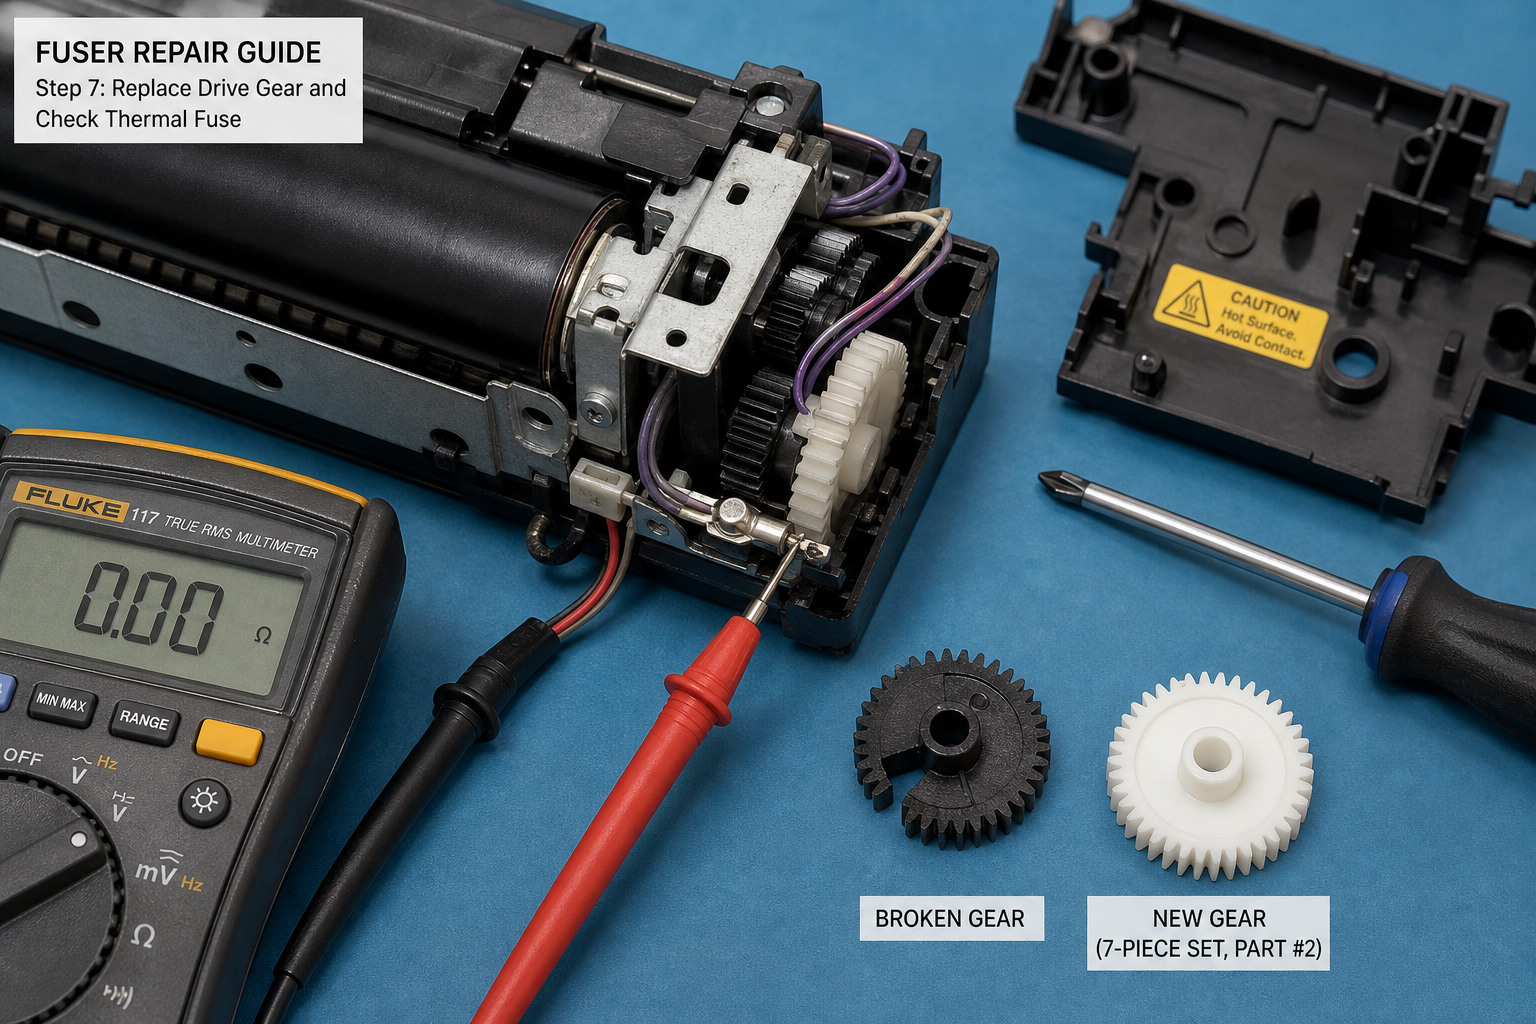
Your printer stopped mid-job with a paper jam error, or you smell burning plastic and see a Fuser Error code on the display. This guide walks you through the exact symptoms, how to confirm the fuser is the problem, why it fails, and whether you can fix it with a $1.30 gear set or need a full replacement. No guesswork — just actionable steps.
What’s Happening — Symptoms in Detail
Your Printer Just Stopped — What You Are Experiencing
Error codes on the display (common examples):
- ‘Fuser Error 50’ on HP LaserJet models (e.g., M404, MFP M428)
- ‘Error 016-xxx’ on Fuji Xerox / Dell printers
- ‘Replace Fuser’ or ‘Fuser Malfunction’ on Brother HL series
- ‘Service 5’ on Canon imageCLASS printers
Physical symptoms you may notice:
- The printer stops mid-page with a jam message even though no paper is actually stuck.
- A burning smell (like hot plastic / rubber) during or just after printing.
- Screeching or grinding noise when the printer tries to feed paper through the fuser area.
- Horizontal wrinkles or melted spots on the last few pages that printed.
- Paper comes out with black streaks or repeating marks at the same interval.
When does it happen?
- Most often during or immediately after a long print job (the fuser is at full operating temperature).
- Some users report a sudden failure after a paper jam that was forcefully cleared.
- On older printers, it may start as an intermittent ‘fuser warm-up failure’ that gets worse over days.
How does the failure progress?
- Gradual failure: first you get occasional wrinkles, then a faint burning smell, then an error code. This points to a failing roller coating or worn gear.
- Sudden failure: one loud snap or grinding sound, followed by error code and no further printing. This usually means a broken gear or seized bearing.
- Intermittent failure: the printer works fine for hours, then randomly throws a fuser error after cooling down. This is common with a failing thermistor (temperature sensor) or thermal fuse.
How to Diagnose the Problem Step by Step
How to Confirm the Fuser Assembly Is the Culprit
Tools needed: Phillips #2 screwdriver, small flathead screwdriver, flashlight, multimeter (optional for advanced checks).
Quick Check (5 minutes, no disassembly)
Power cycle the printer — turn it off, wait 30 seconds, turn back on. If the fuser error clears and you can print one page, but the error returns after a few pages, the fuser is failing, not just a glitch.
Listen during warm-up — after power-on, the fuser takes about 30 seconds to heat up. Normal: a low hum and a soft click when the rollers engage. Abnormal: a grinding or rattling sound lasting more than a few seconds.
Smell test — sniff near the rear output tray. Normal: faint warm paper smell. Abnormal: acrid, sweet burning plastic smell — indicates melted roller coating or overheated thermistor.
Check error code history — press the ‘Information’ button (or ‘Reports’ on the menu) to print a service page / error log. A repeated ‘fuser’ or ‘50.x’ error confirms the assembly needs attention.
Inspect the paper path — open the rear cover (or fuser access door). Use a flashlight. Normal: clean white or gray rollers with no debris. Abnormal: black melted spots, shiny glazed patches on the roller surface, or broken gear teeth visible near the ends.
Detailed Check (15 minutes, remove fuser)
Remove the fuser assembly — locate the two release levers on either side of the printer (usually green or blue). Lift them up and pull the fuser straight out. If it’s stuck, check for jammed paper underneath — do not force it.
Spin the gears by hand — on the side of the fuser, find the large gear that meshes with the printer’s drive train. Turn it clockwise. Normal: smooth rotation with slight resistance. Abnormal: tight spot, grinding feel, or one gear does not turn while the other does — indicates a stripped gear or seized bearing.
Check the thermal fuse and thermistor — locate the small white ceramic block (thermistor) pressed against the roller. Use a multimeter on ohms mode. Normal: room temperature gives ~100kΩ to 1MΩ (check datasheet for your model). Abnormal: open circuit (infinite resistance) or short circuit (near-zero). The thermal fuse should read near 0Ω. If it shows OL, the fuser has overheated and blown — replacement required.
Visual inspection of the pressure roller — the lower rubber roller. Normal: smooth, even surface, no cracks. Abnormal: flat spots, blisters, or cracked rubber — these cause paper jams and poor image quality.
Test for gear backlash — with the fuser out, gently rock the large gear back and forth. Normal: only a minuscule amount of play (less than 1mm). Abnormal: excessive wobble or the gear can be moved side to side — indicates worn bushing or broken gear mount.
Why This Happens — Root Cause
Why Fuser Assemblies Fail — Engineering Breakdown
Part wear at high temperature: The fuser operates at 180-220°C (356-428°F). The upper roller is coated with PTFE (Teflon) or silicone rubber. Over time, heat cycles cause the coating to degrade, develop micro-cracks, and eventually flake off. These flakes stick to the pressure roller, causing wrinkles and jams.
Gear and bushing failure from stress: The fuser’s drive gear engages with a plastic upper roller gear (common part #1: Upper Fuser Roller Gear with Bushing — $1.07). This gear is exposed to high torque when clearing paper jams. If a user pulls a jammed sheet forcefully, the gear teeth can strip or the bushing can crack. This causes a sudden grinding sound and failure to rotate.
Thermal fuse and thermistor burnout: The thermal fuse is a one-time safety device. If the thermistor fails (drifting resistance), the fuser may overheat, blowing the fuse. Common on HP LaserJet Pro models after 3-4 years of heavy use. Once blown, the printer will not allow the fuser to heat up at all.
Conditions that accelerate failure:
- High-volume printing (over 5,000 pages/month) without maintenance
- Wrong paper type (thick cardstock or labels) that increases heat stress
- Forceful jam removal — yanking paper can crack gear housings
- Dusty environments — particles get into bushings, acting as abrasive
- Power surges — can damage the heating element or control board
Specific model known issues:
- HP LaserJet M404 / M428: Fuser error 50.4 — common after 50k pages due to worn thermistor.
- Brother HL-L2350DW: Gear noise and ‘Replace Fuser’ after 30k pages — the drive bushings wear out.
- Canon imageCLASS LBP226dw: Burning smell and ‘Fuser Malfunction’ — pressure roller develops flat spots.
- Dell / Fuji Xerox 3100: Error 016-311 — often caused by a broken upper roller gear (part #1 fits many of these).
Can You Fix It Yourself?
Can You Fix It? Honest Assessment
Difficulty: 3 out of 5
- Requires careful disassembly of the fuser unit itself, not just the printer.
- Many small clips and springs inside — losing one will ruin the fix.
Time required: 45–90 minutes for first-timers; 20 minutes for experienced techs.
Skill level needed:
- Basic: screwdriver work (Phillips #2, small flathead)
- Intermediate: handling small plastic clips without breaking them
- Not required: soldering (unless you need to replace a thermistor — rare)
Risks:
- Breaking clips — easy to snap plastic tabs. Use a metal spudger, not a screwdriver, to pry.
- Incorrect reassembly — if a gear is not seated properly, the fuser will jam instantly on first print.
- Over-tightening screws — can crack the plastic frame. Use hand-tight only.
- Electrical shock — fuser operates at high voltage. Unplug the printer and let it cool for 30 minutes before touching any heating element.
- Fire hazard — if you install a wrong-rated thermal fuse, the fuser could overheat. Always match exact specs.
Tools required:
- Phillips #2 screwdriver (magnetic tip helps)
- Small flathead screwdriver (2mm tip)
- Spudger or plastic pry tool (to release clips)
- Needle-nose pliers (for small wires)
- Multimeter (for thermal fuse continuity check)
- Isopropyl alcohol and lint-free cloth (to clean old grease)
- White lithium grease or fuser-specific grease (for gear bushings — do not use WD-40)
- Optional: heat gun (to soften old adhesive on labels)
If you are unwilling to risk breaking the fuser frame, skip DIY. But if you follow steps methodically, the repair is straightforward.
Cost Breakdown — DIY vs Professional
DIY vs Professional — Real Cost Comparison
DIY Option 1: Replace only the broken gear(s)
- Part #1: Upper Fuser Roller Gear with Bushing — $1.07 (ships from Printer Parts Review)
- Part #2: 7-pcs set RM1-2963, RU5-0655, RM1-2538 & other gear/bushing assortments — $1.30 (covers multiple models)
- Shipping: ~$4 (standard)
- Total DIY cost: $5.37 (if you only need one gear set) or $5.60 with the 7-piece kit
- Additional consumables: grease ($5), alcohol ($3) — total ~$15 if you have nothing.
DIY Option 2: Full fuser assembly replacement
- OEM fuser for HP M404: $80-$130 on Amazon or eBay
- Compatible / refurbished fuser: $35-$60
- DIY full swap: $35-$130 depending on source
Professional Repair Shop Rates:
- Diagnosis fee: $30-$50 (often non-refundable)
- Labor: $60-$120/hour (most shops charge 1 hour)
- Parts: they will add 30-50% markup on gear sets or fuser assemblies
- Typical total: $100-$200 for gear replacement, $150-$250 for full fuser swap
When to skip DIY:
- If you broke a clip while opening the fuser — now you need a whole new assembly.
- If the fuser has electrical burn marks on the heating element — likely damaged panel board.
- If your printer model requires firmware updates to clear error codes — some Brother models need a reset procedure.
- If you are not comfortable working with high-voltage components or spring-loaded parts that can fly off.
Verdict: If the problem is a stripped gear or worn bushing, the $1.07 part + 45 minutes of your time saves you $100+. If the entire fuser is melted or the heater is shorted, a full replacement (DIY or pro) is necessary.
Repair Process Overview
Step-by-Step Fuser Gear Replacement (for part #1 or #2)
Safety first: Unplug the printer. Let it cool for 30 minutes. Remove all paper.
Remove the fuser assembly from the printer. Release the two side latches (often green or blue) and pull straight out. Set it on a clean, static-free surface.
Remove the side cover of the fuser. There are typically 2 to 4 Phillips screws on the left end (the gear side). Keep them in a small container.
Note the gear orientation — take a photo with your phone. The upper roller gear (part #1) meshes with a smaller idler gear. If you have the 7-piece kit (part #2), identify which gear is broken by comparing tooth count and inner bore.
Remove the old gear — use a spudger to gently pry it off the shaft. If it’s stuck, rotate it back and forth while pulling. Do not use pliers on the shaft, or you will damage the roller.
Clean the shaft and bushing with alcohol and a lint-free cloth. Apply a tiny amount of white lithium grease to the bushing (not to the gear teeth — grease on teeth attracts dust).
Install the new gear (part #1 or #2 matching gear). Press it onto the shaft until it seats flush. It should rotate freely with no wobble.
Reassemble the side cover — ensure no wires are pinched. Tighten screws in a cross pattern to avoid warping the plastic.
Reinstall the fuser into the printer. Lock the side levers. Close all covers.
Common mistakes:
- Forgetting to transfer the thermal fuse clip — the gear kit does not include the thermal fuse; if you accidentally broke its wire, the fuser won’t heat. Solder it back carefully.
- Misaligning the gear train — if you replaced more than one gear, the teeth must align exactly. If the fuser makes a clicking sound on first test, you have a tooth mismatch.
- Over-greasing — excess grease can migrate onto the roller surface, causing paper to slip. Use only a dab.
- Skipping the continuity test — before installing, use a multimeter to verify the thermal fuse still reads near 0Ω. If it’s blown, you need to replace it (not in the gear kit) or the printer will still show Fuser Error.
If the problem persists after gear replacement, the thermistor may be out of range. Clean it with a cotton swab and alcohol. If the error still appears, replace the thermistor or the entire fuser.
After the Repair — Testing & Verification
Verification — How to Know Your Repair Worked
Immediate checks:
- Visual rotation test — with the fuser installed but printer still off, manually turn the large gear through the printer’s rear opening. It should rotate smoothly with no binding. If you feel resistance, recheck gear alignment.
- Power on and listen — plug in and turn on. Normal: a quiet hum for 20-30 seconds as the fuser warms up. Abnormal: clicking, grinding, or a long warm-up time (>60 seconds).
- Print a test page — use the printer’s built-in test page (hold ‘Go’ or ‘Cancel’ for 5 seconds). Normal: a clean, crisp page with no wrinkles, no marks, no smell. Abnormal: repeating horizontal defects, burning smell, or the error reappears immediately.
First hour watchpoints:
- Watch for error codes — if ‘Fuser Error’ returns within 3 pages, you may have a faulty replacement gear (rare) or an electrical issue.
- Check for smudges — run your finger over the page. If toner smudges, the fuser roller temperature is too low (bad thermistor contact) or too high (new thermistor needed).
- Temperature feel — after printing 5 pages, carefully open the rear door and feel the back of the fuser (do not touch the roller!). Very hot is normal; scorching hot that hurts instantly indicates overheating — shut down and check thermal fuse.
- Listen for noise changes — a slight whirring is fine. A high-pitched squeal that appears after 10 minutes suggests a bushing is already wearing — apply more grease to the shaft.
Long-term:
- After 100 pages, inspect the test pages again. If all good, your repair is solid.
- Keep a note of the error code history — if it reappears, you may need to replace the thermistor with a new one (soldering required, part around $5-10).
If everything passes, you have successfully repaired your printer for under $10. Congratulations.
Parts You’ll Need
Here are the parts that match this repair. Click the link to check the current price on AliExpress.
| Product | Price |
|---|---|
| Upper Fuser Roller Gear with Bushing … | $1.07 |
| 7PCS/SET RM1-2963 RU5-0655 RM1-2538 R… | $1.30 |
Prices and availability are subject to change on AliExpress.