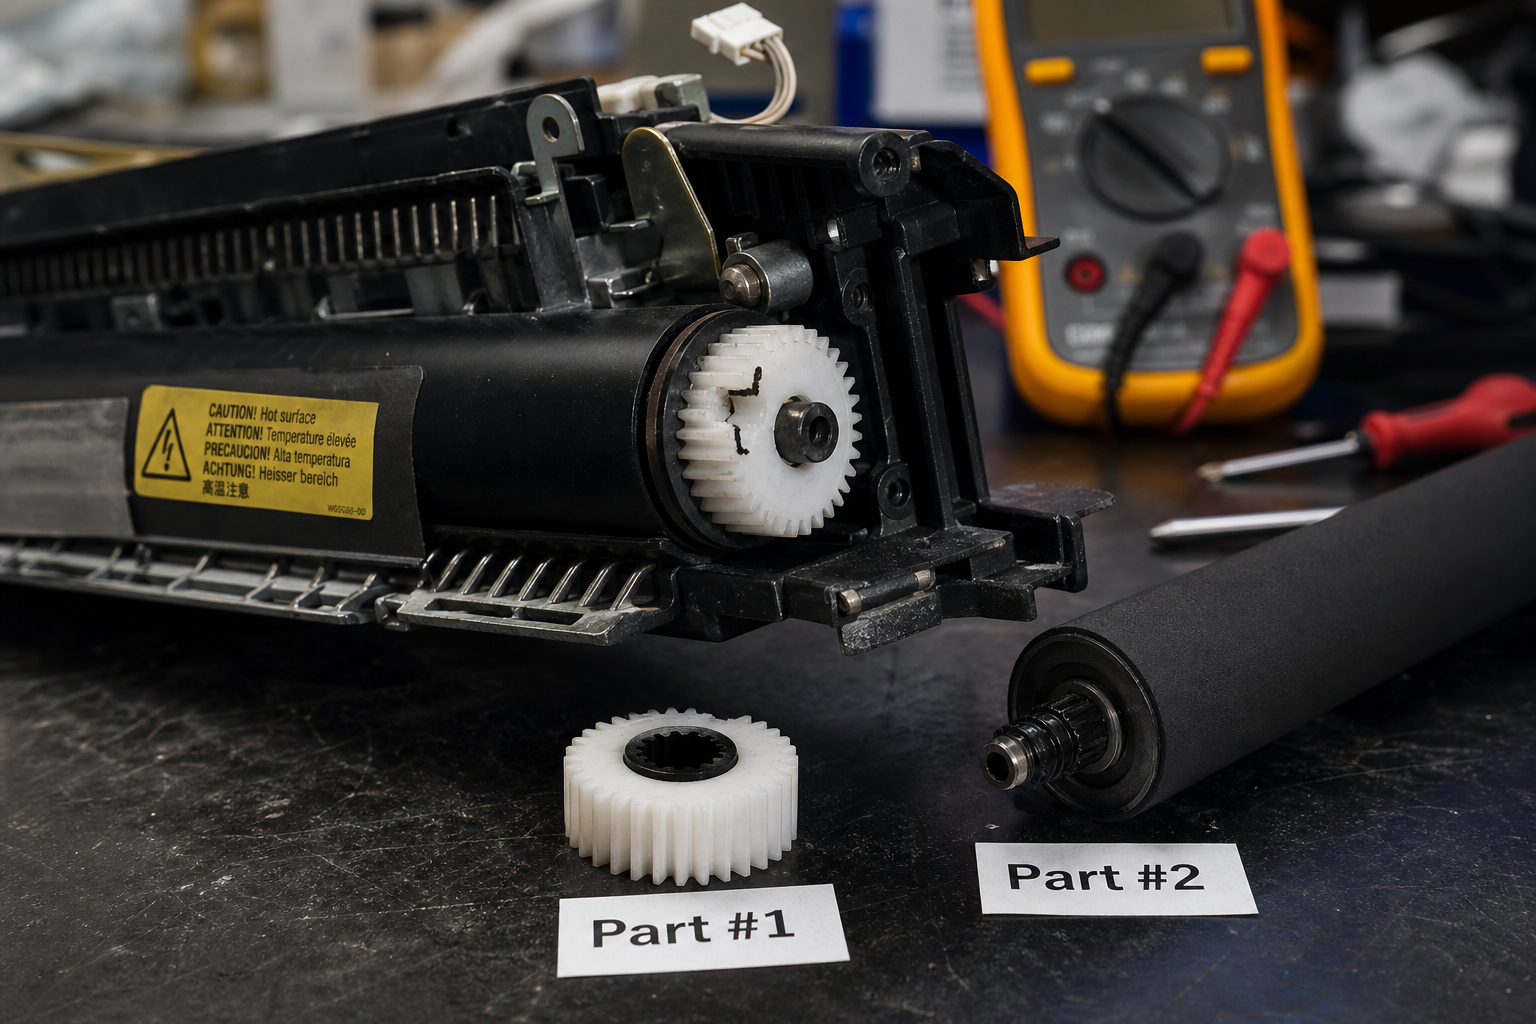
Your printer is flashing error codes, leaving smeared toner on every page, or producing a burning smell. This guide teaches you exactly how to diagnose a failed fuser assembly – from the first symptom to the repair itself – using specific models, measurements, and a two‑part repair that costs under $3 in parts.
What’s Happening — Symptoms in Detail
Symptom 1: Burning Smell and Smoke.
Some users report a sharp, acrid odor coming from the rear of the printer during a print job. This can be accompanied by visible smoke or haze. The smell is strongest near the fuser exit. This typically happens 30–60 seconds after printing begins, when the fuser roller reaches operating temperature.
Symptom 2: Paper Jams at the Fuser.
The paper feeds normally, stops halfway out, and won’t advance. When you open the rear cover, you see the paper crumpled around the upper fuser roller or wrapped around the pressure roller. On models like the HP LaserJet M404 or Brother HL‑L2370, the error code is often E0 (Brother) or 13.XX.YY (HP) indicating a jam inside the fuser assembly.
Symptom 3: Image Quality Defects.
The printed page shows vertical black streaks, repeating every 3.14 inches (typical circumference of a standard fuser roller). There may be ghosting – a faint duplicate image shifted down the page. Toner may rub off on your fingers after printing because the fuser isn’t melting and pressing it properly.
Symptom 4: Error Codes. Common codes include 50.x Fuser Error (HP), E0/E1 (Brother), Fuser Error (Canon), or 1200–1299 series (Xerox). The printer may stop with the Ready or Online light blinking a specific pattern (e.g., 3 blinks, 2 pause = fuser error on Lexmark T65x).
Progression:
- Slow failure: Over weeks, image quality degrades, jams become more frequent.
- Sudden failure: One good page, then next page causes a loud pop and error. This is common when a fuser roller bearing seizes.
The problem appears every time you print once the fuser begins to fail. It does not come and go – once the roller surface is damaged or the gear skips, every page will show the defect.
How to Diagnose the Problem Step by Step
Safety First & Quick Smell Test Unplug the printer. Wait 30 minutes for the fuser to cool. Carefully place your hand near the rear fuser area. If you smell burned plastic or a sweet wax odor (from toner overheating), the fuser has likely overheated or burnt a roller.
Visual Inspection – Rear Cover Remove the rear paper‑output cover (usually two push‑tabs or screws). Look at the upper fuser roller and pressure roller. Normal: both rollers appear smooth, dark gray or black, with no tears, cracks, or melted toner stuck to them. Abnormal: you see shiny melted toner blobs, torn edges, or a broken gear on the end of the upper roller (a small white or blue gear).
Manual Rotation Test Find the gear on the left end of the upper fuser roller (may be hidden under a metal bracket). Use a small flathead screwdriver to gently turn it. Normal: the roller rotates smoothly with even resistance. Abnormal: it sticks, grinds, or only turns partway. If you can turn it but the other end doesn’t move, the roller is broken internally.
Error Code Verification Write down the exact error code shown on the printer panel or in the print driver. Search that code online. For HP: 50.x means fuser low / no heat. 51.x means fuser high heat. Both indicate a failed thermistor or lamp inside the assembly.
Detailed Electrical Check (Advanced) With the printer unplugged and fuser removed (follow section 6 steps to remove), use a multimeter set to ohms (Ω). Measure across the two terminals of the fuser lamp (ceramic block with two wires). Normal: reading between 5–30 Ω depending on model. Abnormal: infinite (open circuit) – lamp is burned out. Also measure the thermistor (small glass bead on a spring). Normal: 100–200 kΩ at room temperature. Abnormal: less than 1 kΩ or infinite.
Tools needed: #2 Phillips screwdriver, small flathead, multimeter (for advanced check), flashlight.
Why This Happens — Root Cause
Why Fuser Assemblies Fail
The fuser is a mechanical and thermal heart of a laser printer. It uses a halogen lamp inside a hollow metal roller to heat the roller to 180–200°C (356–392°F). Toner particles are melted and pressed into the paper by the upper roller and pressure roller.
Primary failure points:
- Bushing wear – The upper fuser roller rotates on small plastic bushings at each end. Over time (typically 50,000–100,000 pages), the bushing deforms or cracks. This allows the roller to wobble, causing uneven pressure, then jams and gear stripping.
- Gear tooth shearing – If a bushing seizes, the drive gear (often part #1: Upper Fuser Roller Gear with Bushing) snaps its teeth. The roller stops turning, and the paper fuses into a wrinkled mess.
- Roller surface deterioration – The soft silicone layer on the upper roller degrades under heat and contact with toner. It can develop cracks, blisters, or flat spots. This causes the repeated streaks every roller circumference.
- Thermistor failure – The glass bead thermistor cracks from thermal shock (repeated heating/cooling). The printer then either under‑heats (toner doesn’t fuse) or over‑heats (melts toner into a sticky residue).
- Lamp burn‑out – The halogen lamp’s filament eventually breaks, especially in printers used for high‑volume continuous printing (like retail receipts).
Accelerating factors:
- Dust – Paper dust and toner debris coat the bushings, acting as an abrasive.
- Poor‑quality paper – Textured or recycled paper transfers more particulate into the fuser.
- Crash force – If you yank a jammed paper out roughly, you can snap the gear or bend the roller.
- Age – Even with low page counts, the silicone roller hardens over 5–7 years and becomes brittle.
Specific model notes:
- HP LaserJet Pro M404/M402 – Known for bushing wear after 30k pages. Error 50.2.
- Brother HL‑L2350DW – Plastic gears on upper roller fail around 15k pages. Error E0.
- Canon imageCLASS LBP226dw – Thermostat fails causing error E001-0000.
- Lexmark T650 series – Fuser lamp burn‑out is common at 100k pages.
Can You Fix It Yourself?
- Difficulty: 3 out of 5 (requires careful disassembly, alignment, and handling of near‑fragile plastic clips)
- Time: 45–75 minutes for a first‑timer; 20 minutes for an experienced technician
- Skill level: Must be comfortable using a screwdriver and tiny flathead. No soldering required – only mechanical replacement.
- Tools required: #1 and #2 Phillips screwdrivers, small flathead screwdriver (2mm), tweezers (to remove snap rings), white lithium grease (for new bushings), multimeter (optional for lamp test), and a plastic opening tool (optional).
- Risks:
- Broken plastic tabs: The fuser housing has delicate snap‑fits. If they crack, the assembly won’t hold together, causing misalignment.
- Roller damage: If you scratch the silicone roller surface with a tool, you’ll create a new streak defect.
- Gear alignment: If the replacement gear (Part #1) is not seated fully, it will skip and jam.
- Electrical shock: Even with the printer unplugged, capacitors can hold charge. Wait 5 minutes after unplugging before touching lamp wires.
- Is it worth it? For a printer worth more than $80, replacing the fuser (entire assembly) often costs $60–120. But if only the gear/bushing (Part #1) or the roller (Part #2) is worn, the DIY fix costs under $3 and saves you that expense. If the lamp is burned out, you need the whole assembly.
Cost Breakdown — DIY vs Professional
DIY part costs:
- Upper Fuser Roller Gear with Bushing (Part #1): $1.07
- JC66-03080A / JC61-03755A Upper Fuser Roller (Part #2): $1.19
- Total for roller + gear replacement: $2.26 (plus shipping, typically $4–$6)
- Alternative: Complete aftermarket fuser assembly from third‑party suppliers: $35–$60
Professional repair shop rates:
- Diagnosis fee: $30–$50 (often waived if you get the repair)
- Labor to replace fuser assembly: $45–$80 (1 hour minimum)
- Parts (OEM fuser): $80–$180
- Total professional repair: $125–$260
When to skip DIY:
- If the printer error code indicates a lamp failure (open circuit) or thermistor failure (incorrect resistance), the parts required are not the roller/gear alone – you need the entire fuser assembly. DIY with just a roller won’t fix it.
- If the printer body is warped (e.g., from a fall) or the main logic board is damaged, replacing the fuser is a waste.
- If you are not comfortable disassembling the fuser housing (many small springs, clips, and alignment pins), paying a shop may be cheaper than breaking your printer further.
Comparison: DIY with the two $1–$2 parts is 50–100 times cheaper than professional repair, but only correct if the root cause is gear/bushing wear or roller surface damage.
Repair Process Overview
Remove the Fuser Assembly
- Unplug the printer and let it cool 30 minutes.
- Open the rear cover / fuser access door. Usually you’ll see two blue clips on each side. Flip them outward.
- Grasp the fuser firmly and pull straight out. On HP/Cannon models, there may be a locking lever – lift it first.
Disassemble the Fuser Housing
- Place the fuser on a clean towel. Remove any visible screws (usually 4–6 Phillips).
- Use a small flathead to gently pry apart the plastic halves. Common mistake: forcing it – instead, work around the seam with a plastic spudger.
- Inside, you’ll see the upper roller (with a gear at one end) and the lower pressure roller.
Replace the Upper Roller Gear & Bushing
- The gear (Part #1) is on the end of the upper roller. It may have a retaining ring – remove it with tweezers.
- Slide the old gear off. If it’s stuck, use gentle wiggling. Abnormal: the shaft may be scored – if so, replace the entire roller (Part #2).
- Slide the new gear onto the shaft until it clicks into place. Apply a tiny drop of white lithium grease to the bushing area.
Replace the Upper Roller (if needed)
- If the roller surface has tears or flat spots, remove the old roller by sliding it off the metal shaft. Note the orientation (usually there’s a flat spot on the shaft that aligns with the gear).
- Install the new roller (Part #2). Ensure the alignment pin inside the roller matches the shaft flat. Important: Do not touch the silicone surface with bare hands – oil from skin can cause sticking. Use gloves or a clean cloth.
Reassemble the Housing
- Make sure both rollers are seated in their bearings. Reattach the plastic halves – they should snap together without gaps.
- Insert and tighten all screws. Do not overtighten – torque just until snug.
Reinstall the Fuser Assembly
- Slide the fuser back into the printer. Ensure it clicks into place and the blue clips flip back to the locked position.
- Close all covers. Plug in the printer and turn it on.
Common mistake to avoid: Forgetting to reconnect the thermistor wire (a small two‑pin connector) before closing the housing. If the printer detects no thermistor, it will throw a Fuser Error immediately.
After the Repair — Testing & Verification
Immediate verification:
- Print a cleaning page (or a blank page) to ensure the printer doesn’t show error codes. The warm‑up cycle should complete without a jam.
Test print quality:
- Print a solid black page (Word or test pattern). Look for streaks, ghosting, or uneven darkness. If you see a repeating defect at 3.14‑inch intervals, the new roller may have a flat spot (rare) – replace it.
Watch for the first few hours:
- Smell: You should smell only a faint warm plastic / toner scent. A strong burnt odor means the new roller is overheating (incorrect thermistor connection) or a bushing is dragging.
- Sounds: Listen for an intermittent grinding or chirping noise. That indicates a gear misalignment – open the back and check that the replacement gear (Part #1) is meshing with the drive gear inside the printer.
- Jams: Print 20 pages back‑to‑back. If you get a jam at the fuser, the assembly may not be fully seated, or the pressure roller is not engaging.
Long‑term watch:
- The new gear and bushing will settle in after 100 prints. If you notice a gradual increase in noise, re‑grease the bushing with a tiny amount of white lithium grease (do not over‑grease).
Parts You’ll Need
Here are the parts that match this repair. Click the link to check the current price on AliExpress.
| Product | Price |
|---|---|
| Upper Fuser Roller Gear with Bushing … | $1.07 |
| JC66-03080A JC61-03755A Upper Fuser R… | $1.19 |
Prices and availability are subject to change on AliExpress.