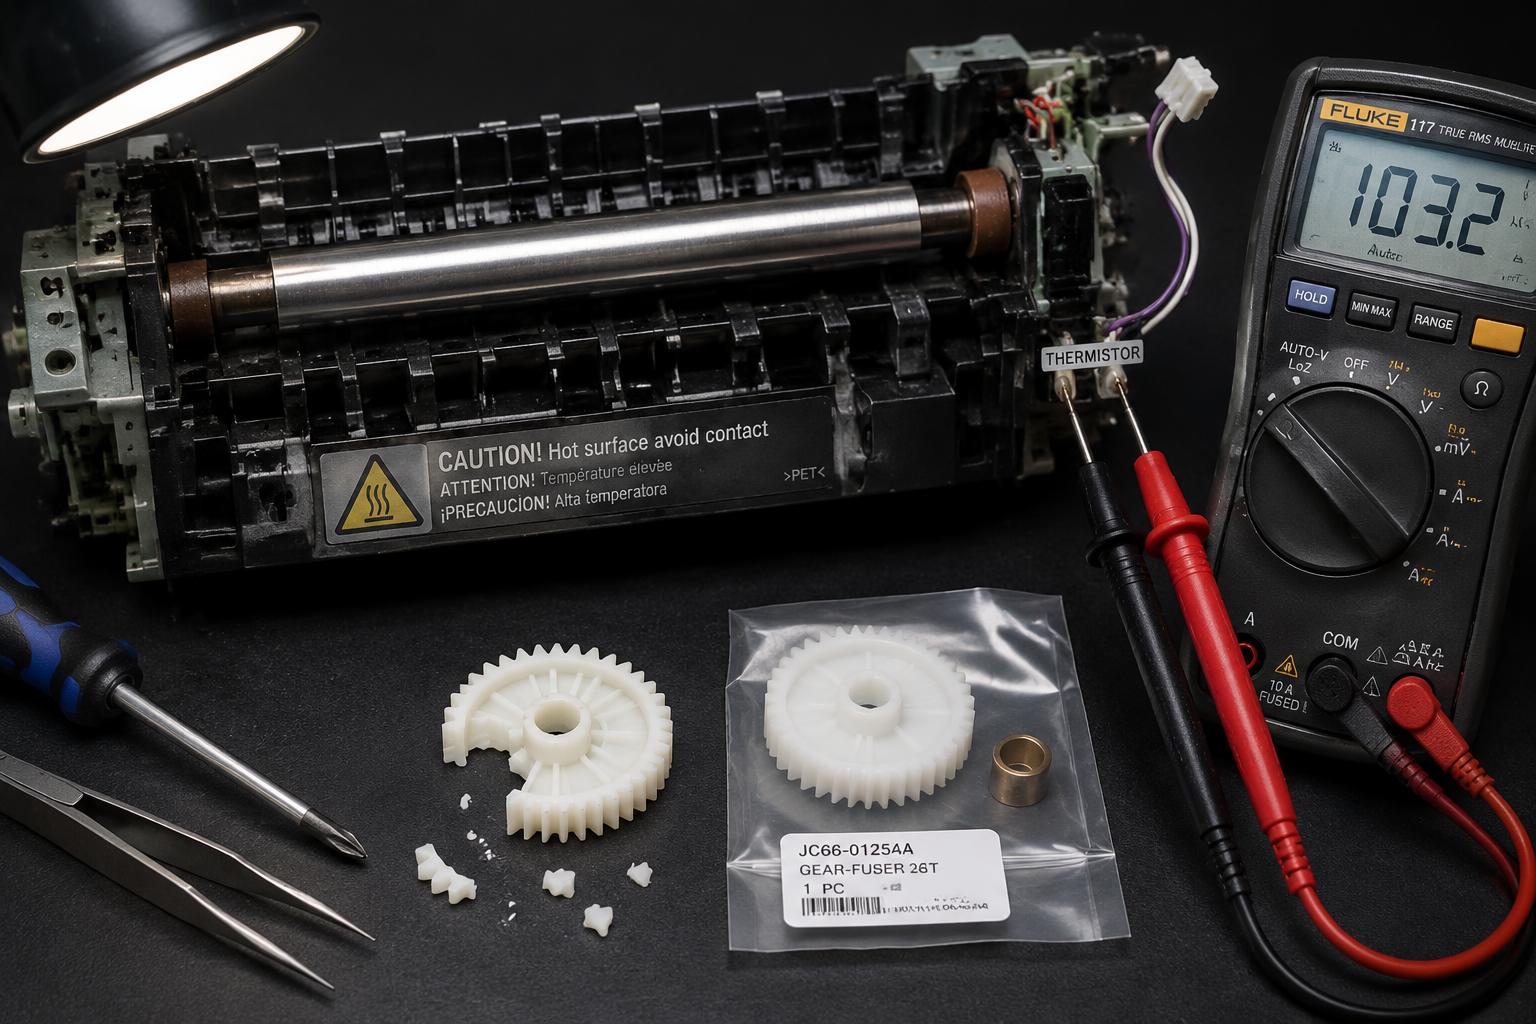
Your printer stopped with a fuser error code, a burning smell, or paper jams right after the half-page mark. This guide explains exactly what went wrong inside the fuser assembly, how to diagnose the specific failed component (gear, roller, thermistor, or thermal fuse), whether you can fix it yourself, and the real cost to repair or replace the assembly.
What’s Happening — Symptoms in Detail
Error Codes on Screen
Most printers display a specific code when the fuser fails. On HP LaserJet models (e.g., M404, M402, M203), you may see 50.1, 50.2, 50.3, or 50.4 fuser errors. On Brother machines, a “Fuser Error” or “Self-Diagnostic” message appears. These codes indicate the fuser is not reaching the correct temperature, or the drive gears have stopped turning.
Odd Sounds and Smells
Some users hear a grinding or clicking noise during the warm-up cycle. Others report a burning plastic smell as the fuser roller overheats or a gear grinds against broken teeth. If the smell is strong, the fuser may be literally melting.
Paper Jams at the Half-Page Point
The paper advances normally until it reaches the fuser, then jams. This happens because the fuser roller has stopped rotating (broken gear) or the fuser pressure roller is stuck (worn bushing). The paper is not fed out, leaving a half-printed page inside.
Visual Symptoms After Print
If the fuser is still partially working, you may see vertical streaks, ghosting, or toner that smears easily. This indicates the upper roller coating is damaged or the cold roller is not fusing toner.
When Does It Happen?
Failures can be sudden (gear snaps during a heavy print job) or gradual (error appears after 30 seconds of warm-up). Often the problem first shows up on startup when the fuser tries to heat up but a broken gear prevents roller rotation.
Progression Over Time
- Gear failure: sudden, one-time snap.
- Thermistor failure: intermittent error that becomes constant.
- Roller wear: streaks appear gradually over months.
How to Diagnose the Problem Step by Step
1. Read the Error Code
Check the printer’s display panel. Write down the exact error code (e.g., 50.1). Look up the code in your manual – 50.x codes are fuser-related. Normal: no errors. Abnormal: any 50.x code or a generic “Fuser Error”.
2. Visual Inspection of the Fuser Assembly
Remove the fuser from the printer (see repair process for steps). Place it on a clean surface. Normal: the fuser looks clean, with no melted plastic or debris. Abnormal: you see broken gear teeth, black char marks on the roller, or a soft burnt section on the upper roller.
3. Roller Rotation Test
Use your hand to manually rotate the drive gear on the side of the fuser. Normal: the upper roller turns smoothly with consistent resistance. Abnormal: the roller sticks, jerks, or does not turn at all. Listen for grinding – that indicates a broken gear or bushing.
4. Thermistor and Thermal Fuse Check
Use a digital multimeter set to continuity mode (Ω symbol). Locate the thermistor (small glass bead on a metal bracket touching the roller). Touch the probes to its two wires. Normal: resistance around 300–500 kΩ at room temperature. Abnormal: infinite resistance (open circuit) or zero resistance (short). Also check the thermal fuse (two small wires leading to a white or blue rectangular component). Normal: continuity (beep). Abnormal: no continuity – fuse is blown.
5. Gear Inspection
Look at the upper fuser roller gear and the bushing. Normal: teeth are sharp and unbroken, bushing is solid. Abnormal: missing teeth, cracks, or the bushing is worn allowing the gear to wobble. For HP printers, the small plastic gear with a metal bushing (Part #1) often fails first.
6. Check the Roller Surface
Run your finger along the upper roller (while off). Normal: smooth, even coating with no tackiness. Abnormal: sticky spots, peeling coating, or bare metal showing. These indicate the roller needs replacement.
Why This Happens — Root Cause
Gear Fatigue and Stress
The fuser drive train uses small plastic gears to turn the upper and lower rollers. Over thousands of prints, heat cycles weaken the plastic. A sudden jam or a thick paper stack can crack the gear teeth. Part #1 – Upper Fuser Roller Gear with Bushing is a common failure point on HP LaserJet M404 and M203 series. The gear snaps at the root of the tooth, causing the roller to stop spinning.
Thermistor Contamination
The thermistor monitors roller temperature. Toner dust, paper fibers, and silicone oil accumulate on its surface, creating an insulating layer. This causes the printer to misread temperature, leading to error 50.1 or 50.3. The thermistor can also crack from repeated thermal expansion.
Roller Coating Degradation
The upper roller has a silicone or Teflon coating. After 200,000+ pages, the coating wears thin or delaminates. Toner sticks to the bare metal, causing smears and jams.
Blown Thermal Fuse
If the fuser overheats (due to a stuck relay or failed thermistor), the thermal fuse opens to prevent fire. Once blown, the fuse must be replaced. This is common after a fuser overrun or if the printer ran without the fuser installed (power surge).
Bushing Wear
The metal bushing inside the gear (Part #1) wears over time. This creates play, causing the gear to wobble and eventually snap. High page counts and heavy paper (such as envelopes) accelerate this.
Specific Model Known Issues
- HP LaserJet Pro M404: Upper fuser roller gear bushing degrades after 150k pages.
- HP LaserJet M203: Thermal fuse blows often due to low-quality thermistor.
- Brother HL-L2370: Lower roller bushing fails, making a chattering noise.
Can You Fix It Yourself?
Difficulty: 3 out of 5
You need to disassemble the fuser unit to access the internal gears and thermistor. This is doable with basic tools but requires patience – the fuser has many small parts and fragile wires.
Time Required: 30–60 minutes
- Removing the fuser from the printer: 5–10 minutes.
- Disassembling the fuser: 15–25 minutes.
- Replacing the gear or roller: 5 minutes.
- Reassembling and re-installing: 15–20 minutes.
Skill Level Needed: Intermediate
- No soldering required if replacing only the gear or bushing.
- For thermistor or thermal fuse replacement, you need basic soldering skills (remove old component, solder two wires).
- Tools: Phillips #1 and #2 screwdrivers, multimeter, tweezers, needle-nose pliers, and spudger or plastic pry tool for clips.
Risks
- Breaking fragile plastic clips: Use gentle force.
- Damaging thermistor wires: They are thin copper – avoid bending too sharply.
- Misaligning gears: If the timing between upper and lower rollers is off, the fuser will jam. Mark gear positions before removal.
- Electric shock: The fuser has a heating element that can hold residual voltage. Unplug the printer for 10 minutes before touching any metal parts.
When to Skip DIY
If you see melted plastic, burnt wires, or a cracked heating lamp, the fuser is damaged beyond a simple gear/roller swap. Or if you have no multimeter and the error code suggests a thermistor issue, professional diagnosis may be faster.
Cost Breakdown — DIY vs Professional
DIY Parts (from available list)
- Upper Fuser Roller Gear with Bushing – $1.02 (Part #1). Replaces the broken gear and its metal bushing.
- JC66-03080A / JC61-03755A Upper Fuser Roller – $1.13 (Part #2). This is the complete upper roller assembly (includes the roller itself and sometimes the gear). Note: These prices are very low because they are generic replacement parts for HP models. Verify compatibility with your printer model before ordering.
Other DIY Costs
- If the thermal fuse is blown, a ST-120 type fuse costs $2–$5.
- A new thermistor costs $3–$8.
- Total DIY: Under $15 if only a gear is needed.
Professional Repair
- Repair shop labor rate: $80–$120 per hour.
- They may charge a flat fee of $60–$100 for fuser diagnosis and gear replacement.
- If they replace the entire fuser assembly (new OEM), expect $120–$250 for the part plus labor = total $200–$350.
When to Skip DIY
- If the fuser has multiple failures (e.g., broken gear + blown thermal fuse + damaged roller), buy a complete fuser assembly for $40–$70 (compatible) and swap it in 15 minutes. No disassembly needed.
- If you lack a multimeter and have no soldering iron for thermistor replacement, the DIY repair becomes more expensive and error-prone.
Repair Process Overview
Overview of Steps
Remove the fuser from the printer
- Unplug the printer, open the rear access door.
- Locate two blue or black locking tabs, push them to release the fuser.
- Disconnect the cable harness (usually a multi-pin connector) by pressing the latch.
- Slide the fuser straight out.
Disassemble the fuser unit
- Place the fuser on a static-free mat.
- Remove the side metal covers (two Phillips screws each).
- Lift off the upper plastic shroud that holds the thermistor.
- Remove the two screws holding the drive gear assembly.
- Carefully separate the upper roller from the lower roller. Note the orientation of the springs.
Replace the failed component
- Gear: Remove the clip retaining the gear, lift off the old gear, press the new gear (Part #1) onto the shaft. Reassemble.
- Roller: If replacing the upper roller (Part #2), slide it out after removing the bushing on one side. Insert new roller, align the driven gear.
- Thermistor: Desolder the two wires from the old thermistor, solder new one in place. Use heat shrink tubing to insulate.
- Thermal fuse: Cut the old fuse wires, solder new fuse (ensure correct temperature rating, usually 210°C).
Reassemble the fuser
- Reverse the disassembly steps. Ensure all gears mesh smoothly – rotate the drive gear by hand to verify.
- Reattach the thermistor wire bracket carefully to avoid shorting.
- Tighten screws to snug, not over-tighten (plastic can crack).
Reinstall the fuser into the printer
- Slide the fuser back into the slot, connect the cable harness.
- Press the locking tabs closed.
- Close the rear door.
Common Mistakes
- Forgetting to reconnect the thermistor wires → printer will show 50.3 error.
- Misaligning the drive gear → the fuser makes a grinding noise on test.
- Over-tightening side cover screws → warps the plastic frame.
- Using wrong thermal fuse rating → can cause the printer to overheat if the fuse is rated too high. Check the original fuse marking.
After the Repair — Testing & Verification
- Power on the printer and wait for it to complete its warm-up cycle (about 30 seconds). Normal: no error codes, the fuser heats up without unusual smell or noise.
- Run a diagnostic print page from the printer menu (e.g., “Print Configuration Page”). Normal: the page prints cleanly, without blank spots or streaking. Abnormal: error code reappears, or the paper jams at the fuser.
- Check for abnormal noises during the first 10 pages. A mild clicking is okay if it fades; persistent grinding means gear alignment is off.
- Examine the first few prints for
- Ghosting (faint duplicate image) indicates the thermistor is not reading correctly.
- Vertical lines – the roller surface may have been damaged during reassembly.
- Perform a 30-minute soak test: let the printer idle in ready state for 30 minutes, then print another page. If the error appears after a few minutes, the thermal fuse or thermistor may have failed again due to improper soldering.
- Check for overheating: Place your hand near the rear exhaust vent during a long print job. Normal: warm air. Abnormal: very hot air that smells like burnt plastic – shut down immediately and recheck the fuse.
Parts You’ll Need
Here are the parts that match this repair. Click the link to check the current price on AliExpress.
| Product | Price |
|---|---|
| Upper Fuser Roller Gear with Bushing … | $1.02 |
| JC66-03080A JC61-03755A Upper Fuser R… | $1.13 |
Prices and availability are subject to change on AliExpress.