A comprehensive guide to diagnosing and repairing a failed fuser assembly in laser printers. Covers common symptoms, step-by-step diagnosis, root causes, and whether to DIY or seek professional repair.
What’s Happening — Symptoms in Detail
Your laser printer is acting up. Error codes like ‘50 Fuser Error’, ‘Replace Fuser’, or ‘Service Required’ appear on the display. Some printers show a blinking amber light sequence—e.g., HP LaserJet models flash 4 times for a fuser failure.
The paper output tells the story too. You see horizontal smudges, repeating marks every 3.7 inches (94 mm)—that’s the fuser roller diameter. Toner rubs off when you touch the print, or the paper comes out with a burnt smell. In severe cases, the paper jams inside the fuser, often halfway through the exit slot.
Some users report a loud grinding noise on startup as the printer warms up the fuser. Others experience the printer shutting down mid-print with a thermal runaway warning. The problem can appear suddenly after a paper jam, or gradually over thousands of pages.
When does it happen? Most failures occur during the warm-up cycle (first 30 seconds) or when printing dense coverage pages. If the fuser lamp fails, you get a cold start error every time. If the thermistor is cracked, the error appears after a few prints as the temperature drifts.
Progression: A degrading fuser often starts with faint grey marks, then worsens to heavy streaks. Eventually, the printer refuses to print entirely. Don’t ignore early symptoms—a failing fuser can damage the transfer belt or pressure roller.
How to Diagnose the Problem Step by Step
Check Error Codes: Note the exact error on the screen. For HP, ‘50.1 Fuser Error’ means low temperature; ‘50.2’ means high temperature. For Brother, ‘Error E0’ indicates fuser failure. Write down the code before proceeding.
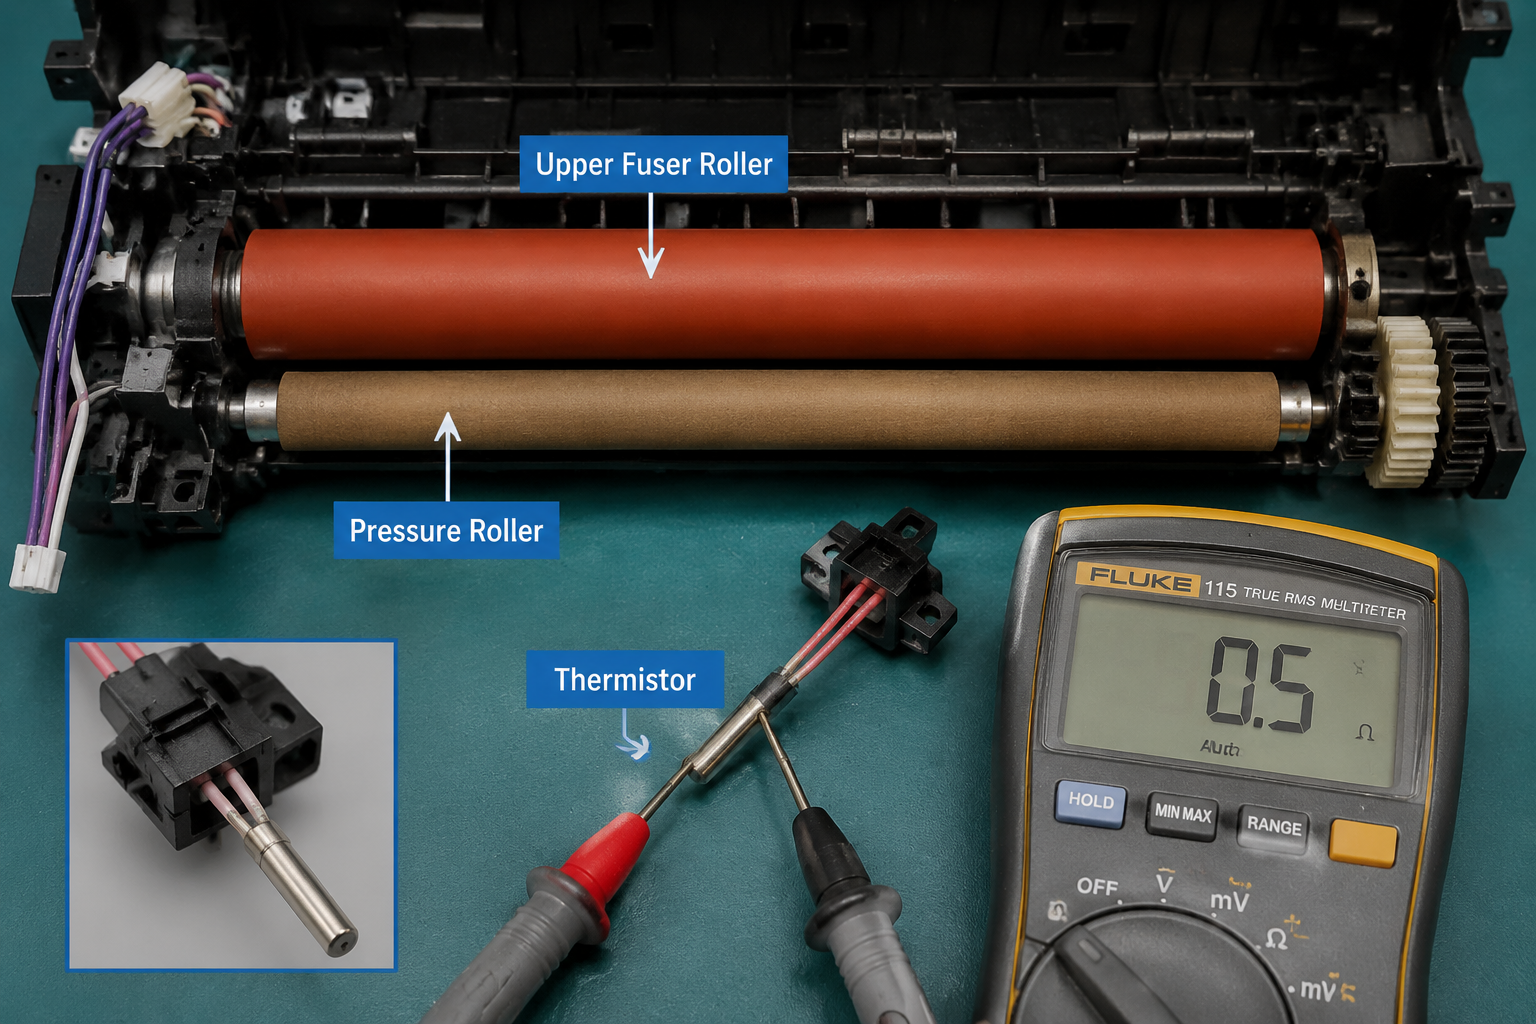
Visual Inspection: Open the rear access door (or remove the fuser cover). Look at the fuser roller— it should be smooth and dark grey. Normal: uniform color, no shiny patches. Abnormal: melted rubber, cracks, shiny glazed spots, or foreign objects stuck to it.
Manual Rotation Test: With power off, manually rotate the fuser drive gear (usually visible on the left side). Normal: smooth, even resistance. Abnormal: binding, grating feeling, or one roller doesn’t turn when the other does. This indicates a seized bearing or broken gear.
Thermistor Continuity Check: Set your multimeter to resistance (ohms). Locate the thermistor—a small bead or flat sensor on a spring arm touching the fuser roller. Measure resistance across its two wires. Normal: 100k–500k ohms at room temperature (varies by model). Abnormal: infinite (open) or zero (short). This confirms a dead thermistor.
Fuser Lamp Test: If your fuser uses a halogen lamp (common in older models), disconnect it and measure continuity. A good lamp shows <10 ohms. An open lamp means the heating element is burned out. Warning: Capacitors may hold charge; discharge before touching contacts.
Why This Happens — Root Cause
The fuser assembly uses a heating element (halogen lamp or ceramic heater) to melt toner onto paper. Over time, several mechanical and thermal stress factors cause failure:
- Worn fuser roller: The rubber coating wears down after 50,000–100,000 pages. Once the surface becomes non-uniform, toner sticks to the roller instead of the paper, causing repeats and smudges.
- Broken thermistor: The thermistor is a delicate glass-encased component that signals temperature to the controller. A single paper jam can snap the spring arm or crack the bead. Without accurate temperature, the printer shuts down.
- Gear strip: The Upper Fuser Roller Gear with Bushing (#1) is a common failure point. The plastic gear teeth shear off under load, especially if paper jams force the motor to grind. You’ll hear a clicking or grinding sound on startup.
- Thermal fuse blown: A built-in safety fuse opens if the fuser overheats. This is a one-time fuse—once blown, it must be replaced.
- Fuser film (for Samsung/Brother models): These use a Teflon-coated film sleeve that can tear or develop wrinkles. A creased film causes permanent vertical lines on prints.
Accelerating factors: High humidity (causes moisture on paper, stressing the fuser), frequent thick-stock printing, power surges, and low-quality toner that leaves residue on the roller.
Can You Fix It Yourself?
- Difficulty Level: 3 out of 5 (moderate). Disassembly requires patience with plastic clips and ribbon cables.
- Time Required: 40–90 minutes, depending on printer model.
- Skill Level: Basic – you need a Phillips #0 and #1 screwdriver, a spudger, and a multimeter. No soldering required for most repairs (except replacing the thermistor sometimes).
- Risks:
- Snapping plastic locking tabs when removing the fuser shroud.
- Damaging the thin fuser film if you use metal tools.
- Reassembling with a misaligned gear, causing another failure.
- Electrocution risk from high-voltage components (discharge capacitors by pressing the fuser lamp connector against the metal chassis for 10 seconds).
- Tools Needed:
- Phillips #0 and #1 screwdrivers
- Flathead screwdriver for prying
- Multimeter with continuity setting
- Isopropyl alcohol and lint-free cloth for cleaning roller
Cost Breakdown — DIY vs Professional
- DIY Parts Cost:
- Upper Fuser Roller Gear with Bushing — $1.07 (Part #1) – replaces broken gear.
- JC66-03080A / JC61-03755A Upper Fuser Roller — $1.19 (Part #2) – replaces worn roller surface.
- Additional parts if needed: thermistor ($2–$5), fuser lamp ($5–$10).
- Total DIY: $5–$20, plus shipping.
- Professional Repair Shop:
- Bench fee: $50–$100 just to diagnose.
- Full fuser assembly replacement: $150–$300 (parts + labor).
- If the shop rebuilds the fuser (replaces only failed component), expect $80–$150.
- When to Skip DIY:
- If the printer is a complex HP MFP with multiple integrated circuit boards and you can’t find service manual.
- If the fuser frame itself is cracked (metal or plastic) – replacement requires the entire assembly.
- If you are uncomfortable handling high-voltage components or fine ribbon cables.
- Cost Comparison Example: For an HP LaserJet M402, a new OEM fuser costs $120–$180. Replacing just the roller and gear for $3 parts yields 98% savings. Most DIY repairs succeed on the first try if you follow the service manual.
Repair Process Overview
Remove the Fuser Assembly: Power off, unplug the printer. Remove the toner cartridge and any rear covers. Locate the fuser – it’s the metal/plastic unit with two rollers. Release the blue locking levers (varies by brand) and slide the assembly out.
Disassemble the Fuser (on a clean anti-static mat): Remove the side covers (often 4–6 Phillips screws). Note the spring positions – take a photo. Separate the upper roller from the pressure roller.
Replace the Gear (if needed): If the Upper Fuser Roller Gear with Bushing (Part #1) has missing teeth, use a spudger to pry the old gear off the roller shaft. Press the new gear firmly until it clicks. Ensure the bushing is fully seated.
Replace the Upper Roller (if needed): If the roller surface is shiny or cracked, remove the old JC66-03080A roller (Part #2). Slide off the old roller, noting the orientation of the gear flange. Install the new roller – it should slide on smoothly without tools.
Check the Thermistor: If the thermistor arm is bent or cracked, replace it. Desolder the old one (or unplug if connector type). Use a replacement with exact same resistance curve. Reinstall the spring arm so it touches the roller lightly.
Reassemble and Install: Reattach side covers, ensuring all springs hook correctly. Slide the fuser back into the printer. Connect any hard-wired cables (if present). Secure the locking levers.
Common Mistakes:
- Forgetting to reattach the ground wire – causes static buildup.
- Overtightening screws – can warp the fuser frame.
- Using the wrong gear orientation – the gear only goes on one way; check alignment marks.
- Not cleaning the pressure roller rubber – toner buildup can cause jams even after repair.
After the Repair — Testing & Verification
- First Print Test: Print a plain text page. Normal: clean, dry output with no smudges. Abnormal: grey streaks or repeating marks mean the new roller is not seating correctly.
- Error Code Check: The printer should not display any fuser errors during warm-up. If ‘50 Fuser Error’ reappears, the thermistor may be misaligned or the connection loose.
- Thermal Cycling: Print 10 consecutive pages with 50% coverage. Monitor the fuser area for burning smell. A faint new-electronic smell is normal for the first 20 prints; any strong odor indicate overheating.
- Listen for Noise: Run a quiet room test. The fuser should hum smoothly. Grinding or clicking means the new gear is slipping or the bushing is not lubricated (apply a drop of silicone grease if needed).
- 200-Page Validation: Print 100 pages duplex and 100 pages simplex. Check for any residual issues. Most roller replacements need a ‘break-in’ period of 50 pages before the coating fully conditions.
- Final Check: If all tests pass, close all covers and reset the printer’s maintenance counter (consult manual). Your fuser is now restored to full spec.
Parts You’ll Need
Here are the parts that match this repair. Click the link to check the current price on AliExpress.
| Product | Price |
|---|---|
| Upper Fuser Roller Gear with Bushing … | $1.07 |
| JC66-03080A JC61-03755A Upper Fuser R… | $1.19 |
Prices and availability are subject to change on AliExpress.