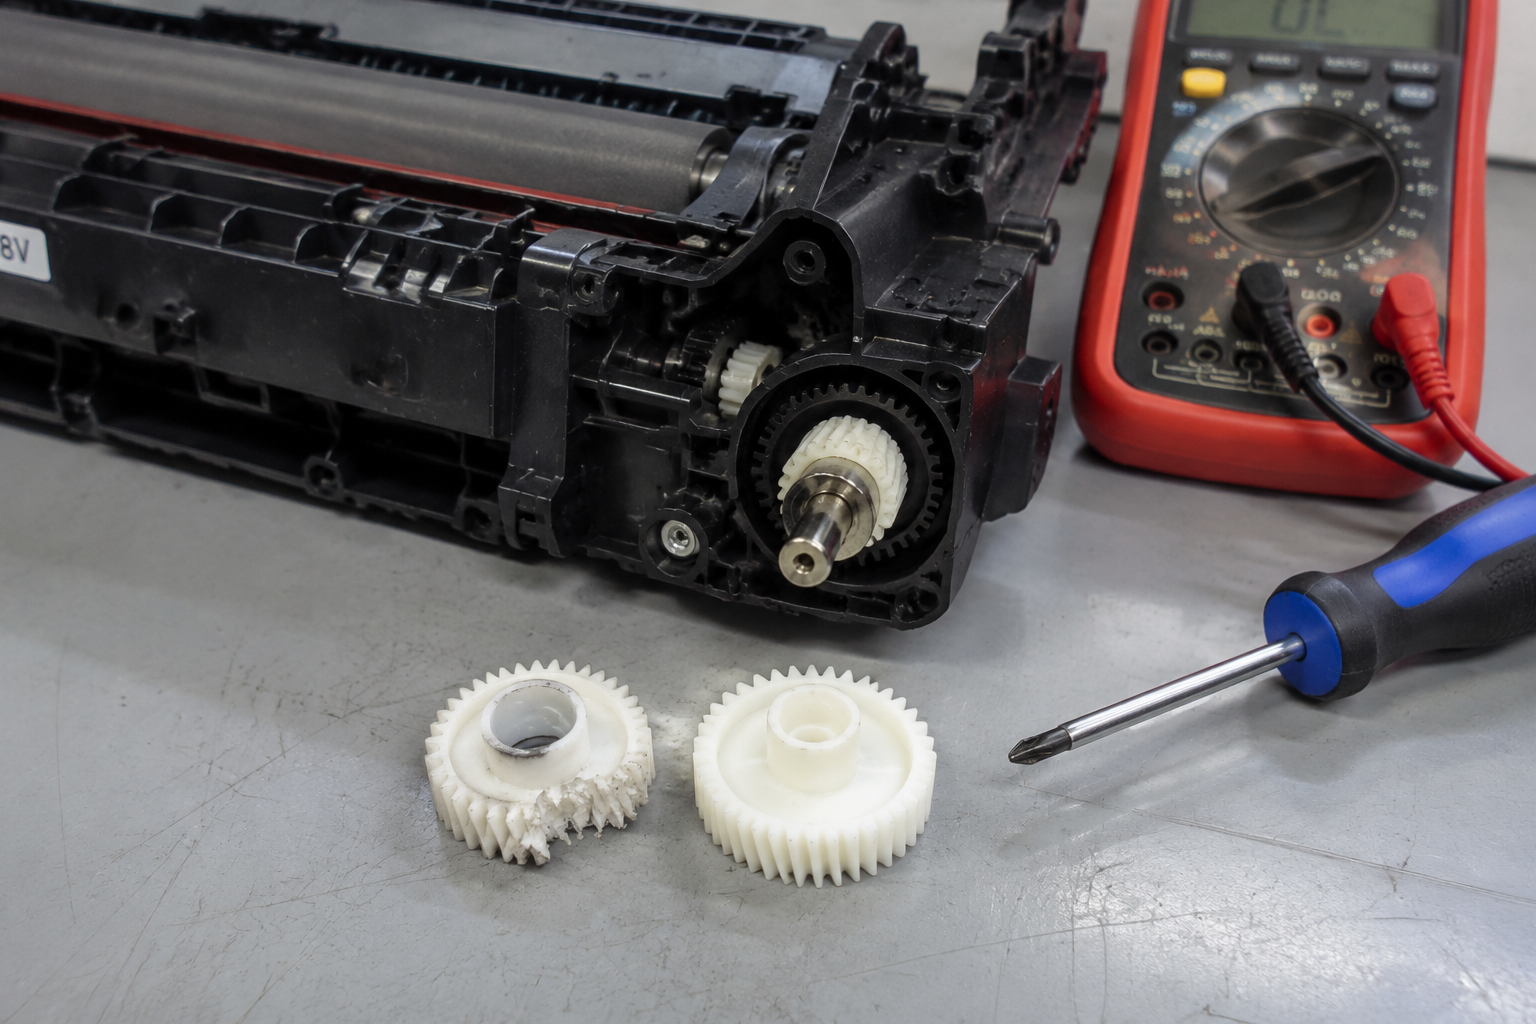
Your printer just stopped mid-print, maybe smoked or gave error codes like 0x610000F5 or Jam 13. This guide walks you through the exact symptoms of a failed fuser assembly, step-by-step diagnosis with common tools, root causes (worn rollers, blown thermistor, stripped gears), and whether you can fix it yourself or need a pro. Includes specific part costs and a repair overview.
What’s Happening — Symptoms in Detail
Your printer suddenly stops printing, makes a grinding or screeching noise, or emits a burning smell. Common symptoms include:
- Error codes on screen: Many HP models show 0x610000F5 (fuser error), Canon shows E000 or E014, Brother shows Fuser Error or Jam 13 after a few pages.
- Jam after jam: Paper stops halfway through the fuser with crinkled, melted, or torn edges. Some printers will try to pull in paper but fail, then display a jam code.
- Smoke or burning odor: A faint to strong electrical burn smell, sometimes accompanied by visible smoke from the rear of the printer. This is a critical sign — unplug immediately.
- Scorched or wavy output: Pages come out with dark streaks, wavy lines, or partial fusing (toner rubs off easily). Some users report the paper feels hot and has a wrinkled texture.
- Sound changes: A high-pitched squeal during the fusing phase, or a repetitive click-click sound as the fuser roller tries to turn but slips.
- Intermittent failure: The problem may start as occasional jams on heavy paper, then worsen to failure on every print. Other times it’s sudden — a loud pop, then nothing works.
The fuser assembly is the part that melts toner onto paper. When it fails, the printer cannot complete the printing process. Messages may say “Fuser Error” or “Replace Fuser” on the LCD.
Some printers will try to initialize the fuser and fail, flashing error lights in a pattern (e.g., three slow blinks on a Brother). Others will power on, warm up for 10–20 seconds, then error out immediately.
The exact moment of failure varies: during the warm-up cycle, halfway through a long print job, or while feeding the first page after a paper jam cleared.
How to Diagnose the Problem Step by Step
Follow these steps in order. You need a small flathead screwdriver, a multimeter, and a pair of needle-nose pliers. Do NOT proceed if you see smoke; unplug first.
Power cycle and observe: Unplug the printer for 5 minutes. Plug back in, turn it on, and listen. Normal: a quiet hum for 20–30 seconds as the fuser heats up, then silence. Abnormal: a continuous buzzing, grinding, or the fan runs but the fuser never clicks into ready state.
Check error code: Most printers display a code on the screen or via blinking lights. Look up the code for your model (e.g., HP 0x610000F5, Canon E000, Brother 31). This tells you if it’s a temperature sensor (E000) or a mechanical failure (Jam 13 with multiple pages). Write it down.
Manual rotation test: With the printer unplugged, open the rear door (fuser access). You should see the fuser rollers. Try to turn the large upper fuser roller by hand using a screwdriver tip in the gear. Normal: smooth rotation with slight resistance. Abnormal: won’t turn at all, feels gritty, or the gear slips (indicating stripped teeth). Each revolution should feel consistent.
Resistance check of thermistor: Using a multimeter set to ohms (Ω), locate the thermistor (a small glass bead or flat ceramic disc pressed against the roller, with two wires). Measure resistance at room temperature. Normal: around 100kΩ to 200kΩ (check service manual for exact value). Abnormal: infinite (open circuit) or near zero (short circuit). If the thermistor is broken, the printer will not heat safely.
Visual inspection of roller surface: Look at the upper fuser roller (the shiny, smooth one) and lower pressure roller (the rubbery one). Normal: surface is smooth, uniform color, no gouges. Abnormal: you see cracks, blisters, melted toner stuck to it, or flat spots. If the pressure roller has a shiny glaze, it’s hardened and will cause wrinkling.
Check fuser lamps: Some fusers use a halogen lamp inside the roller. Shine a flashlight into the roller opening. Normal: you see a straight, unbroken wire. Abnormal: the wire is broken (a gap) or the glass is blackened. A broken lamp means no heat.
Gear and bushing inspection: Look at the gear on the end of the upper roller. Spin the gear — it should engage the rest of the drive train. Normal: teeth are sharp, no missing sections. Abnormal: teeth are worn flat, chipped, or the gear spins independently of the roller (the bushing is stripped). Part #1 (Upper Fuser Roller Gear with Bushing) is a common failure point on HP LaserJet 1020/1022 series. If the gear spins freely without turning the roller, the bushing has sheared.
If any step shows abnormal, you have identified the failed part. If all steps pass, the issue may be in the power supply or mainboard, not the fuser itself.
Why This Happens — Root Cause
The fuser assembly fails due to mechanical wear, heat degradation, or electrical failure. Here’s why:
Stripped gear/bushing: Over years of use, the plastic gear on the upper roller (often a nylon/polycarbonate composite) wears against the metal shaft. The driving force gradually rounds out the bushing hole. This is accelerated when paper jams are cleared forcefully — users pull the jammed paper, applying torque that snaps the gear-off alignment. Part #1 is specifically this failure in many HP models (LaserJet 1000/1018/1020). The gear keeps spinning but the roller doesn’t rotate, leading to no paper feed and a jam error.
Thermistor or thermostat failure: The thermistor is a negative-temperature-coefficient resistor that tells the mainboard the exact temperature. Over time, it can crack from heat cycles or get contaminated with toner dust. A failed thermistor gives open circuit — the mainboard thinks the fuser is cold forever, causing a E000 error on Canon printers. Alternatively, a short circuit tells the board the fuser is hot instantly, shutting down immediately.
Halogen lamp burnout: The lamp inside the fuser roller is a quartz tube with a tungsten filament. It fails after thousands of hours of operation, especially if the printer is used in an environment with voltage fluctuations. A blown lamp shows no light during warm-up (check by briefly running a print cycle in a dark room). The lamp itself is often replaceable, but many assemblies are sealed.
Roller surface degradation: The silicone/PTFE coating on the upper roller wears off, exposing the metal core. Toner then sticks to the hot metal, fusing to the paper again, causing ghosting. The lower pressure roller (rubber) dries out and hardens, leading to poor nip pressure and wrinkling. This is accelerated by high humidity and paper dust.
Crush damage from jam clearing: When you pull a jam from the rear, you may bend the fuser frame, misalign the rollers, or break the plastic mounting brackets. This causes uneven pressure and jams even with a new fuser.
Specific model issues: HP LaserJet P1005/P1505 fusers have a known weakness in the thermistor mount that breaks off. Brother HL-L2300 series fusers often fail because the fuser oil wick dries out, causing the paper to stick. Canon imageCLASS MF240/260 series have a fragile fuser film (not roller) that tears easily.
Heat cycling and age: Every time you print, the fuser heats up to 180°C (356°F) and cools. This thermal expansion and contraction loosens screws, cracks plastic, and fatigues electrical connections. Printers in dusty environments (garages, workshops) fail faster because toner dust acts as an abrasive on moving parts.
Can You Fix It Yourself?
Difficulty: 3 out of 5 (requires disassembly of the printer, careful handling of hot electrical components, and alignment).
Time required: 45–90 minutes for the first time; 30 minutes if you’ve done it before.
Skill level needed: You need basic hand tool experience — screwdrivers (Phillips #0 and #1, flathead), pliers, and a multimeter. No soldering required unless you replace a thermistor (then basic soldering helps). You must be comfortable removing paper path covers, connectors, and tension springs.
Risks:
- Electrical shock: The fuser runs at mains voltage (120V/230V). Always unplug and wait 5 minutes for capacitors to discharge before touching the fuser.
- Breaking plastic clips: Printer housings use brittle ABS. Forcing a clip can crack the frame, requiring a new printer.
- Misalignment: If you reassemble without aligning the fuser drive gears, the printer may jam immediately.
- Incorrect part: Ordering the wrong fuser unit (e.g., 110V vs 220V) can cause a fire. Check your model’s voltage.
Tools required:
- Phillips #0 and #1 screwdrivers
- Flathead small screwdriver for prying clips
- Needle-nose pliers (for springs and connectors)
- Multimeter (for thermistor check)
- Tweezers (for small connectors)
- Flashlight
- Work mat with magnetic tray (to avoid losing screws)
When to attempt: Only if you have the confidence to follow a service manual and the correct replacement part. If the fuser is sealed (one-piece assembly with no replaceable roller), you may need to replace the entire fuser unit.
Cost Breakdown — DIY vs Professional
Here is a realistic cost breakdown for DIY vs professional repair.
DIY Costs:
- Part #1: Upper Fuser Roller Gear with Bushing — $1.07. This small nylon gear fixes stripped drive issues on HP LaserJet 1020/1022 series. You still need to open the fuser to replace it.
- Part #2: JC66-03080A JC61-03755A Upper Fuser Roller — $1.19. This is a replacement upper roller (with gear) for Samsung/HP multifunction printers. If the roller surface is damaged, this is your fix.
- Complete fuser assembly (generic): $25–$45 on Amazon/eBay for popular models.
- Thermistor (generic): $2–$5.
- Halogen lamp: $5–$10.
- Shipping: ~$8. Total DIY range: $3 to $60 depending on part.
Professional Repair Shop Costs:
- Diagnostic fee: $30–$50 (often waived if you proceed with repair).
- Labor: $60–$120 per hour. Most repairs take 1–2 hours.
- Parts markup: The shop will sell you the same $30 fuser assembly for $60–$80.
- Total estimate: $120–$250.
When to skip DIY:
- If your printer is a high-end color laser (e.g., HP Color LaserJet Pro M454dw) with a complex fuser film belt, the risk of damaging the unit is high.
- If you lack tools or a well-lit workspace.
- If the printer has multiple errors (fuser + mainboard + paper pickup), replacement might be more economical.
- If your specific printer requires laser calibration or fuser reset via firmware (some Canon models), DIY may not solve the error code even with new parts.
Comparison: For a $100 office printer, a $120 repair is borderline. For a $400 workgroup printer, DIY at $30 is worth it.
Repair Process Overview
The exact steps depend on your printer model, but here is a generic overview applicable to most laser printers (e.g., HP LaserJet, Brother, Canon). Refer to a service manual for your model.
Unplug the printer and wait 10 minutes for the fuser to cool. Remove the toner cartridge and paper tray.
Remove the rear cover / fuser access door. Usually held by 2–4 Phillips screws or push clips. Set them aside in a magnetic tray.
Disconnect the fuser from the power supply. Locate the 2–3 wire connectors: high-voltage for the lamp, and low-voltage for the thermistor. Gently pull by the connector body, not the wires. Note their orientation (take a photo).
Remove the fuser assembly. It slides out after unscrewing mounting brackets (2–4 screws). Some printers require removing the paper guide above the fuser.
Disassemble the fuser (if replacing a roller or gear). Open the fuser shell by removing screws on the end plates. The upper and lower rollers are held by springs and clips. Remove carefully — the roller is heavy and can slip.
Replace the defective part:
- For a stripped gear (Part #1): Slide the old gear off the roller shaft (may need pliers to pull). Press the new gear on until it seats. Do NOT force — alignment notch must match the shaft flat.
- For a damaged roller (Part #2): Slide off the old roller, transfer the end bushings and gears to the new roller, then install.
- For a blown lamp: Unscrew the lamp holder, slide out the broken lamp, insert new lamp (do not touch glass with fingers — use lint-free cloth).
- For a bad thermistor: Desolder the old one from the small PCB, solder the new one in place (observe polarity if needed). Use heat-shrink tubing.
Reassemble the fuser in reverse order. Ensure all springs route correctly — they provide nip pressure. Tighten screws to moderate torque (snug, not over).
Reinstall the fuser into the printer. Connect all wiring. Make sure the fuser drive gear meshes with the printer’s gear train (rotate manually to confirm).
Secure the rear cover and reinstall the toner cartridge.
Common mistakes:
- Forgetting to reattach a ground wire — this can cause electrical arching.
- Cross-threading screw holes in plastic.
- Damaging the fuser film (if your model uses film instead of roller).
- Not resetting the fuser page-count in the printer menu (for some Brother models, you must enter diagnostics mode and zero the fuser counter).
After the Repair — Testing & Verification
After reassembly, perform these checks to confirm the fix works.
Power on test: Plug in and turn on. Listen for the fuser warm-up sound. Normal: a low hum for 15–30 seconds, then the ready light turns solid. Abnormal: error code appears immediately or the fuser makes a rattling noise.
Self-test page: Print a configuration page (hold Go button for 5 seconds on HP, or menu -> Print Reports). The page should come out flat, with crisp text. Run a finger over the printed area — toner should not smudge.
First 10-page test: Print a document with solid black areas (e.g., a letter). Check for:
- Jams: Any paper feeding through the fuser area.
- Wrinkles: Especially on the back of the paper.
- Ghosting: Faint duplicate images offset by 1–2 inches — indicates the fuser isn’t hot enough.
- Smell: A brief factory odor is normal for a new roller; a burning plastic smell means something is rubbing.
Check error codes after 50 pages: Some printers will log a soft error (like a roller revolution count) that may require a reset. If a Fuser Life End message appears, you may need to clear the counter via software utility.
Monitor the first hour: Run a few print jobs spaced 5 minutes apart. If the printer was heating fine but then shuts down with a Temperature Error, the thermistor may have poor contact — check it is pressed firmly against the roller.
Listen for noise changes: The fuser gears should be quiet. Any clicking or grinding after 10 prints suggests the gear mesh is off or a bushing is failing again.
If the repair fails: revisit the diagnosis steps. A common oversight is the fuser pressure springs — if not seated correctly, the roller nip is too light, causing jams. Or a connector was left loose (especially the lamp connector).
Parts You’ll Need
Here are the parts that match this repair. Click the link to check the current price on AliExpress.
| Product | Price |
|---|---|
| Upper Fuser Roller Gear with Bushing … | $1.07 |
| JC66-03080A JC61-03755A Upper Fuser R… | $1.19 |
Prices and availability are subject to change on AliExpress.