Your printer just stopped working with a cryptic error code (50.x, 55.x, or “Fuser Error”), or it’s producing wrinkled pages with ghost images. This guide walks you through the exact symptoms, step-by-step diagnosis using basic tools, root causes with part numbers, cost comparison between DIY and professional repair, and a full repair process for the fuser assembly. No fluff—just actionable steps to get your printer back online.
What’s Happening — Symptoms in Detail
Specific Symptoms You’re Seeing (Identify Yours)
Error Codes on the Screen: Many printers display a numeric error when the fuser fails. Common codes include:
- HP LaserJet: 50.x (50.1, 50.2, 50.3) – Fuser error; 55.x (55.1, 55.2) – DC controller/fuser communication.
- Brother: Error 50, 51, or 52 – Fuser failure or overheat.
- Canon: E0xx (e.g., E052) – Fuser malfunction.
- Generic: “Replace Fuser” or “Fuser Error” message.
Print Quality Issues (without a clear error):
- Ghosting: A faint reprint of the previous page appears down the page, especially near the top.
- Vertical streaks or black lines that repeat every few inches (equal to fuser roller circumference).
- Wrinkled pages – paper comes out curled, rippled, or with creases.
- Smudging – toner rubs off easily when you touch the print.
Mechanical Noises:
- Grinding or scraping sounds during the fusing process (usually after the paper has passed the transfer belt).
- Clicking – a broken gear inside the fuser assembly.
Timing & Progression:
- Symptoms often appear gradually – first a few wrinkles, then more frequent ghosting, then error codes.
- Sudden failure is also common after a paper jam where the user forcefully pulled jammed paper, snapping internal fuser gears or dislodging thermistors.
- The problem worsens with heat cycles – the first print of the day might work, but after 5-10 pages the error triggers.
Paper Jams: The fuser can cause jams at the rear output or duplex area because the pressure roller is damaged or the fuser film isn’t rotating.
How to Diagnose the Problem Step by Step
Step-by-Step Diagnosis – From Quick Check to Detailed Inspection
Tools Needed:
- Flashlight
- Flathead screwdriver (small, 1/8″)
- Multimeter (for thermistor continuity test)
- Clean white paper (for half-test)
Check the Exact Error Code
- Write down the error displayed on the screen (e.g., 50.2, 55.1).
- Normal: No error or a simple low-toner message.
- Abnormal: Persistent fuser errors that prevent printing.
Visual Inspection – Rear Access Door
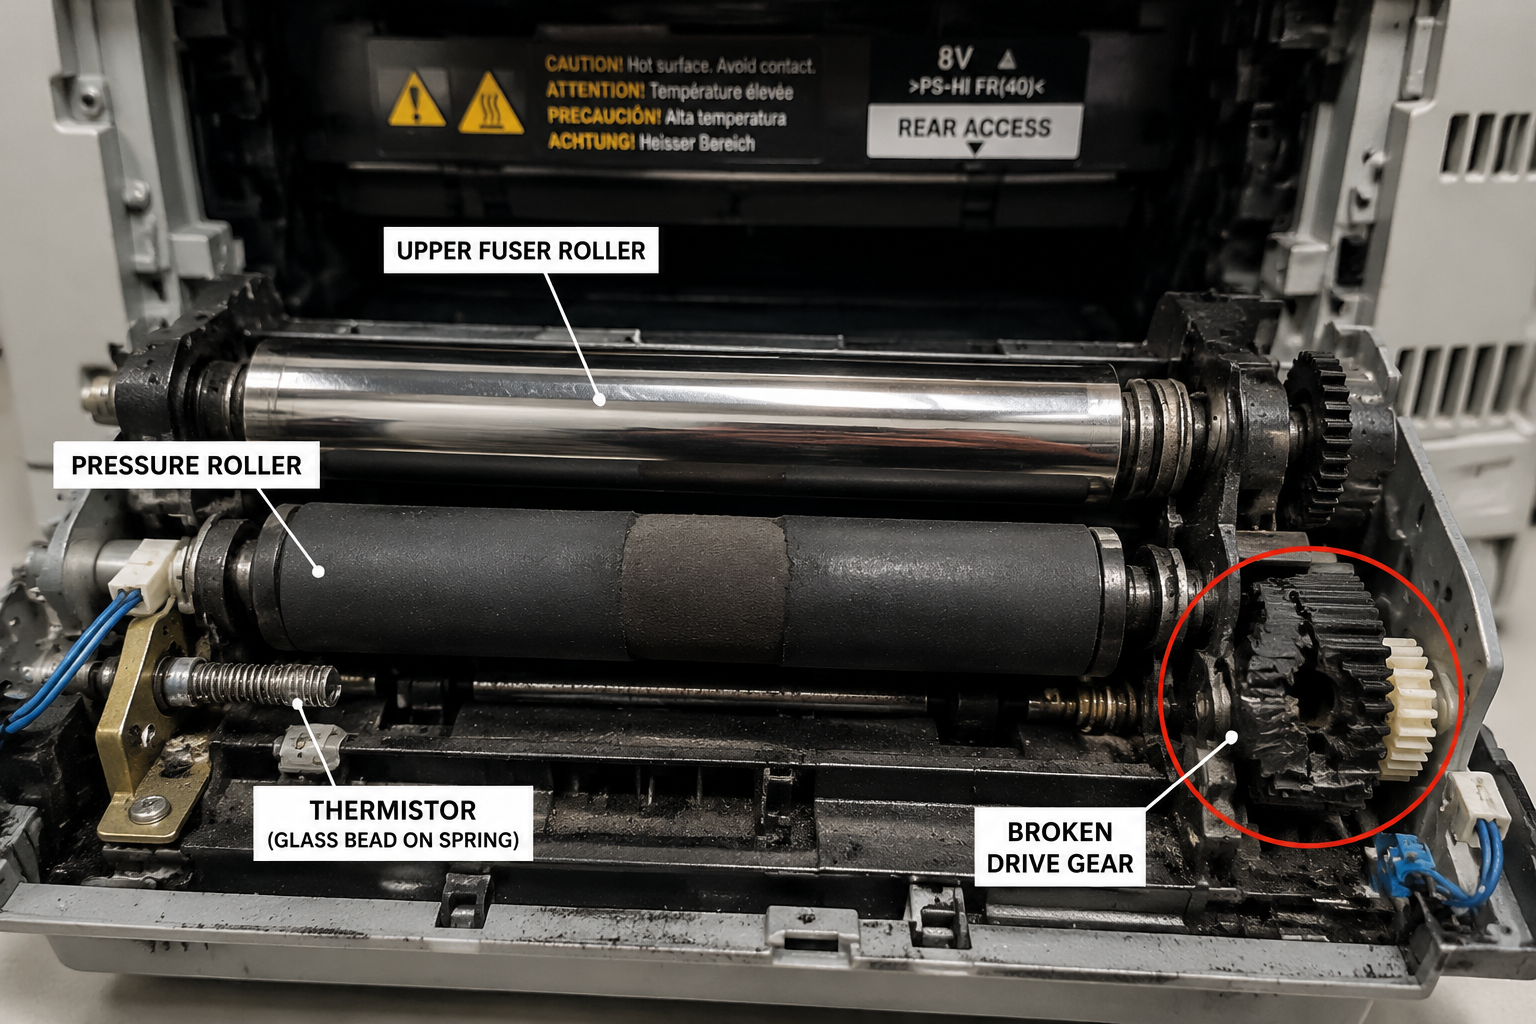
- Open the rear door (or fuser access panel). You’ll see two rollers – the upper fuser roller (shiny, often black or green) and the lower pressure roller (softer, rubbery).
- Normal: Rollers are smooth, no cracks, no melted toner stuck to them.
- Abnormal: You see a flat spot on the pressure roller, cracks on the fuser roller, or globbed toner that looks like plastic.
Half-Test Print
- Load a sheet of paper, then open the toner door just as the paper starts feeding (within 1-2 seconds). This halts the print before the fuser.
- Normal: The image appears fully on the paper but is powdery and smudges easily (toner not fused).
- Abnormal: The image is already fused (halfway) – indicates the fuser is overheating or stuck on. Or no image at all – suggests the transfer belt or drum failed, not the fuser.
Thermistor Continuity Test
- Locate the thermistor – a small glass bead or ceramic disk on a spring-loaded arm touching the fuser roller.
- Normal: With a multimeter on the Ω setting, the thermistor reads around 100-500k ohms at room temperature.
- Abnormal: Infinite resistance (open circuit) – the thermistor is blown. Zero ohms – short circuit, but rare.
Gear Check
- Manually rotate the fuser’s drive gear (usually accessible from the side after removing a cover).
- Normal: Smooth rotation with slight resistance.
- Abnormal: Grinding or no rotation – likely a broken gear (e.g., Upper Fuser Roller Gear with Bushing – part #1).
Why This Happens — Root Cause
Why the Fuser Assembly Fails (Engineering & Mechanics)
The fuser assembly uses heat (from a halogen lamp or ceramic element) and pressure (between a hard roller and a soft rubber backup roller) to melt and fuse toner into the paper fibers. Over time, multiple failure modes occur:
Thermistor Burnout: The thermistor is a temperature-sensing resistor that tells the printer when to turn the heating lamp on/off. Normal life: 100,000–200,000 pages. Failure accelerates if:
- The printer is used in dusty environments (paper dust insulates the thermistor).
- The user frequently prints envelopes or thick media that jam, causing the thermistor to overheat.
- A power surge or bad DC controller sends continuous power to the lamp.
Pressure Roller Flat Spots: The lower roller is made of soft silicone rubber. If the printer sits idle for weeks with the fuser engaged (most printers keep slight pressure), the roller develops a flat spot. This causes wrinkles and uneven fusing. Common on HP LaserJet P1000 series and Brother HL-L2300.
Broken Fuser Film (Samsung, Xerox): Some models use a thin fuser film instead of a rigid roller. The film can tear or wrinkle after a paper jam where the user pulls the jammed sheet backward. The tear leads to toner leaking and ghosting.
Gear Stripping: The fuser drive mechanism uses small plastic gears. Forceful removal of jammed paper or dropping the printer can snap the Upper Fuser Roller Gear (part #1). This causes a grinding noise and the fuser stops rotating.
Connection Failure: The thermistor wires are thin and can break inside the insulation due to repeated heat cycles. This results in intermittent error codes (50.1 that comes and goes).
Can You Fix It Yourself?
Honest Assessment: Can You Fix It?
- Difficulty: 2 out of 5 (requires careful handling, but no soldering or programming).
- Time Required: 45 minutes to 1.5 hours if it’s your first time.
- Skill Level: Beginner to intermediate. You need patience with small plastic clips and ribbon cables.
- Risks:
- Electric shock – Always disconnect the printer’s power cable and wait 5 minutes for capacitors to discharge before touching fuser components.
- Damaging plastic tabs – The fuser housing is held by fragile clips; use a spudger or flathead screwdriver gently.
- Misaligning the thermistor – If the thermistor doesn’t touch the roller, the printer will report an overheat error.
- Tools Required:
- Phillips #2 screwdriver
- Small flathead screwdriver (for prying clips)
- Multimeter (for continuity testing, optional but recommended)
- Tweezers (for handling small connectors)
- Thermal paste (only if replacing the thermistor – not needed for gear replacement)
When the difficulty rises: If your printer’s fuser is integrated into a complex frame (e.g., HP MFP M227 or Canon MF744Cdw), the disassembly might require removing the entire engine – that’s a 4/5 difficulty. But most consumer lasers (HP LaserJet Pro, Brother HL) are straightforward.
Cost Breakdown — DIY vs Professional
DIY vs Professional – Real Cost Comparison
DIY Repair:
- Part Costs:
- Upper Fuser Roller Gear with Bushing – $1.02 (part #1) – Great for fixing grinding noise and ghosting caused by uneven rotation.
- JC66-03080A / JC61-03755A Upper Fuser Roller – $1.13 (part #2) – Replaces the roller itself if it’s cracked or has flat spots.
- Complete fuser assembly (if entire unit is bad) – $35 to $80 on eBay or Amazon (e.g., for HP 1020, Brother HL-L2360).
- Total DIY Cost: $1-$80 depending on what needs replacement.
- Special Note: If you only need a gear, spending $1 is far cheaper than a whole assembly.
Professional Repair:
- Bench Fee: $50-$100 just to diagnose.
- Labor + Parts: $100-$250 total for a typical fuser replacement.
- Authorized Service Center: $150-$300.
When to Skip DIY:
- If the error is intermittent and you’ve already changed the fuser – the problem might be on the DC controller board.
- If the printer requires laser alignment after fuser replacement (rare, but some high-end color lasers do).
- If you are uncomfortable working near high-voltage circuits (fuser lamps run at 120V AC or higher).
Repair Process Overview
Repair Process Overview – Replacing the Faulty Part
Power Off & Disconnect
- Unplug the printer from wall power. Remove the toner cartridge and any paper trays.
- Wait 5 minutes for internal capacitors to discharge.
Remove the Fuser Assembly
- Open the rear access door. Locate the two screws or clips holding the fuser. On HP units, these are often Phillips #2 screws on either side.
- Disconnect the fuser’s ribbon cable (thermistor/wiring) – it’s usually secured by a small latch. Use tweezers if needed.
- Lift the fuser straight out. Set it on a clean surface.
Disassemble the Fuser Housing
- Remove the side covers held by plastic tabs. You’ll see the drive gear (plastic) and thermistor arm.
- If replacing a gear: pry off the old gear with a screwdriver. The new Upper Fuser Roller Gear with Bushing (#1) should snap onto the shaft; ensure the bushing seats flush.
- If replacing the roller: undo the retaining clip on the non-drive side, slide off the old roller, and slide on the new JC66-03080A / JC61-03755A (#2). Reinstall the clip.
Check the Thermistor
- Use a multimeter to measure resistance across the thermistor leads. If it’s open circuit, you may need to replace the entire fuser assembly (thermistor cannot be easily swapped on most units).
Lubricate (Optional but Recommended)
- Apply a small dab of Teflon-based grease on the gear teeth. Do not use standard grease – it will melt and cause odor.
Reassemble
- Put the side covers back, ensuring the thermistor arm sits against the roller. Reconnect the ribbon cable.
- Insert the fuser into the printer, tighten screws, reconnect power.
Common Mistakes to Avoid:
- Forcing the plastic clips – if they don’t click, you’re misaligned. Remove and try again.
- Pinching the thermistor wires – route them neatly; a pinched wire will fail again.
- Over-greasing – excess grease attracts dust and can cause paper feed issues.
After the Repair — Testing & Verification
After Repair Verification – How to Know It Worked
- First Power-Up: The printer should initialize without error codes. You’ll hear a warm-up cycle (fuser heating).
- Print a Test Page: Use the printer’s internal test page (hold the “Go” button for 10 seconds, or print from control panel).
- Check for:
- No error codes – especially 50.x or “Replace Fuser”.
- Even fusing – rub your finger across the text; toner should not smudge.
- No wrinkles – the paper should come out flat.
- No ghosting – compare the test page to a known good print.
- Check for:
- Listen for Noises: The fuser should be silent except for a low hum. Any grinding or clicking indicates a gear issue – recheck the drive gear alignment.
- Monitor the First 50 Prints: Run a batch of 20-30 pages. If the error returns, it could be a thermistor problem (open circuit or misalignment) or a failing DC controller.
- Final Check: After the printer has run and cooled down, open the rear door again. Touch the fuser roller (when cold) – it should rotate freely by hand.
Parts You’ll Need
Here are the parts that match this repair. Click the link to check the current price on AliExpress.
| Product | Price |
|---|---|
| Upper Fuser Roller Gear with Bushing … | $1.02 |
| JC66-03080A JC61-03755A Upper Fuser R… | $1.13 |
Prices and availability are subject to change on AliExpress.