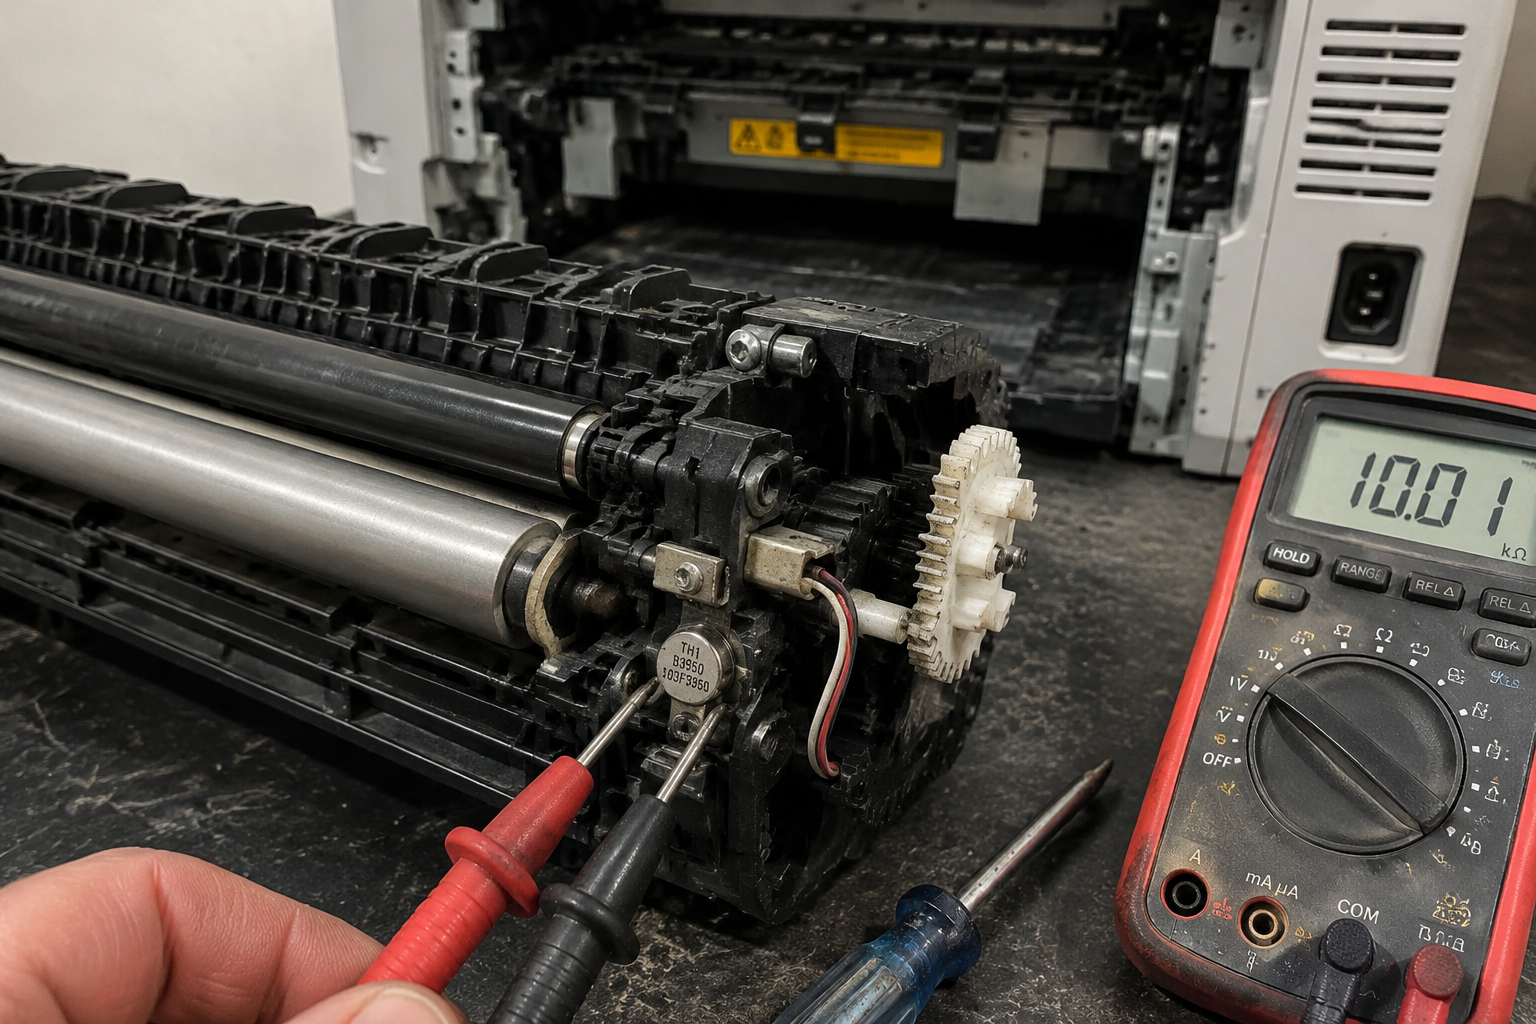
If your printer shows Fuser Error, prints with ghosting (faded images that reappear), wrinkles pages, or jams around the output area, the fuser assembly is likely failing. This guide walks you through diagnosing the exact failure—whether it’s a blown heater lamp, worn gear, or bad thermistor—and compares DIY repair (parts as low as $1.07) to professional service costs.
What’s Happening — Symptoms in Detail
The Problem in Detail
Common Error Codes and Messages:
- “Fuser Error 50.x” (HP, Canon), “Self-Diagnostic Error 1A” (Samsung), “Replace Fuser” (Brother, Lexmark)
- Blinking orange or red LED on the control panel, often with a number
- No error message but prints coming out cold or with smudged toner that rubs off
Visual and Audible Symptoms:
- Ghosting: A faint duplicate of a printed image appears an inch or two lower on the page. This happens when the fuser isn’t hot enough to fully fuse the toner.
- Wrinkled pages: The paper comes out crimped or with a wavy edge—usually a pressure roller issue.
- Grinding noise: A loud, repetitive clunking or grinding during warm-up or printing, often from a stripped gear.
- Paper jam inside the fuser: Jam message appears with paper stuck exiting the fuser, often with chewed edges.
- Burning smell: A distinct electrical or burnt plastic odor, indicating component failure (thermistor short, lamp arcing).
When Does It Happen?
- On startup: The printer attempts to warm up the fuser (typically 180°C–200°C). If the lamp fails or the thermistor gives a bad reading, the printer goes into error immediately.
- During a print job: After a few pages, the fuser may fail if a component overheats or a gear breaks.
- After a paper jam: Forceful removal of jammed paper can break fuser film sleeves or gear teeth.
- Progression: Some symptoms (ghosting, grinding) get gradually worse over weeks. Others (blown lamp, shorted thermistor) cause sudden total failure.
Specific Model Behaviors:
- HP LaserJet M402 / M404: Ghosting + error 50.3 (low fuser temperature). Often the thermistor or heater lamp fails.
- Samsung CLP-365 / SL-M4070: Error 1A-0000 (fuser high temperature). Usually a shorted thermistor or bad control board.
- Brother HL-L2300: Grinding noise + “Fuser Error”. The upper fuser roller gear (our $1.07 part) strips, causing the roller to slip.
What It Feels Like to the User: You’re mid-print, hear a snap, then the printer stops. Error shows. You try turning it off/on—same error after warm-up. The paper sitting halfway out is crumpled. You’re frustrated because the printer was fine yesterday. This is a classic fuser failure.
How to Diagnose the Problem Step by Step
Step-by-Step Diagnosis
Tool Checklist:
- #1 Phillips screwdriver (magnetic tip)
- Multimeter with ohms (Ω) setting
- Small flathead screwdriver for prying clips
- Flashlight
- Safety gloves (heat; fuser parts can be hot even after off)
Quick Check (Beginner – 5 minutes)
Power down and unplug the printer. Wait 30 minutes for residual heat to dissipate. Touch the metal frame to ground yourself.
Open the rear or top access door to reach the fuser area. Look for the fuser assembly (two rollers, one shiny metal, one rubber, with a lamp visible inside).
Compare what you see to normal:
- Normal: Both rollers rotate smoothly when turned by hand. No visible cracks, melted plastic, or ash.
- Abnormal: A roller is loose, has flat spots, or there are black chunks of debris. The fuser film sleeve may have a tear (shiny silver sleeve with a cut).
Gently turn the large white gear on the side of the fuser. Normal: slight resistance, smooth rotation. Abnormal: gear spins freely without moving the roller, or you hear a click-click of missing teeth.
Detailed Check (Advanced – 20 minutes)
Remove the fuser assembly (usually 2-4 screws and one harness connector). Place on a workbench.
Test the heater lamp: Set multimeter to 200 ohms. Touch probes to the two lamp pins. Normal: 5–20 Ω (depends on wattage). Abnormal: OL (open circuit) = blown lamp. 0.0 Ω = shorted lamp (rare, usually trips the breaker).
Test the thermistor (small glass or metal bead on a spring arm). Use 200k ohms range. Normal: at room temp, 50,000–150,000 Ω (50–150 kΩ). Abnormal: OL (open) or near 0 Ω (shorted). Note: If you heat it with a hair dryer, resistance should decrease. If it doesn’t change, thermistor is dead.
Inspect the gears: Look at the upper fuser roller gear (the one meshing with the motor). Turn the motor by hand (on the back of the fuser). Abnormal: missing teeth, cracks, or the bushing (plastic ring around the gear shaft) is broken. This is the $1.07 part.
Check pressure roller bushings: These are the two plastic or metal sleeves at each end of the rubber roller. Normal: smooth, round, no play. Abnormal: oval-shaped, cracked, or the roller wobbles. Worn bushings cause wrinkling.
Test for paper paths: Use a single sheet of paper and feed it manually through the fuser gap (turn the gear to advance it). Normal: paper exits straight, no jamming. Abnormal: paper catches on a torn film sleeve or jambs between rolls.
Why This Happens — Root Cause
Root Cause — Why This Happens
Engineering Mechanics: The fuser assembly’s job is to melt toner into the paper’s fibers. It does this with two rollers: a heat roller (with a halogen lamp inside) and a pressure roller (rubber-backed metal). The heat roller is covered with a fuser film sleeve (PTFE or silicone) that must slide frictionlessly. A thermistor senses temperature and tells the control board to cycle the lamp on/off. Gears driven by the main motor rotate both rollers.
Primary Failure Modes:
Blown Heater Lamp: The lamp filament snaps after thousands of thermal cycles (expansion/contraction). Common in high-page-count printers (over 100k pages). Sudden failure—no gradual warning.
Bad Thermistor: Failed open (infinite resistance) causes the printer to overheat and shut down. Failed shorted (zero resistance) causes the printer to think it’s already hot and never heat up. Often happens after a paper jam that physically broke the thermistor spring.
Worn Gears / Bushes: The upper fuser roller gear (part #1, $1.07) strips because of repeated stress from pulling paper through the fuser nip. The plastic bushing cracks over time due to heat hardening. This causes a grinding noise and failure to rotate.
Torn Fuser Film Sleeve: A sharp edge (from a paper clip, staple, or misrouted paper) cuts the thin PTFE sleeve. This causes oil to leak, toner to stick, and ghosting/ jams.
Worn Pressure Roller Bushings: The bushings become oval-shaped from constant pressure. This causes the roller to tilt, leading to wrinkled paper and uneven fusing.
Conditions That Accelerate Failure:
- High heat (printing continuously without cool-down) — accelerates wear on bushings and film.
- Dust and debris — paper dust clogs gear teeth and prevents smooth rotation.
- Jam force — yanking a stuck sheet can break gear teeth, bend pressure roller arms, or tear the film.
- Age — After 2–4 years, elastomers and plastics degrade from heat exposure.
- Low-quality toner — incompatible toner may not melt fully, causing the fuser to work harder.
Known Model-Specific Issues:
- HP M452/M477: The fuser film sleeve tears near the center after ~60k pages. Known to cause black streaks.
- Samsung CLP-680: Thermistor wires break at the solder joint due to vibration. Repairable with soldering iron.
- Brother HL-L2390DW: Upper roller gear strips (our $1.07 part) — a common, cheap fix.
Can You Fix It Yourself?
Can You Fix It? — Honest Assessment
Difficulty Level: 3 out of 5 (Moderate)
- Requires careful disassembly of the fuser assembly, not just removing the whole unit.
- Handling small plastic clips and wiring connectors.
Time Required: 30–90 minutes (depending on model and symptom).
- Removing fuser: 5 min
- Disassembly and part replacement: 20–60 min
- Reassembly and test print: 10–20 min
Skill Level Needed:
- No soldering required for gear/bushing replacement.
- Basic multimeter skills (to test lamp and thermistor) are helpful but not mandatory if you visually identify damage.
- Comfort with small screws and clips is essential. If you have difficulty with jewelry work, this may be frustrating.
Risks and What Could Go Wrong:
- ⚠️ Electrical Shock: The heater lamp operates at 220–240V mains voltage. Always unplug and wait 10 minutes before touching any fuser component. Even after unplugging, capacitors in the power supply can hold charge.
- ⚠️ Damaging Plastic Clips: The fuser housing is held by fragile locking tabs. Forcing them open can snap the housing, requiring a full fuser replacement.
- ⚠️ Misaligning Gears: If the upper gear is replaced but not indexed properly (teeth position), the fuser won’t rotate and will jam. Note the orientation before removal.
- ⚠️ Over-tightening Screws: The fuser frame is thin metal. Stripping a screw hole makes reassembly impossible.
- ⚠️ Overtaxing the Thermistor: If you accidentally break the thermistor wire, you’ll need a new fuser assembly (or soldering iron).
Tools Required (Specifics):
- #1 Phillips screwdriver (for most printer screws)
- #2 Phillips screwdriver (for fuser frame screws)
- Small flathead screwdriver (for prying clips)
- Multimeter (DT830 or similar, set to ohms)
- Tweezers (to handle gears and springs)
- Work mat (keep screws organized)
- Heat-resistant gloves (optional but recommended)
Cost Breakdown — DIY vs Professional
DIY vs Professional — Real Cost Comparison
DIY Cost (Replace only the failed component)
Upper Fuser Roller Gear with Bushing (Part #1) — $1.07
- This tiny gear fits many HP, Brother, and Samsung fusers (e.g., HP M452, Brother HL-L2320). Replaces stripped gear that causes grinding.
JC66-03080A / JC61-03755A Upper Fuser Roller Assembly (Part #2) — $1.19
- This is a small subassembly containing the roller and one gear. Used in Samsung Xpress series (SL-M2020, etc.). Fixes ghosting from gear slip.
Full Fuser Assembly (generic) — $25–$50 on eBay/Amazon for OEM equivalent. For example, a HP M402 fuser costs about $35.
Thermistor replacement — ~$3 for a generic NTC thermistor (pack of 5).
Pressure Roller Bushings — ~$5 for a set of 2.
Total DIY cost for a gear fix: $1.07–$1.19 (plus $5 shipping). Total DIY cost for a full fuser rebuild: $35–$60.
Professional Repair Cost
- Diagnostic fee: $30–$50 (often waived if you get repair).
- Fuser replacement (labor + part): $100–$200.
- Typical shop charges $80–$120 for labor (1–2 hours).
- They install an OEM fuser assembly ($60–$120 markup).
- Geartrain repair (if they do it): $50–$90 (rare, most shops swap entire fuser).
When to Skip DIY
- If the fuser film sleeve is torn — The film is often fused to the roller; replacement requires a full fuser assembly. DIY attempt to replace just the sleeve is fragile and usually fails.
- If the printer’s main control board has a shorted thermistor circuit — You’ll pop the new thermistor. Diagnose with multimeter before ordering parts.
- If you lack a multimeter — You’re guessing. The $15 meter is worth it.
- If the printer is very old (e.g., HP LaserJet 4) and parts are hard to find — Just buy a used working fuser on eBay for $20.
Bottom Line: For a simple gear or bushing failure, DIY is a no-brainer at under $2 vs $150 shop. If you need a full fuser assembly, DIY still saves 50%–70%.
Repair Process Overview
Repair Process Overview
Major Steps
Power down, unplug, discharge. Remove toner cartridge and any jammed paper. Wait 5–10 minutes for fuser to cool.
Remove the fuser assembly.
- Open the rear door. Usually 2–4 screws (cross-head) secure the fuser. Also unplug one harness (press tab to release).
- Lift the fuser out. Place on a clean cloth.
Disassemble the fuser housing.
- Remove the metal clips or screws holding the two halves together. Note which side holds the thermistor wire.
- Carefully separate the halves. The pressure roller may be attached with springs—note their positions.
Identify the failed component.
- Gear: Inspect the upper roller gear (small white or black plastic gear). If teeth are missing or the bushing is cracked, replace it. (This is the $1.07 part.)
- Bushing: If the gear turns freely but the roller is loose, replace the bushing (often included with gear).
- Lamp: If it’s blown, remove the lamp (pry out the clamp). Install a replacement lamp (same wattage/voltage).
- Thermistor: Desolder or unclip the old thermistor. Solder or clip in a new one (3–5 minutes).
Replace the part.
- For the gear: Slide the old gear off the shaft, slide new gear on (alignment tab should match notch). Press the bushing into the housing.
- For the lamp: Insert new lamp, ensure contacts touch the terminals.
Reassemble the fuser.
- Fit the two halves together, aligning the pressure roller springs.
- Reinstall screws/clips. Ensure no wires are pinched.
Reinstall the fuser into the printer.
- Connect the harness (listen for click). Tighten screws.
- Close rear door, insert toner cartridge.
Test without paper first: Plug in, turn on. The printer will warm up. Listen for any grinding. Normal: a soft hum for 30 seconds, then ready.
Common Mistakes and How to Avoid Them
- Mistake: Forcing the gear onto the shaft without aligning the flat edge. Avoid: Check that the shaft has a D-shape or notch; the gear hole must match.
- Mistake: Over-tightening the fuser housing screws, cracking the plastic. Avoid: Snug tight only—turn until you feel resistance, then stop.
- Mistake: Reversing the two fuser halves. Avoid: Take a photo before disassembly. The thermistor wire is usually on the front side.
- Mistake: Leaving a foreign object (screw, paper bit) inside the fuser. Avoid: Shake the assembly gently before closing.
After the Repair — Testing & Verification
After Repair — Verification
How to Know the Repair Worked
- Power on: Printer boots without error code. The warm-up cycle completes in 30–45 seconds (no longer than usual).
- No unusual smells: A slight warm plastic smell is normal; burning odor means a short or overheated thermistor.
- Test print: Print a single monochrome page (e.g., a Windows test page). Normal: Sharp text, no smudging, no ghost images.
- Print 10 pages: Run a continuous job. Normal: No jams, no grinding, consistent output.
- Temperature test: After 5 pages, carefully feel the output paper for warmth. Should be warm but not hot to the touch. If paper is cold, fuser isn’t heating.
What to Watch for in the First Few Hours
- First 10 prints: Listen for any clicking from the gear area. If you hear a regular click, the gear may not be seated correctly—stop printing and recheck.
- After 30 minutes of idle: Print again. If the printer takes unusually long to warm up, the thermistor may be sluggish.
- Check for debris: After 20 pages, inspect the fuser access area for tiny plastic fragments (sign of gear stress).
- Error codes revisited: If error returns, the issue might have been the control board or power supply, not the fuser. In that case, a professional diagnostic is needed.
Long Term Monitoring
- Fuser lifecycle: With new gear/bushing, the fuser should last another 50,000–100,000 pages. If the roller itself is worn (flat spots), you’ll see ghosting return earlier.
- Preventive care: Clear any paper jams gently (use manual turn gear to release). Use high-quality paper to reduce dust. Periodically clean the pressure roller with a lint-free cloth.
If your repair passes these checks, you’ve successfully fixed the fuser assembly for under $2. Congratulations!
Parts You’ll Need
Here are the parts that match this repair. Click the link to check the current price on AliExpress.
| Product | Price |
|---|---|
| Upper Fuser Roller Gear with Bushing … | $1.07 |
| JC66-03080A JC61-03755A Upper Fuser R… | $1.19 |
Prices and availability are subject to change on AliExpress.