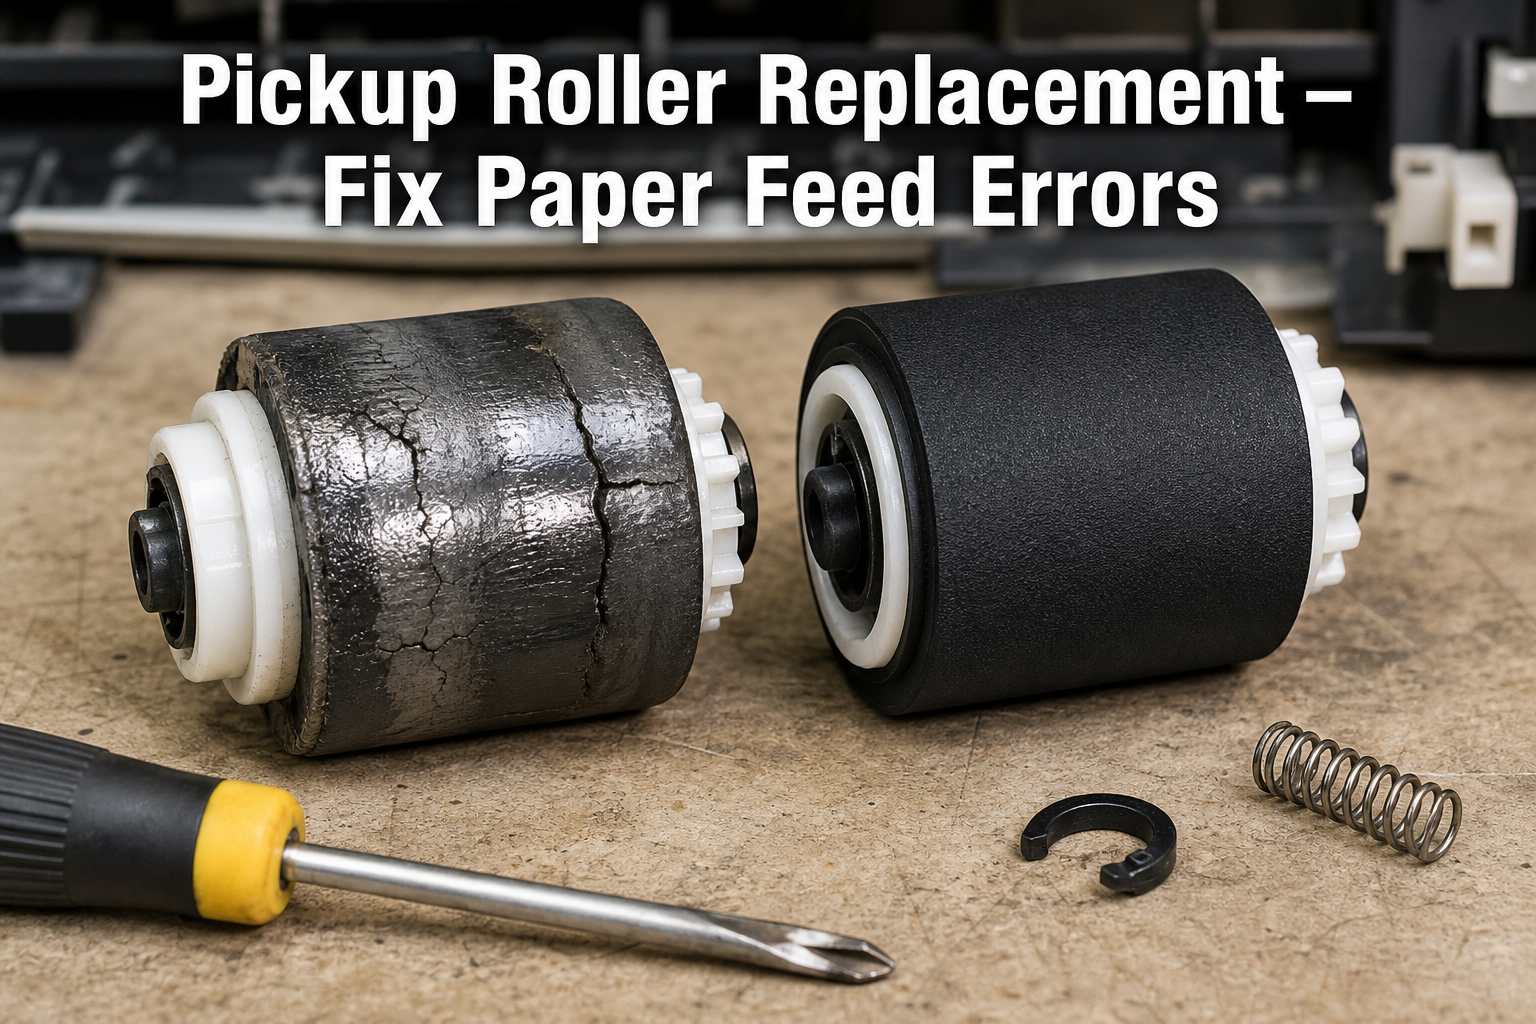
Your printer is making a grinding or clicking noise, displaying error messages like ‘Paper Jam’ or ‘Tray Empty’, but paper is loaded. This is a classic sign of worn or dirty pickup rollers. This guide will help you diagnose the issue precisely and replace the rollers yourself, saving a costly repair bill.
What’s Happening — Symptoms in Detail
What You Are Experiencing
Your printer has suddenly stopped picking up paper from the input tray. Common symptoms include:
- Grinding or slipping noise: A high-pitched squeal or a repetitive thumping sound when the printer tries to feed paper.
- Error messages: On the screen you may see ‘Paper Jam’, ‘Tray Empty’, or ‘Load Paper’ even though the tray is full. Some models display codes like HP Error 13.0 or Brother Error 46.
- Paper skew or multiple sheets: The paper enters at an angle, or multiple sheets are pulled in at once (this can also point to a separation pad issue).
- No paper movement: You hear the printer motor run, but the paper remains stationary.
When Does It Happen?
- On first print of the day (after the printer has been idle for hours).
- After loading new paper (different paper types, especially glossy or thin paper).
- During high-volume jobs (the roller heats up and loses grip).
Progression
- Slow onset: At first, you might only see the issue on the second print. Over weeks, it happens more often until the printer fails every time.
- Sudden failure: A piece of torn paper or a sticky label can coat the roller instantly, causing complete failure.
Important: A dirty roller can sometimes be fixed with a cleaning, but if the rubber is hardened or glazed, replacement is the only solution.
How to Diagnose the Problem Step by Step
Step-by-Step Diagnosis (No Tools Needed)
Open the printer cover and locate the pickup roller assembly – usually behind the front door above the paper tray. In HP LaserJet P1102, it’s a green or grey rubber wheel on a shaft.
Manually rotate the roller with your finger. Normal: it turns smoothly with slight resistance. Abnormal: it’s stiff, jammed, or spins freely (shaft broken).
Inspect the rubber surface. Normal: matte, slightly tacky, no cracks. Abnormal: shiny (glazed), hard as plastic, or cracked. If you press a fingernail into it, it should leave a mark – if not, the rubber is dead.
Perform the paper grab test: With the printer on, load a single sheet of paper and initiate a print. As the roller starts turning, listen for a slipping noise. If the paper barely moves or doesn’t move at all, the roller lacks friction.
Check the separation pad (the small rubber pad opposite the roller). If it’s shiny or worn, replace it together with the roller (common kit).
Advanced Diagnosis (requires tools)
Remove the roller assembly (usually a 3mm hex screw or a clip). Examine the one-way clutch bearing inside the roller – it should only turn in one direction. If it’s seized, the roller won’t feed.
Measure the roller diameter with a caliper. A new roller is typically 18-20mm. If below 16mm, it’s worn beyond specs.
Why This Happens — Root Cause
Why Pickup Rollers Fail
The rubber material (typically EPDM or Silicone) degrades over time. Three main factors:
- Oxidation: Exposure to air and ozone causes the rubber to harden and lose its tackiness. This is irreversible.
- Glazing: Paper dust, toner residue, and oils from hands create a glossy, hard layer that reduces friction. Cleaning can help but only temporarily.
- Wear: The repeated contact with paper wears the surface down, reducing the diameter and altering the contact pressure.
What Accelerates Failure
- High humidity (rubber becomes sticky but then degrades faster)
- Low quality or recycled paper (higher dust content coats the roller)
- Constant standby rollers left pressed against the platen for long periods can develop flat spots.
Specific Models & Known Issues
- HP LaserJet P1102 / M201: Roller part RL1-0540 (also listed as $1.09 option) fails often after 20,000 pages.
- Brother HL-L2350DW: Roller part M934-RO – known for premature hardening.
- Canon imageCLASS: The separator pad wears faster than the roller – check both.
Internal Part Numbers Referenced: HP uses RM1-4693 for the pickup roller assembly; Brother uses Part #B934. The available part #2 (RL1-0540) and #3 (generic with separator) are direct replacements.
Can You Fix It Yourself?
Honest Assessment: Can You Fix It?
- Difficulty: 2 out of 5 – simple mechanical removal and snap-on installation. No soldering or wiring.
- Time Required: 15 to 30 minutes for a first-timer. Experienced users can do it in under 10.
- Skill Level: Basic – need ability to use a screwdriver (Philips #1 or #2) and maybe a small flathead for clips.
- Tools Required:
- Small Phillips-head screwdriver (size #1 for most)
- Maybe a tweezers or pick for small C-clips
- Cotton swab and isopropyl alcohol for cleaning the separation pad (optional)
- Risks & What Could Go Wrong:
- Breaking a plastic clip – if you force it, the housing cracks.
- Losing the one-way clutch spring – keep it oriented correctly.
- Installing the roller upside down (some are directional).
- Forgetting to reset the page count – not urgent, but some printers use page count to remind you.
Bottom line: If you can follow a YouTube video and have a steady hand, you can do this.
Cost Breakdown — DIY vs Professional
DIY vs Professional – Real Cost Comparison
DIY Options:
- Part #1: Pickup Roller Separator Pad HP P1102 – $0.96 (just the pad, if roller is okay).
- Part #2: New RL1-0540 Paper Pickup Roller Tray – $1.09 (the roller only, needs separator pad purchase).
- Part #3: 1Pcs Printer Paper Pickup Roller With Separator Pad – $1.47 (best value, includes both components). Total DIY cost: $1.47 including the most essential parts.
Professional Repair:
- Shop labor rate: $50–$100 per hour (most shops charge a flat $45–$75 for this job).
- Parts mark-up: They’d charge $5–$15 for the same $1.47 roller kit.
- Total typical invoice: $60–$90.
When to Skip DIY:
- If your printer has additional issues (e.g., main gear split, main board failure) – not worth fixing.
- If you are not comfortable removing screws and clips – but this is the easiest printer repair.
- If the printer cost less than $100 – buying new might be cheaper than shop fees. But at $1.47 DIY, it’s worth trying.
Repair Process Overview
Replacement Step-by-Step (General for HP/Brother/Canon)
- Turn off and unplug the printer. Remove the paper tray.
- Open the access door (usually the front cover) to reveal the roller assembly area.
- Remove the old roller:
- Look for a retaining clip (small C-clip or a slide-lock).
- Carefully slide the roller off its metal shaft. Some models require unscrewing two Phillips screws (HP P1102).
- Inspect the shaft – if it’s bent, replace the whole assembly.
- Clean the shaft with a dry cloth (remove old grease).
- Install the new roller:
- Note orientation – the roller usually has a flat side that aligns with the shaft’s flat spot.
- Slide it on and secure with the clip or screws.
- Replace the separation pad (if included in kit #3):
- The pad is often a small rubber square clipped onto the metal arm above the tray. Unclip and snap new one.
- Close all covers, insert tray, and plug in.
- Print a test page. If errors persist, you may need to reset the page count (hold the job cancel button 10 seconds on some HP models).
Common Mistakes:
- Reusing the old separation pad – always replace both for reliable feeding.
- Installing the roller with the spring loaded incorrectly – the one-way clutch must engage.
- Forgetting to remove packing tape (some generic rollers have protective film – peel it off).
After the Repair — Testing & Verification
How to Verify the Repair Worked
- Immediate test: Print a single page from the computer. The paper should feed smoothly without noise.
- Grip test: After the test, manually rotate the exposed roller – it should still feel slightly tacky.
- Multiple pages: Print a 10-page document. Watch for any misfeeds or double feeds.
What to Watch for in the First Few Hours
- First 5 prints: If you hear a new noise (grinding), the roller might be binding. Open and re-check the alignment.
- First 20 prints: If paper starts skewing again, the separation pad might still be worn – confirm you replaced it.
- Within a week: Check the roller surface for any signs of slipping. If the problem returns, the issue might be the feed clutch or the paper tray’s pick-up mechanism (friction pad).
Pro tip: If you used part #2 (roller only), the separator pad remains old. If you get double-feeds after a few days, order part #1 or #3 and replace that pad too.
Parts You’ll Need
Here are the parts that match this repair. Click the link to check the current price on AliExpress.
| Product | Price |
|---|---|
| Pickup Roller Separator Pad HP P1102 … | $0.96 |
| New RL1-0540 Paper Pickup Roller Tray… | $1.09 |
| 1Pcs Printer Paper Pickup Roller With… | $1.47 |
Prices and availability are subject to change on AliExpress.