Is your laser printer leaving black streaks on every page, jamming constantly, or making grinding noises? This guide explains exactly why a worn-out maintenance kit causes these problems, how to diagnose it in minutes, and whether you can fix it yourself for under $50.
What’s Happening — Symptoms in Detail
Your printer was working fine yesterday, but today every print comes out ruined. You might see vertical black streaks running down the page, or ghost images of previous prints appearing faintly in the background. Some users report that the paper jams at the same spot every time, often with a crumpled corner or a ripped trailing edge. Others hear a grinding or squeaking noise when the printer warms up, followed by an error code like 13.xx (paper jam) or 50.x (fuser error) on an HP LaserJet, or Jam Inside on a Brother printer.
The problem often starts gradually. First, prints become slightly lighter in the middle. Then small dots appear. Eventually, toner smudges when you rub your finger across the page. In some cases, the printer stops mid-print with a motor stall sound. The printer may display Replace Maintenance Kit or Service Required after reaching its page count. This is not a random failure — it’s a predictable wear pattern that affects every laser printer after 100,000 to 200,000 pages, depending on the model.
When does it happen?
- On the first print after idle (cold start)
- When printing dense graphics or dark pages
- On heavier paper (cardstock, envelopes)
- After a firmware update (only if the update reset page counters)
How does it progress?
- Week 1: Slight gray background on white areas
- Week 2: Vertical streaks appear in the same spot
- Week 3: Paper jams 1 in 10 pages
- Week 4: Printer refuses to print, with a jam or error code every time
How to Diagnose the Problem Step by Step
Check the page count: On your printer’s LCD, navigate to Setup > Reports > Configuration Report. Look for Total Pages or Page Count. For most HP LaserJet models, the maintenance kit is due at 150,000 pages. For Brother, it’s 100,000 pages.
Visual inspection of the fuser assembly: Open the rear door and look at the fuser rollers (the large rubber and Teflon-coated rollers near the exit). Normal: the surface is smooth and slightly glossy. Abnormal: there are scratches, dents, or melted toner stuck to the surface.
Pickup roller test: Push a sheet of paper partway into the tray and press the Go button or send a print job. Watch the roller that grabs the paper. Normal: it rotates without skipping and the paper feeds smoothly. Abnormal: the roller chatters or the paper stays still, or you see a flat spot on the roller surface.
Separation pad check: Remove the paper tray and look at the small rubber pad at the front of the tray. Normal: it has a slight texture. Abnormal: it is glazed, shiny, or cracked. Press your fingernail into it — it should feel rubbery, not hard.
Transfer roller inspection: Open the front door and remove the toner cartridge. Look at the spongy roller inside the printer (the transfer roller). Normal: it is dark gray and uniform. Abnormal: it has white patches, toner buildup, or uneven color.
Why This Happens — Root Cause
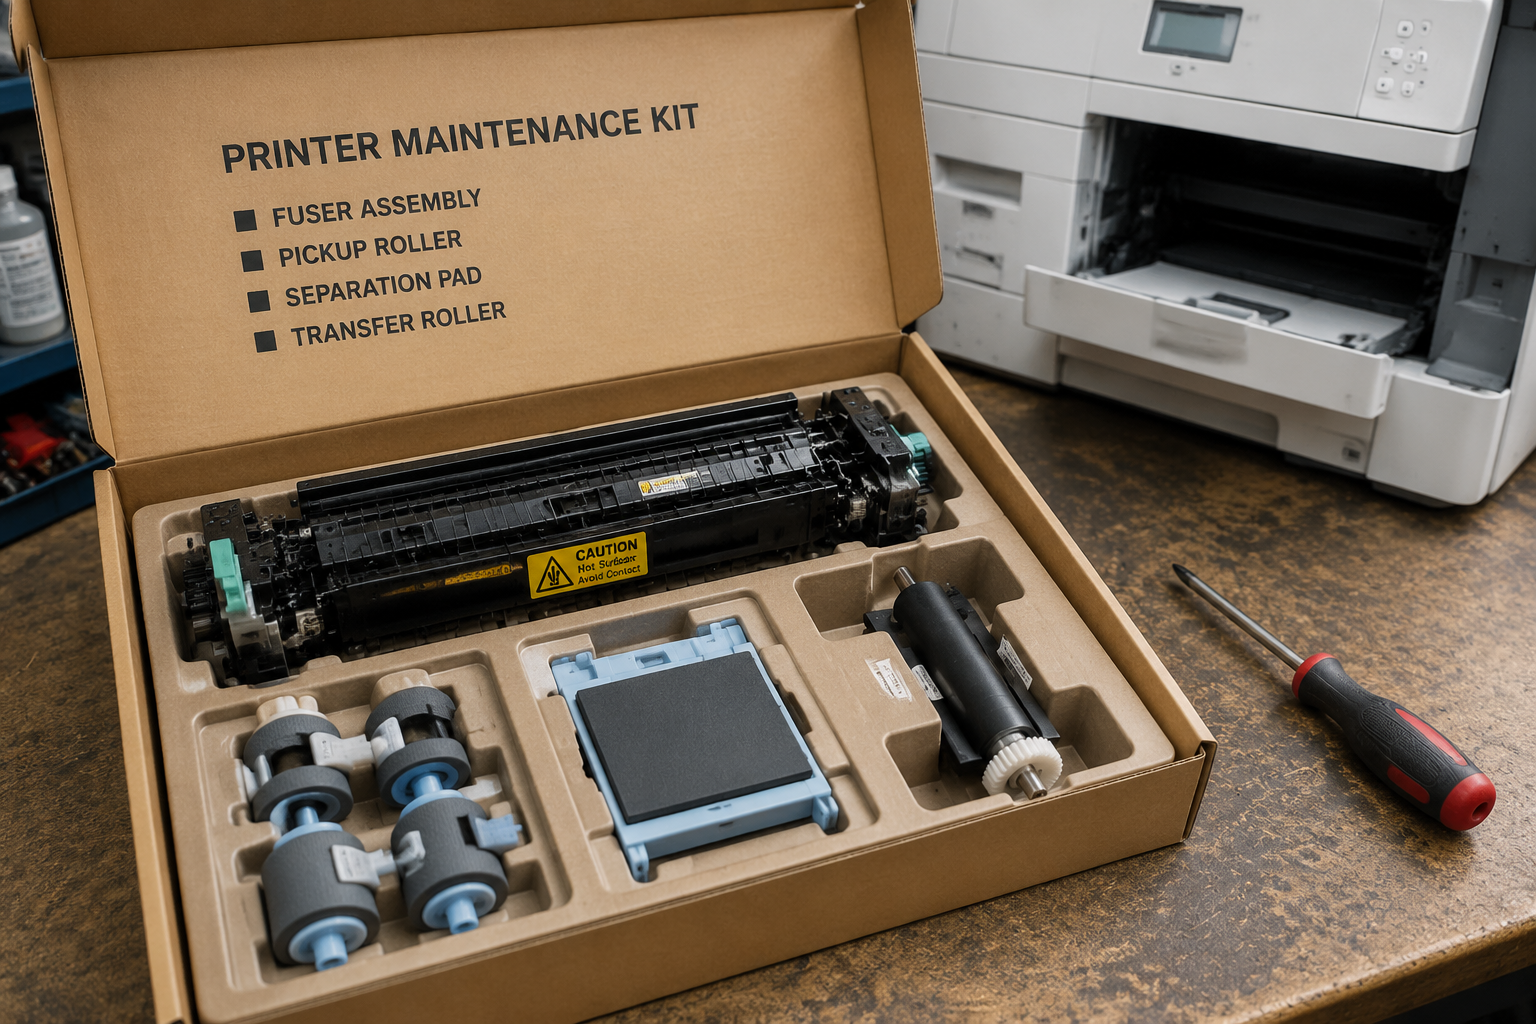
A printer maintenance kit is a bundle of consumable parts that wear out over time. The key components are:
- Fuser assembly (two rollers and a heating lamp): heats toner to fuse it onto paper. The Teflon coating wears off after 100,000+ pages, causing toner to stick instead of fuse.
- Pickup rollers: rubber wheels that grab paper from the tray. The rubber hardens and loses grip after 50,000–100,000 pages.
- Separation pad: a rubber pad that prevents multiple sheets from feeding. It glazes over from toner dust and pressure.
- Transfer roller: a conductive foam roller that attracts toner from the drum onto the paper. It becomes covered in debris and loses its charge.
Why does this happen?
- Heat: The fuser runs at 180–200°C. Over time, the Teflon degrades, and toner bakes onto the roller.
- Dust: Paper dust and loose toner accumulate on rollers, reducing friction and conductivity.
- Cyclic stress: Each print cycle compresses the rubber, causing micro-cracks and flat spots.
- Moisture: High humidity accelerates pad glazing; low humidity makes rubber brittle.
Specific models with known issues:
- HP LaserJet M402/M403: Fuser failure at 150k pages – error 50.3
- Brother HL-L2350DW: Pickup roller flat spots after 50k pages
- Canon imageCLASS LBP226dw: Separation pad wears after 80k pages – causes multi-feed jams
- Samsung Xpress M2020: Transfer roller contamination – gray background on prints
Can You Fix It Yourself?
- Difficulty: 3 out of 5 (requires careful disassembly, but no soldering)
- Time required: 20–40 minutes for a basic kit (rollers only), 45–90 minutes for a full fuser replacement
- Skill level: You need to handle a Phillips #2 screwdriver, possibly a T10 Torx driver, and be able to follow a video guide. No soldering.
- Risks:
- Damaging plastic clips if you force covers open
- Touching the fuser hot surfaces (let it cool for 20 minutes after use)
- Mixing up screws – take photos during disassembly
- Static electricity – ground yourself before touching circuit boards
- Tools required:
- Phillips #2 screwdriver
- T10 Torx driver (for some HP models)
- Flathead screwdriver (for prying clips)
- Tweezers for small springs
- Isopropyl alcohol (90%) and lint-free cloth for cleaning guides
Cost Breakdown — DIY vs Professional
- DIY cost: A maintenance kit for your model typically costs $20–$50 (e.g., HP CE505A maintenance kit, Brother BU-100CL). You can also use:
- Part #1: DIY Refill Tool ($4.54) – to refill toner cartridges if needed
- Part #2: Printhead Maintenance Cleaning Liquid ($2.56) – to clean transfer roller if not replacing
- Part #3: Universal DIY CISS Ink Cartridge Clamp ($4.17) – for inkjet printers, not needed here
- Professional repair: A shop will charge $80–$200 for labor plus the kit cost ($30–$80). Total $110–$280.
- When to skip DIY:
- If your printer is out of warranty and the kit cost is more than half the printer’s new price
- If you have no experience with electronics or mechanical repair
- If your printer is over 5 years old and parts are no longer available
- Hidden costs: You may need a service manual (free PDF online) or a video guide. Shipping for parts can add $5–$10.
Repair Process Overview
- Remove the toner cartridge and place it on a clean surface. Power off the printer and unplug it.
- Remove side covers (usually two screws each) and the rear output tray (pop off clips).
- Disconnect the fuser cables (two connectors), then remove the fuser bracket screws (2-4 screws).
- Pull the fuser assembly out straight toward you. Follow the same steps in reverse for installation.
- Replace pickup rollers: Open the paper tray, remove the roller rod (slide to one side), and slide out the old roller. Install the new one, making sure the keyed notch aligns.
- Replace separation pad: Remove the pad holder from the tray (pop out with a flathead), unclip the pad, clip the new one in.
- Replace transfer roller: Remove the metal clips holding it, pull out the old roller, push the new one in until it clicks.
- Reset the maintenance counter: On the printer’s menu, go to System Setup > Maintenance > Reset Maintenance Kit (varies by model).
- Reassemble: Attach covers, tighten screws, reinsert toner cartridge, plug in and turn on.
Common mistakes:
- Forgetting to reset the counter – the printer will still display ‘Replace Kit’
- Overtightening screws – strip the plastic threads
- Not aligning the fuser gear with the drive gear – causes grinding and error code
- Using the wrong kit (e.g., HP Kit 120 vs Kit 124) – check your printer’s model number
After the Repair — Testing & Verification
- Print a configuration page: From the printer’s panel, select Reports > Configuration. The first page should be clean, with no streaks or smudges.
- Print a test pattern: Use your computer’s printer utility (e.g., Windows Printer Properties > Print Test Page). Look for uniform density across the page.
- Check for jams: Feed 10 sheets of plain paper, one at a time. Watch the paper path. Normal: each sheet feeds smoothly without skewing.
- Listen for unusual sounds: The printer should be quiet during warm-up. Any clicking, grinding, or chirping indicates a gear or roller problem.
- Inspect output after 50 pages: The new rollers need a break-in period. If streaks reappear, the transfer roller may be contaminated – clean it with Part #2 Printhead Maintenance Cleaning Liquid on a lint-free cloth.
- Monitor the page counter: Write down the current page count. The printer should now display OK or no warning. Reset the counter a second time if the message persists.
Parts You’ll Need
Here are the parts that match this repair. Click the link to check the current price on AliExpress.
| Product | Price |
|---|---|
| DIY Refill Tool Epson/hp/Canon/lexmar… | $4.54 |
| Printhead Maintenance Cleaning Liquid… | $2.56 |
| Universal DIY CISS Ink Cartridge Clam… | $4.17 |
Prices and availability are subject to change on AliExpress.